
If you’re on a keto diet, you might think desserts are off-limits. But that’s not the case. With the right ingredients, you can enjoy sweet treats without worrying about kicking yourself out of ketosis. From rich chocolate mousse to almond flour cookies, there are plenty of options that satisfy your cravings. Ready to discover some delicious low-carb recipes that keep your health goals intact? Let’s explore these tempting ideas.
Keto Chocolate Mousse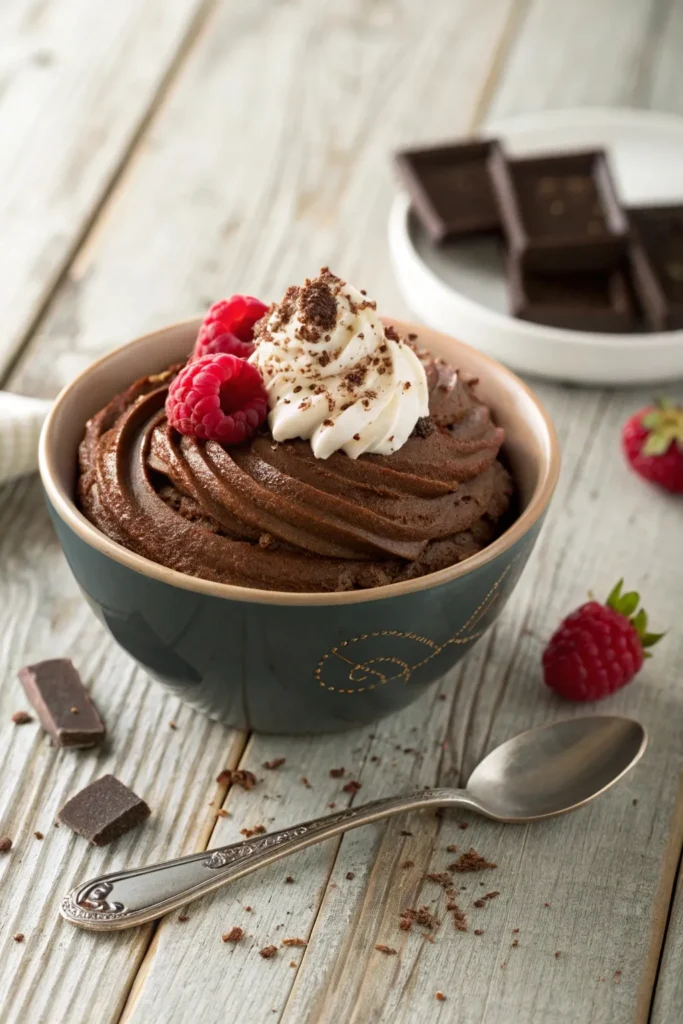
Keto Chocolate Mousse is a deliciously decadent dessert that fits perfectly into a low-carb lifestyle. This rich, creamy treat isn’t only easy to make but also satisfies your chocolate cravings without the guilt of traditional desserts.
With the use of sugar-free sweeteners and high-quality cocoa, this mousse offers a delightful combination of flavors and textures that will impress anyone who tries it.
The best part about this Keto Chocolate Mousse is that it requires minimal ingredients and can be whipped up in just a short amount of time. It’s perfect for a special occasion or a simple weeknight treat.
Whether you enjoy it on its own or topped with some whipped cream and berries, this mousse is sure to become a favorite in your household.
Ingredients:
- 1 cup heavy cream
- 2 tablespoons unsweetened cocoa powder
- 1/4 cup powdered erythritol (or your preferred keto-friendly sweetener)
- 1 teaspoon vanilla extract
- A pinch of salt
- Optional: sugar-free chocolate shavings or berries for garnish
Instructions:
In a mixing bowl, whip the heavy cream until soft peaks form. Gradually add in the unsweetened cocoa powder, powdered erythritol, vanilla extract, and a pinch of salt, continuing to whip until the mixture is smooth and fluffy.
Be careful not to overwhip, as you want to maintain a light and airy texture. Once combined, spoon the mousse into serving dishes and refrigerate for at least 30 minutes to set before serving.
Extra Tips:
For an extra boost of flavor, consider adding a splash of espresso or a hint of peppermint extract to the mousse mixture.
If you prefer a richer chocolate taste, use dark cocoa powder instead of regular cocoa. Always check the labels of your sweeteners to verify they’re truly keto-friendly, and feel free to adjust the sweetness level according to your personal taste.
Enjoy your delicious and guilt-free Keto Chocolate Mousse!
Almond Flour Cookies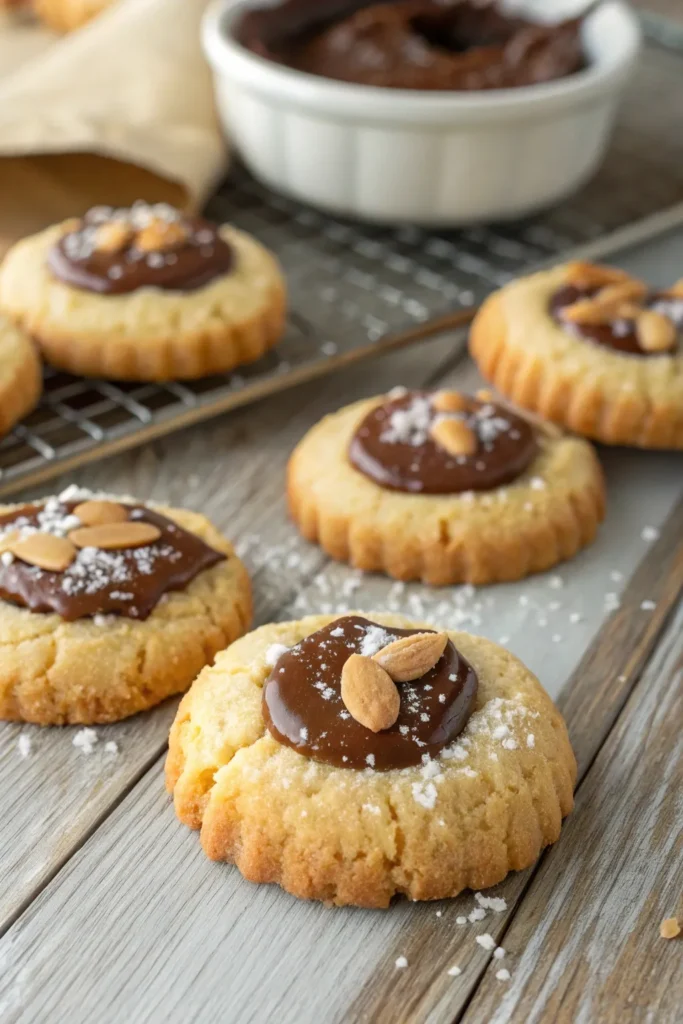
Almond flour cookies are a delicious and healthy alternative for those looking to enjoy a sweet treat without the high carb content of traditional cookies. Made primarily with almond flour, these cookies aren’t only gluten-free but also packed with healthy fats and protein.
They’ve a delightful nutty flavor and a chewy texture that makes them irresistible, whether enjoyed as a snack or dessert. This low-carb dessert is incredibly versatile, allowing you to customize it with your favorite add-ins like sugar-free chocolate chips, nuts, or even dried fruit.
Perfect for those on a ketogenic or low-carb diet, almond flour cookies can satisfy your sweet tooth without derailing your dietary goals. Let’s explore this simple recipe that will have your taste buds dancing!
Ingredients
- 2 cups almond flour
- 1/2 cup erythritol or your preferred sweetener
- 1/4 teaspoon baking soda
- 1/4 teaspoon salt
- 1/4 cup coconut oil, melted (or unsalted butter)
- 1 large egg
- 1 teaspoon vanilla extract
- Optional: 1/2 cup sugar-free chocolate chips or nuts
Instructions
In a mixing bowl, combine the almond flour, erythritol, baking soda, and salt.
In another bowl, whisk together the melted coconut oil, egg, and vanilla extract until well blended. Gradually add the wet ingredients to the dry ingredients and mix until a dough forms. If desired, fold in chocolate chips or nuts.
Preheat your oven to 350°F (175°C) and line a baking sheet with parchment paper. Scoop tablespoon-sized portions of dough and place them on the prepared baking sheet, leaving space between each cookie.
Bake for 10-12 minutes or until the edges are lightly golden. Allow to cool on the baking sheet for a few minutes before transferring to a wire rack to cool completely.
Extra Tips
To guarantee your almond flour cookies turn out perfectly, make sure to measure your almond flour correctly; it’s best to spoon it into your measuring cup and level it off rather than scooping directly from the bag.
You can also experiment with adding different flavorings such as almond extract or a pinch of cinnamon for a unique twist. Store any leftovers in an airtight container at room temperature for up to a week, or freeze them for longer storage—just be sure to separate them with parchment paper to prevent sticking.
Coconut Cream Pie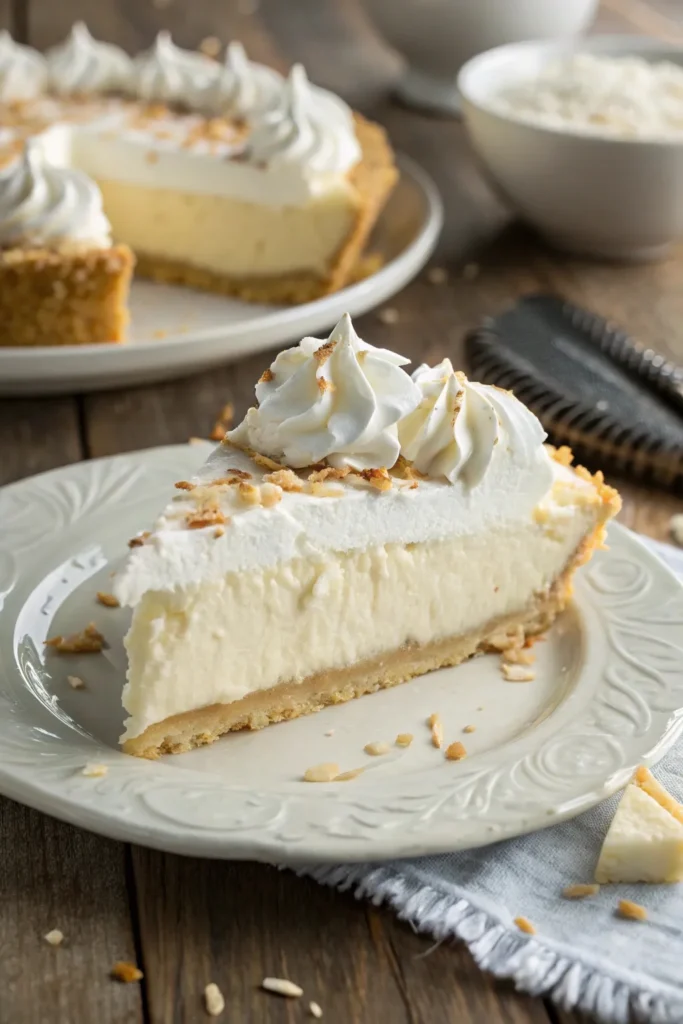
Coconut Cream Pie is a delightful low-carb dessert that satisfies sweet cravings without the sugar overload. This recipe uses coconut flour and a creamy filling made from coconut milk, ensuring it remains low in carbohydrates while still delivering rich flavors and textures. Perfect for those following a low-carb lifestyle, this pie is a great way to indulge without the guilt.
The crust is made from a mix of coconut flour and butter, providing a crisp base that pairs beautifully with the smooth coconut filling. Topped with whipped cream and toasted coconut flakes, this dessert is both visually appealing and delicious. Whether you’re hosting a gathering or just enjoying a quiet evening at home, this Coconut Cream Pie is sure to impress.
Ingredients:
- 1 cup coconut flour
- 1/2 cup unsalted butter, melted
- 1/4 cup erythritol or preferred low-carb sweetener
- 1/4 tsp salt
- 1 can (13.5 oz) coconut milk
- 3 large eggs
- 1 tsp vanilla extract
- 1/2 cup unsweetened shredded coconut
- Whipped cream (optional, for topping)
- Toasted coconut flakes (optional, for garnish)
Instructions:
Preheat the oven to 350°F (175°C). In a mixing bowl, combine the coconut flour, melted butter, erythritol, and salt to form the crust. Press the mixture firmly into a pie pan and bake for 10-12 minutes until golden brown.
Meanwhile, in another bowl, whisk together the coconut milk, eggs, vanilla extract, and shredded coconut. Pour the filling into the baked crust and return to the oven for an additional 25-30 minutes or until the filling is set. Allow the pie to cool before refrigerating for at least 2 hours before serving.
Extra Tips:
For a richer flavor, consider adding a pinch of cinnamon or nutmeg to the filling. If you’re looking for a dairy-free option, substitute the whipped cream topping with coconut whipped cream. Always make sure to store the pie in the refrigerator to maintain freshness, and it can be enjoyed for up to a week!
Berry Chia Pudding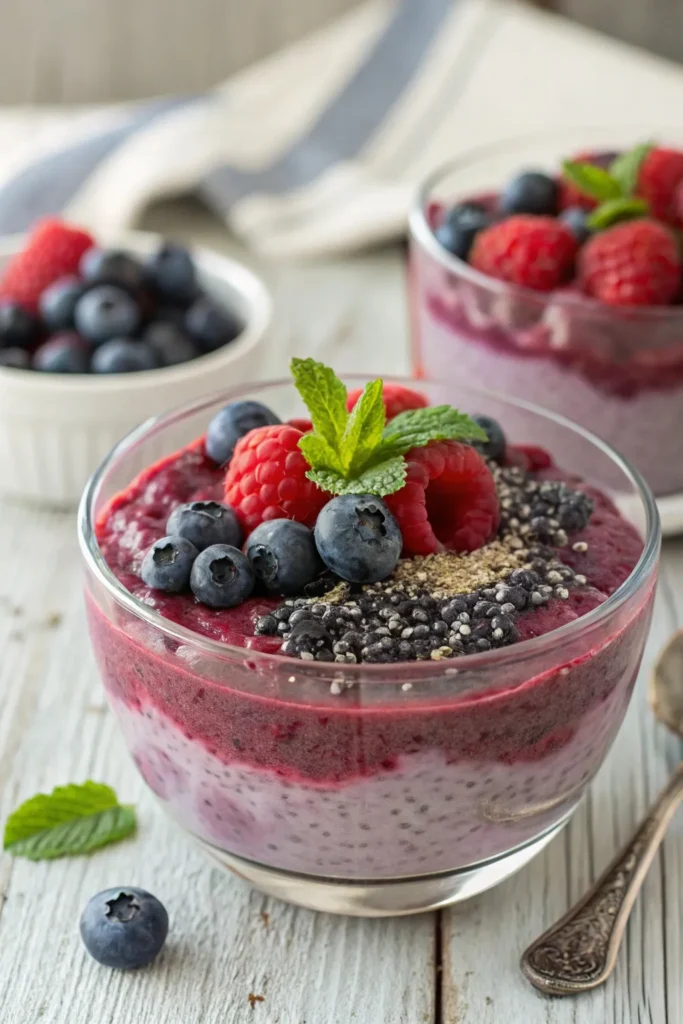
Berry Chia Pudding is a delightful and nutritious low-carb dessert that’s perfect for any time of the day. This creamy and satisfying pudding is made with chia seeds, which are packed with fiber, protein, and omega-3 fatty acids. By combining these seeds with your favorite berries and a non-sugar sweetener, you can create a guilt-free treat that satisfies your sweet tooth without derailing your low-carb lifestyle.
This pudding isn’t only easy to prepare but also incredibly versatile. You can customize it with different types of berries or even add a splash of vanilla extract for extra flavor. The best part is that it requires minimal cooking time; simply mix your ingredients together and let them sit to thicken. Serve it chilled for a revitalizing dessert that’s both delicious and healthy.
Ingredients:
- 1 cup unsweetened almond milk (or any low-carb milk alternative)
- 1/4 cup chia seeds
- 1-2 tablespoons low-carb sweetener (like stevia or erythritol)
- 1 cup mixed berries (such as strawberries, blueberries, and raspberries)
- 1 teaspoon vanilla extract (optional)
Instructions:
In a medium bowl, combine the almond milk, chia seeds, sweetener, and vanilla extract if using. Whisk well to guarantee the chia seeds are evenly distributed.
Allow the mixture to sit for about 5 minutes, then whisk again to break up any clumps. Cover the bowl and place it in the refrigerator for at least 2 hours or overnight, until the pudding has thickened.
When ready to serve, layer the pudding in bowls or jars with the mixed berries on top.
Extra Tips:
For an added twist, you can blend a portion of the berries with the chia mixture before refrigerating for a smoother texture, or use half the berries blended and half whole for a nice visual contrast.
Additionally, feel free to experiment with different flavorings, such as almond or coconut extract, to personalize your pudding. This recipe can also be doubled or tripled to serve a crowd or meal prep for the week ahead!
Peanut Butter Fat Bombs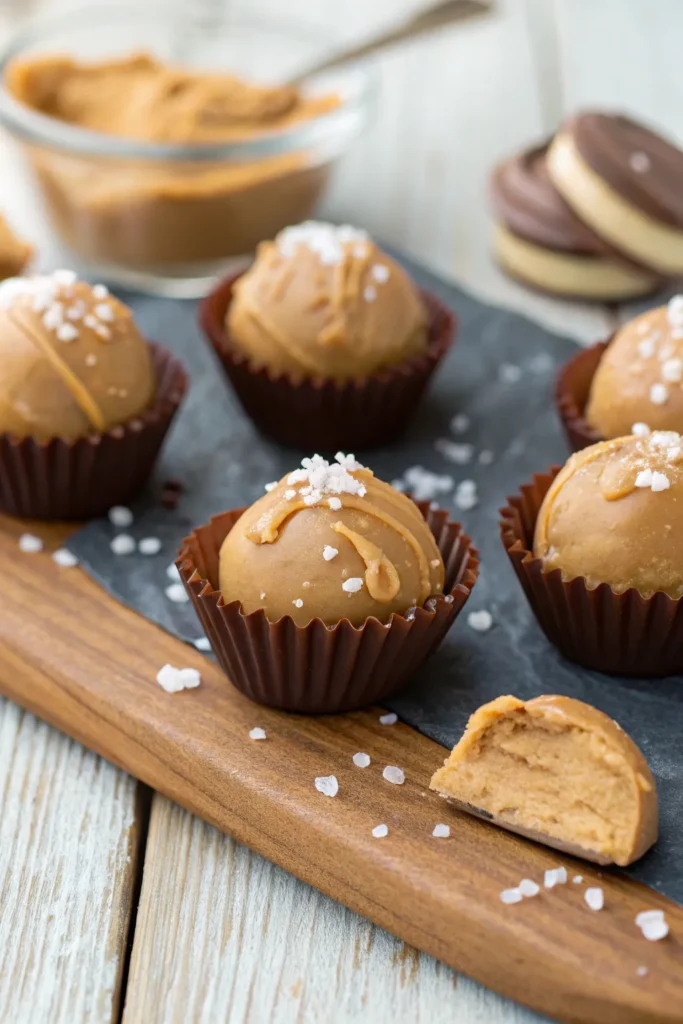
Peanut Butter Fat Bombs are a delicious and satisfying low-carb treat that can help you curb cravings while enjoying a rich, creamy flavor.
These little bites of goodness are perfect for anyone following a ketogenic diet or looking to reduce their carbohydrate intake. Packed with healthy fats from peanut butter and coconut oil, they provide a quick energy boost and can be easily customized to suit your taste.
Making Peanut Butter Fat Bombs is incredibly simple and requires minimal ingredients. Whether you’re looking for a quick snack between meals or a sweet treat to satisfy your dessert cravings, these fat bombs are sure to hit the spot.
Plus, they can be made in advance and stored in the freezer, making them a convenient option for busy days. Let’s explore the recipe!
Ingredients:
- 1 cup natural peanut butter (smooth or crunchy)
- 1/2 cup coconut oil (melted)
- 1/4 cup unsweetened cocoa powder (optional)
- 1/4 cup powdered erythritol (or preferred low-carb sweetener)
- 1 teaspoon vanilla extract
- Pinch of salt
Instructions:
In a mixing bowl, combine the natural peanut butter, melted coconut oil, cocoa powder (if using), powdered erythritol, vanilla extract, and a pinch of salt.
Stir until all ingredients are well blended and smooth. Pour the mixture into silicone molds or a lined muffin tin and freeze for about 30 minutes or until firm.
Once set, pop them out of the molds and store them in an airtight container in the freezer.
Extra Tips:
Feel free to experiment with different nut butters or add-ins like shredded coconut, chopped nuts, or a sprinkle of sea salt on top for an extra flavor boost.
If you prefer a sweeter taste, adjust the amount of sweetener to your liking. Additionally, you can create variations by adding a few drops of food-safe essential oils or extracts, such as peppermint or almond, for a unique twist.
Enjoy your Peanut Butter Fat Bombs as a guilt-free indulgence!
Low-Carb Cheesecake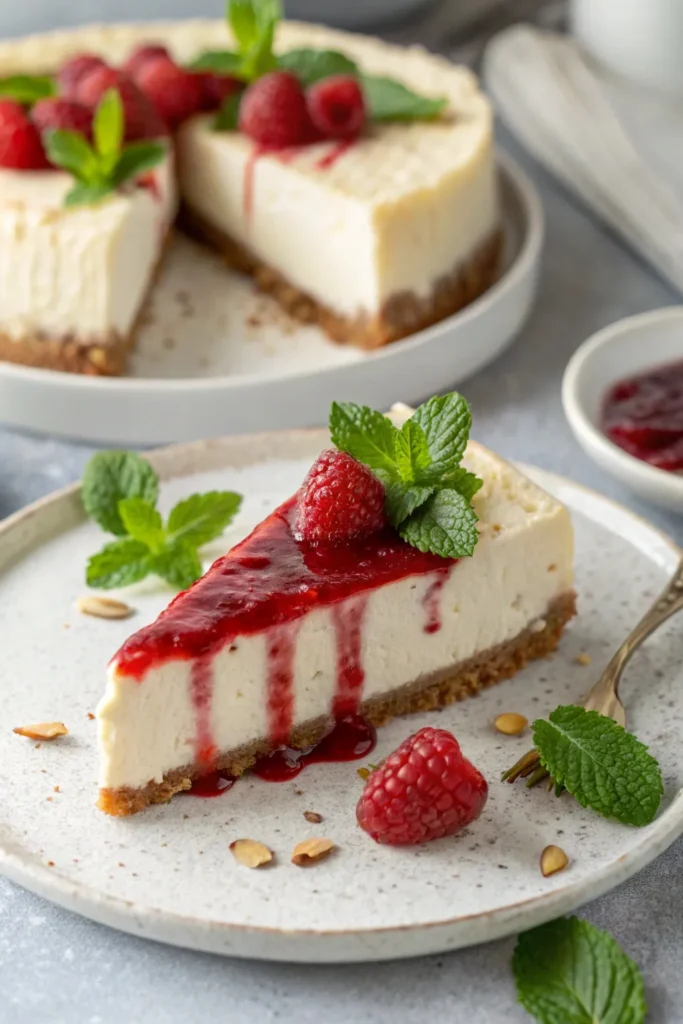
Low-carb cheesecake is a delightful dessert option for those looking to satisfy their sweet tooth without the extra carbs. This creamy, rich cheesecake is perfect for special occasions or a sweet treat after dinner. With a few simple substitutions, you can enjoy all the classic flavors of cheesecake while keeping your carbohydrate intake in check.
In this recipe, almond flour is used for the crust, providing a nutty flavor and a satisfying crunch, while the filling utilizes cream cheese and a low-carb sweetener to create that velvety smooth texture. This low-carb cheesecake isn’t only delicious but also easy to make, making it a fantastic addition to any dessert table.
Ingredients:
- 1 ½ cups almond flour
- ¼ cup unsalted butter, melted
- 2 tablespoons erythritol (or preferred low-carb sweetener)
- 1 teaspoon vanilla extract
- 16 oz cream cheese, softened
- ½ cup erythritol (or preferred low-carb sweetener)
- 2 large eggs
- 1 teaspoon vanilla extract
- 1 tablespoon lemon juice
- Pinch of salt
Instructions:
Preheat your oven to 325°F (160°C). In a medium bowl, mix the almond flour, melted butter, erythritol, and vanilla extract until well combined.
Press this mixture firmly into the bottom of a greased 9-inch springform pan to form the crust. In a separate bowl, beat the softened cream cheese until smooth, then gradually add the erythritol, eggs, vanilla extract, lemon juice, and salt, blending until the mixture is creamy and fully combined.
Pour the cream cheese mixture over the prepared crust and smooth out the top. Bake for 40-45 minutes, or until the edges are set and the center is slightly jiggly. Allow the cheesecake to cool, then refrigerate for at least 4 hours before serving.
Extra Tips:
For the best results, make sure your cream cheese is at room temperature for easy blending and a smooth filling. If you want to add a little flavor variation, consider incorporating a teaspoon of almond extract or mixing in some fresh berries for a fruity twist.
Be mindful of the baking time, as ovens can vary; keep an eye on the cheesecake to prevent overbaking. Enjoy your low-carb cheesecake plain or with a dollop of whipped cream for an extra treat!
Chocolate Avocado Pudding
Chocolate Avocado Pudding is a creamy and indulgent dessert that not only satisfies your sweet tooth but also keeps your carbohydrate intake in check. This rich pudding combines the healthy fats from avocados with the deep flavor of cocoa powder, creating a delicious treat that’s perfect for any occasion.
Whether you’re following a low-carb diet or simply looking for a healthier dessert option, this recipe is sure to impress your family and friends.
Making Chocolate Avocado Pudding isn’t only simple but also quick, requiring minimal ingredients. The avocados provide a silky texture, while the cocoa powder gives it a rich chocolate flavor. Sweetened with a low-carb sweetener of your choice, this dessert is both guilt-free and delightful.
You can enjoy it on its own or top it with some fresh berries or whipped cream for an extra special touch.
Ingredients:
- 2 ripe avocados
- 1/4 cup unsweetened cocoa powder
- 1/4 cup low-carb sweetener (e.g., erythritol, stevia)
- 1/4 cup almond milk (or any unsweetened milk alternative)
- 1 teaspoon vanilla extract
- A pinch of salt
To make the pudding, simply scoop out the flesh of the avocados and place it in a food processor. Add the cocoa powder, low-carb sweetener, almond milk, vanilla extract, and a pinch of salt.
Blend until the mixture is smooth and creamy, scraping down the sides as needed. Taste the pudding and adjust the sweetness or cocoa level as desired. Once everything is well combined, transfer the pudding to serving bowls and refrigerate for about 30 minutes to allow it to chill and thicken slightly.
For best results, use ripe avocados for a creamier texture and a richer flavor. If you want to enhance the taste, consider adding a tablespoon of nut butter or a sprinkle of cinnamon.
This pudding can be stored in an airtight container in the refrigerator for up to 3 days, making it a convenient option for meal prep or last-minute dessert cravings. Enjoy your delicious, low-carb treat!
Lemon Blueberry Muffins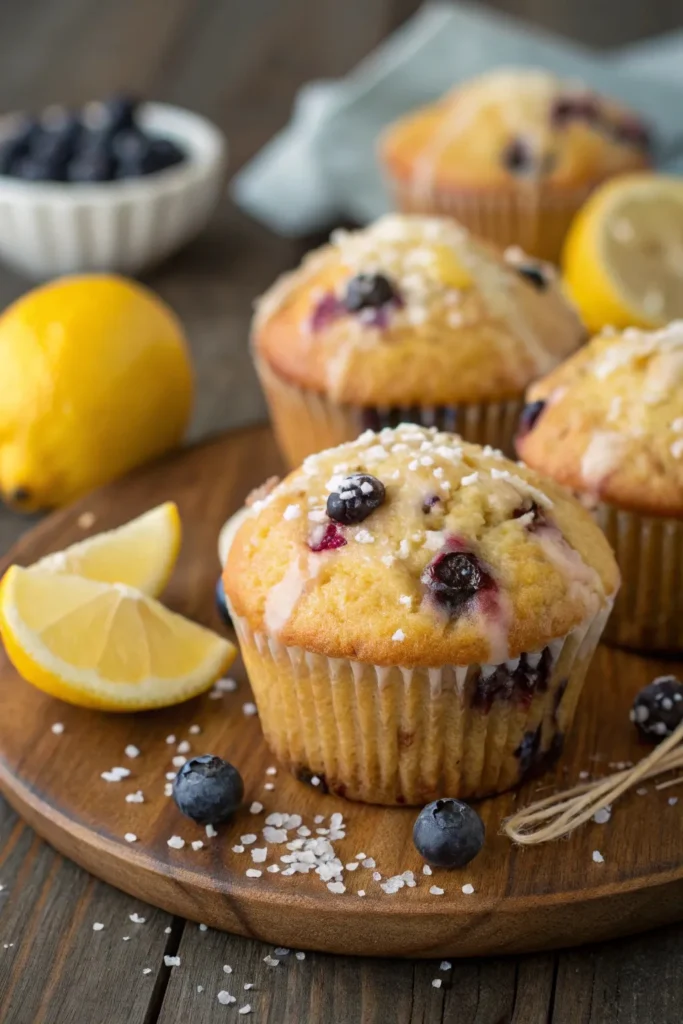
Low-Carb Lemon Blueberry Muffins are a delightful treat that satisfy your sweet tooth without compromising your dietary goals. These muffins aren’t only low in carbohydrates but are also packed with fresh flavors from the blueberries and a zesty kick from the lemons. Perfect for breakfast or as a snack, they’re easy to whip up and can be stored for a quick grab-and-go option throughout the week.
Made with almond flour and a sugar substitute, these muffins are gluten-free and suitable for various dietary preferences. The combination of lemon and blueberries makes them invigorating and enjoyable, while the added protein from eggs and Greek yogurt keeps you feeling full longer. Whether you’re following a keto diet or simply looking to reduce your carb intake, these muffins are sure to please your palate.
Ingredients:
- 2 cups almond flour
- 1/2 cup erythritol or preferred sugar substitute
- 1 teaspoon baking powder
- 1/2 teaspoon baking soda
- 1/4 teaspoon salt
- 3 large eggs
- 1/2 cup unsweetened Greek yogurt
- 1/4 cup melted coconut oil or butter
- Zest of 1 lemon
- 2 tablespoons lemon juice
- 1 cup fresh blueberries
Instructions:
Preheat your oven to 350°F (175°C) and line a muffin tin with paper liners or grease it lightly. In a large mixing bowl, combine the almond flour, erythritol, baking powder, baking soda, and salt.
In another bowl, whisk together the eggs, Greek yogurt, melted coconut oil, lemon zest, and lemon juice until smooth. Pour the wet ingredients into the dry ingredients and mix until just combined.
Gently fold in the blueberries, then divide the batter evenly among the muffin cups. Bake for 18-20 minutes, or until golden brown and a toothpick inserted in the center comes out clean. Allow to cool in the tin for a few minutes before transferring to a wire rack to cool completely.
Extra Tips:
To enhance the flavor of your Lemon Blueberry Muffins, consider adding a teaspoon of vanilla extract to the wet ingredients. If you prefer a sweeter muffin, feel free to adjust the amount of erythritol to your taste.
For added texture, you can mix in some chopped nuts or seeds. These muffins can be stored in an airtight container in the refrigerator for up to a week, or you can freeze them for longer storage. Enjoy them fresh or warmed up for a comforting treat!
Keto Brownies
Keto brownies are a delicious way to satisfy your sweet tooth while sticking to a low-carb lifestyle. These rich and fudgy treats are made with almond flour and sugar substitutes, making them a perfect dessert for those following a ketogenic diet. With their intense chocolate flavor and gooey texture, you’ll never miss the traditional brownies again!
Not only are these keto brownies low in carbohydrates, but they’re also incredibly simple to make. With just a handful of ingredients and minimal prep time, you can whip up a batch in no time. Whether you’re hosting a gathering or just want to indulge yourself, these brownies are sure to impress!
Ingredients:
- 1/2 cup unsweetened cocoa powder
- 1/2 cup almond flour
- 1/2 cup erythritol or another sugar substitute
- 1/4 cup melted coconut oil
- 2 large eggs
- 1 teaspoon vanilla extract
- 1/2 teaspoon baking powder
- 1/4 teaspoon salt
- Optional: sugar-free chocolate chips or nuts for topping
Instructions:
Preheat your oven to 350°F (175°C) and line an 8×8 inch baking pan with parchment paper.
In a mixing bowl, combine the cocoa powder, almond flour, erythritol, baking powder, and salt.
In a separate bowl, whisk together the melted coconut oil, eggs, and vanilla extract.
Combine the wet and dry ingredients, mixing until well incorporated.
Pour the batter into the prepared baking pan, smoothing the top, and sprinkle optional chocolate chips or nuts on top if desired.
Bake for 20-25 minutes, or until a toothpick inserted in the center comes out mostly clean.
Allow to cool before cutting into squares and serving.
Extra Tips:
For the best texture, make sure not to overmix the batter, as this can result in a denser brownie.
If you prefer a sweeter treat, feel free to adjust the amount of erythritol to suit your taste.
Additionally, these brownies can be stored in an airtight container in the refrigerator for up to a week, and they can also be frozen for longer storage.
Enjoy your guilt-free indulgence!
Creamy Coconut Popsicles
Creamy coconut popsicles are a delightful and invigorating dessert that are perfect for satisfying your sweet tooth without the guilt. Made with coconut milk and a touch of natural sweetener, these popsicles aren’t only low in carbohydrates but also rich in flavor. They’re an ideal treat for hot summer days, or anytime you crave something cool and creamy.
Plus, they’re incredibly easy to prepare, making them a great option for both beginners and seasoned cooks alike.
In addition to being low-carb, these popsicles can be customized with your favorite flavors and add-ins. You could add a splash of vanilla extract for extra depth, or toss in some shredded coconut for added texture. The versatility of this recipe allows you to experiment with various ingredients while keeping it healthy.
So, let’s get started on making these delicious creamy coconut popsicles!
Ingredients:
- 1 can (13.5 oz) full-fat coconut milk
- 1/4 cup low-carb sweetener (such as erythritol or stevia)
- 1 teaspoon vanilla extract
- 1/2 cup shredded unsweetened coconut (optional)
- Pinch of salt
Instructions:
In a mixing bowl, combine the full-fat coconut milk, low-carb sweetener, vanilla extract, and a pinch of salt. Whisk the mixture until the sweetener is fully dissolved and everything is well combined.
If desired, fold in the shredded coconut for added texture. Pour the mixture evenly into popsicle molds, insert sticks, and freeze for at least 4-6 hours or until completely solid.
Once frozen, gently run warm water over the outside of the molds to help release the popsicles.
Extra Tips:
For an extra burst of flavor, consider blending in some berries or lime juice to the coconut mixture before pouring it into the molds.
You can also layer different flavors by filling the molds halfway with one mixture, freezing for a bit, and then adding another flavor on top.
Be sure to store any leftover popsicles in an airtight container in the freezer to keep them fresh and prevent freezer burn. Enjoy your creamy coconut popsicles as a guilt-free dessert any time!
Sugar-Free Jello
Sugar-Free Jello is a delightful low-carb dessert that brings a burst of flavor to your palate without the added sugar. This guilt-free treat is perfect for those following a ketogenic or low-carb diet, as it allows you to satisfy your sweet tooth without compromising your health goals.
Whether you enjoy it as an invigorating snack or a fun addition to a dessert platter, Sugar-Free Jello is incredibly versatile and easy to make.
Making Sugar-Free Jello at home isn’t only simple but also provides an opportunity to customize flavors and colors to your liking. You can experiment with different sugar-free flavorings or add fresh fruits for a pop of color and texture.
This fun dessert can be enjoyed by everyone, making it a great choice for parties or family gatherings. Plus, it’s a fantastic way to stay on track with your dietary goals while enjoying something sweet.
Ingredients:
- 1 package of sugar-free gelatin (any flavor)
- 2 cups boiling water
- 2 cups cold water
- Optional: fresh berries for garnish
Instructions:
In a large mixing bowl, dissolve the sugar-free gelatin in 2 cups of boiling water, stirring continuously until completely dissolved.
Once the gelatin is fully dissolved, add 2 cups of cold water and mix well. Pour the mixture into individual serving cups or a large dish and refrigerate for at least 4 hours, or until fully set.
Extra Tips:
For an added twist, consider incorporating different flavors of sugar-free gelatin for a layered effect, or mix in some unsweetened whipped cream for a creamy version.
If you prefer a fruitier taste, adding a few slices of sugar-free fruits like strawberries or raspberries before refrigerating can enhance the texture and flavor.
Always check the labels of your ingredients to verify they align with your dietary needs!
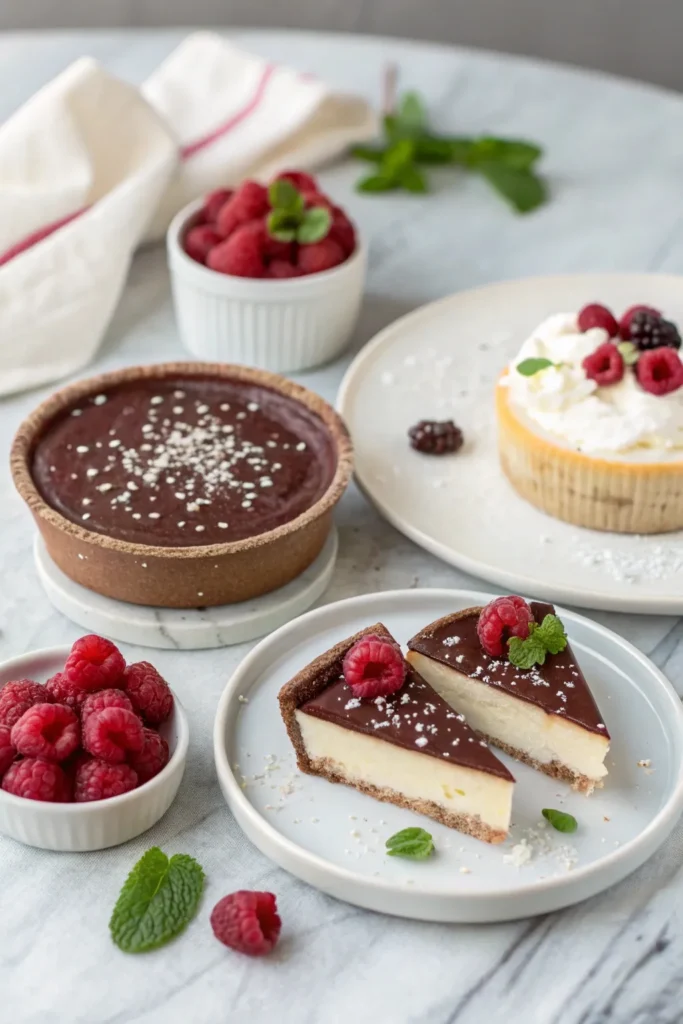
Raspberry Almond Tart
Indulging in a delicious dessert doesn’t have to mean sacrificing your low-carb lifestyle. This Raspberry Almond Tart combines the natural sweetness of fresh raspberries with a nutty almond crust, creating a delightful treat that satisfies your sweet tooth without the guilt.
Perfect for special occasions or simply as a sweet ending to your day, this tart isn’t only easy to make but also visually stunning, making it sure to impress your family and friends.
The tart is rich in healthy fats and fiber, making it a smart choice for those who are watching their carbohydrate intake. With the tartness of the raspberries balanced by the sweetness of a low-carb sweetener, this dessert is a marvelous way to enjoy a classic treat with a modern twist.
So roll up your sleeves and get ready to create a dessert that’s as pleasing to the palate as it’s to the eye.
Ingredients:
- 1 cup almond flour
- 1/4 cup unsalted butter, melted
- 2 tablespoons erythritol or your preferred low-carb sweetener
- 1/2 teaspoon vanilla extract
- 1/4 teaspoon salt
- 1 cup fresh raspberries
- 1 tablespoon lemon juice
- 1 tablespoon chia seeds (optional, for thicker filling)
Instructions:
Preheat your oven to 350°F (175°C). In a mixing bowl, combine the almond flour, melted butter, erythritol, vanilla extract, and salt to form a dough.
Press the dough firmly into the bottom and up the sides of a tart pan. Bake for 10-12 minutes, or until golden brown.
While the crust is baking, gently toss the fresh raspberries with lemon juice and chia seeds in a separate bowl.
Once the crust is ready, remove it from the oven and let it cool for a few minutes before filling it with the raspberry mixture.
Return the tart to the oven and bake for an additional 15-20 minutes, or until the raspberries are soft and bubbly. Allow the tart to cool before serving.
Extra Tips:
For a richer flavor, consider adding a pinch of almond extract to the crust.
You can also experiment with other berries, such as blueberries or blackberries, for a different taste.
If you prefer a sweeter tart, adjust the sweetener to your liking.
Serve the tart chilled or at room temperature, and for an added touch, whip some heavy cream sweetened with a low-carb sweetener to serve alongside it.
Enjoy your guilt-free dessert!
Chocolate Chip Zucchini Bread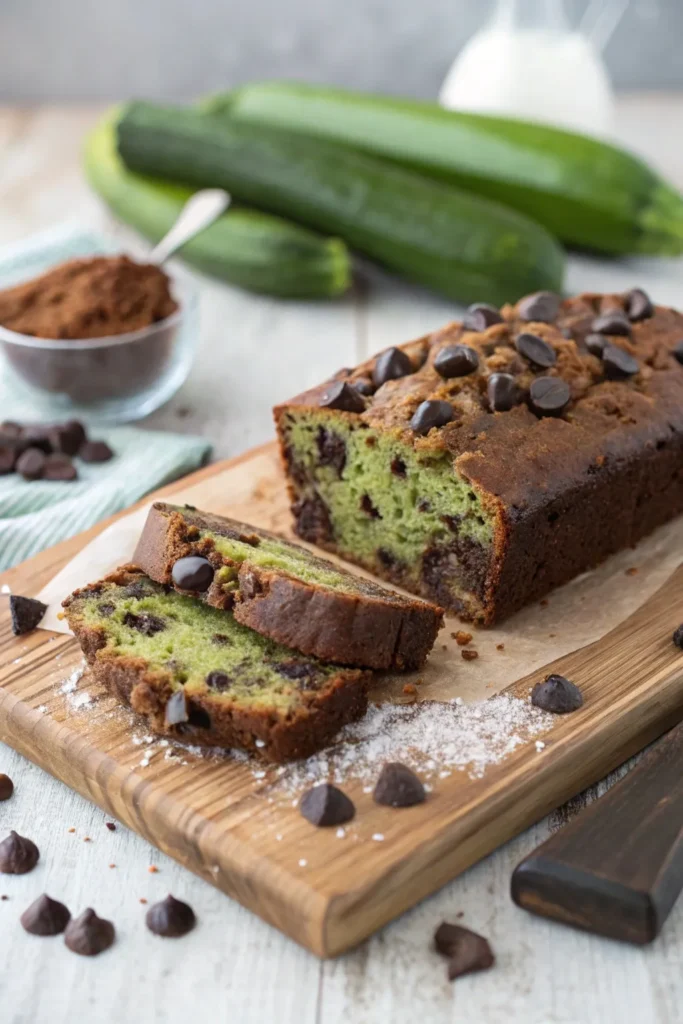
Chocolate Chip Zucchini Bread is a delightful low-carb dessert that combines the moistness of zucchini with the rich flavor of chocolate chips, making it a perfect treat for anyone looking to satisfy their sweet tooth without the added carbs.
This recipe isn’t only easy to whip up, but it also packs in the goodness of vegetables, making it a sneaky way to incorporate more nutrients into your diet. The result is a deliciously moist bread that can be enjoyed as a snack, breakfast, or dessert.
This delightful bread can be customized to suit your taste by adding nuts, spices, or even swapping out chocolate chips for other low-carb options. The use of almond flour keeps the carb count low while providing a lovely texture.
Plus, zucchini adds moisture without overpowering the flavors, making this bread a family favorite. So, gather your ingredients and get ready to enjoy a guilt-free treat that everyone will love!
Ingredients:
- 1 ½ cups almond flour
- ½ cup erythritol or your preferred low-carb sweetener
- 1 teaspoon baking powder
- 1 teaspoon baking soda
- ½ teaspoon salt
- 1 teaspoon cinnamon
- 3 large eggs
- 1 cup grated zucchini (about 1 medium zucchini)
- ½ cup unsweetened applesauce
- 1 teaspoon vanilla extract
- ½ cup sugar-free chocolate chips
Cooking Instructions:
Preheat your oven to 350°F (175°C) and grease a 9×5-inch loaf pan.
In a large mixing bowl, combine the almond flour, erythritol, baking powder, baking soda, salt, and cinnamon.
In another bowl, whisk together the eggs, grated zucchini, applesauce, and vanilla extract until well combined.
Gradually add the wet ingredients to the dry ingredients, stirring until just combined.
Gently fold in the chocolate chips, then pour the batter into the prepared loaf pan.
Bake for 50-60 minutes or until a toothpick inserted into the center comes out clean.
Allow the bread to cool in the pan for 10 minutes before transferring it to a wire rack to cool completely.
Extra Tips:
To enhance the flavor of your Chocolate Chip Zucchini Bread, consider adding a pinch of nutmeg or a handful of chopped nuts for added texture.
Be sure to squeeze out excess moisture from the grated zucchini using a clean kitchen towel or paper towel, as this will help prevent the bread from becoming too soggy.
Additionally, this bread can be stored in an airtight container at room temperature for up to three days or in the refrigerator for up to a week.
For longer storage, consider slicing and freezing individual pieces to enjoy later!
No-Bake Peanut Butter Bars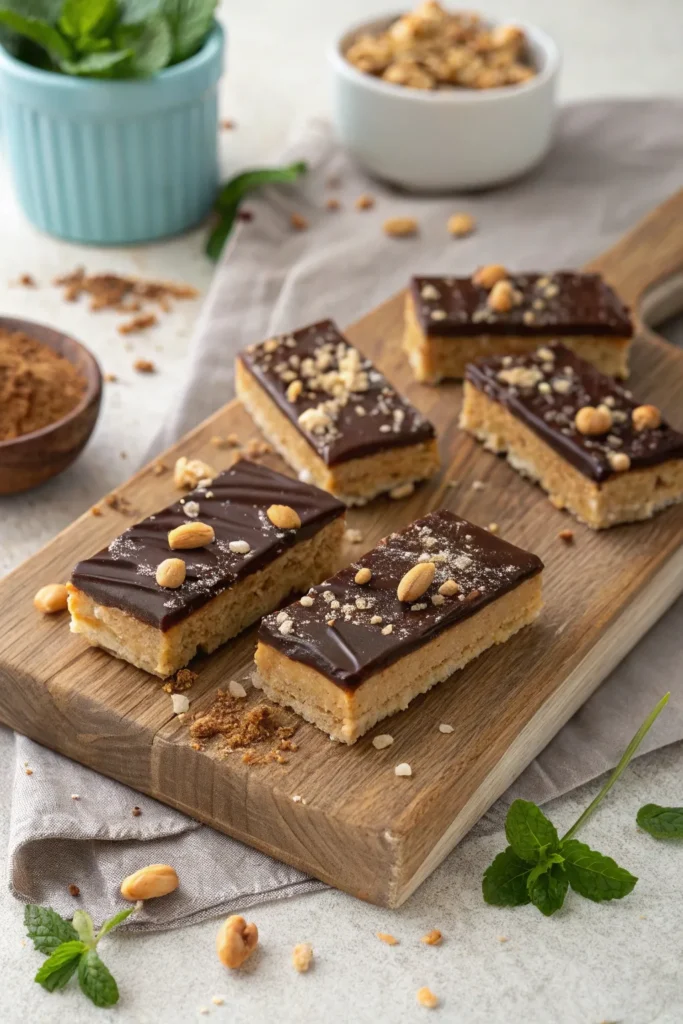
No-Bake Peanut Butter Bars are a delightful treat for anyone following a low-carb diet. These bars aren’t only easy to make but also satisfy your sweet tooth without the guilt of traditional desserts. Packed with protein and healthy fats from the peanut butter, they provide a satisfying snack or dessert option that can be enjoyed by everyone, including those who aren’t watching their carb intake.
The best part about these bars is that they require no oven and can be prepared in just a few minutes. With the combination of creamy peanut butter, low-carb sweeteners, and a few other simple ingredients, you can create a deliciously indulgent treat that will keep you coming back for more.
Whether you’re looking for a quick snack or a dessert to share at your next gathering, these No-Bake Peanut Butter Bars are sure to impress.
Ingredients:
- 1 cup natural peanut butter (creamy or crunchy)
- 1/4 cup unsweetened cocoa powder
- 1/4 cup low-carb sweetener (like erythritol or stevia)
- 1/2 teaspoon vanilla extract
- 1/2 cup almond flour
- A pinch of salt
- Optional: chopped nuts or sugar-free chocolate chips for topping
In a mixing bowl, combine the peanut butter, cocoa powder, low-carb sweetener, vanilla extract, almond flour, and salt. Mix until all ingredients are well incorporated and a thick dough forms.
Line a square baking dish with parchment paper and press the mixture evenly into the bottom of the dish. If desired, sprinkle chopped nuts or sugar-free chocolate chips on top for added texture and flavor. Refrigerate for about 30 minutes to set before cutting into bars.
When making these bars, feel free to customize them to your taste by adding in your favorite low-carb ingredients, such as shredded coconut or protein powder.
Also, make sure that you use natural peanut butter without added sugars or oils for the best results. These bars store well in the refrigerator for up to a week, making them a convenient option for meal prep or a quick grab-and-go snack. Enjoy your delicious low-carb treat!
Vanilla Coconut Macaroons
Vanilla coconut macaroons are a delightful low-carb dessert that perfectly blends the rich flavors of coconut and vanilla. These sweet treats aren’t only easy to make but also satisfy your sweet tooth without the guilt of traditional sugary desserts.
With a crisp exterior and a soft, chewy center, these macaroons are sure to become a favorite among both low-carb dieters and dessert lovers alike. To enhance the flavor profile, this recipe includes the addition of vanilla extract, which gives the macaroons a warm, aromatic touch.
The use of unsweetened shredded coconut keeps the carb count low while providing a wonderful texture. Whether enjoyed as a post-dinner treat or a midday snack, these macaroons are versatile and can be stored for several days, making them an excellent option for meal prep.
Ingredients:
- 2 ½ cups unsweetened shredded coconut
- ½ cup almond flour
- ¼ cup erythritol (or preferred low-carb sweetener)
- 2 large egg whites
- 1 teaspoon vanilla extract
- 1/4 teaspoon salt
- Optional: sugar-free chocolate for drizzling
Cooking Instructions:
Preheat your oven to 325°F (160°C) and line a baking sheet with parchment paper. In a mixing bowl, combine the shredded coconut, almond flour, erythritol, egg whites, vanilla extract, and salt until well mixed.
Using your hands or a cookie scoop, form small mounds of the mixture and place them on the prepared baking sheet, spacing them about an inch apart. Bake for 15-20 minutes or until the edges are golden brown. Allow the macaroons to cool on a wire rack before serving.
Extra Tips:
For an added touch of flavor, consider dipping the cooled macaroons in melted sugar-free chocolate or drizzling it on top for a decadent finish.
Be sure to watch closely while baking, as the macaroons can go from golden to burnt quickly. To store, keep them in an airtight container at room temperature for up to a week, or refrigerate for longer freshness. Enjoy your delicious low-carb treats!


