
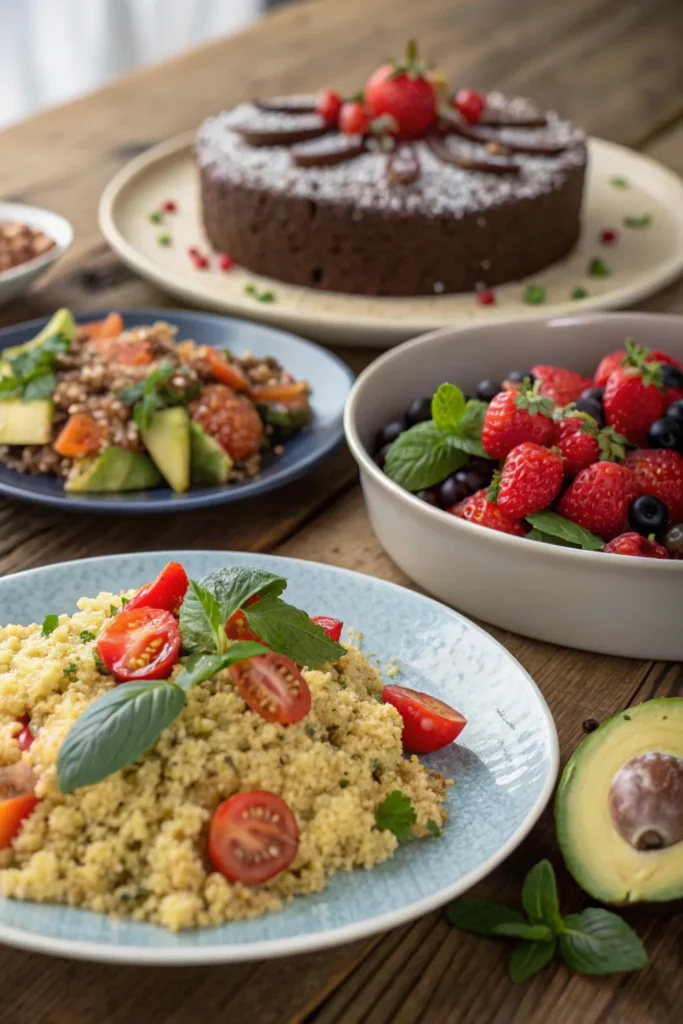
Imagine hosting a dinner party where every dish dazzles your guests, yet it’s all gluten-free. It’s a common misconception that removing gluten means sacrificing flavor. However, with the right recipes, you can serve meals that are both satisfying and delicious. From zesty zucchini noodles to rich chocolate mousse, these 11 recipes prove that gluten-free doesn’t have to mean flavor-free. Curious about how to elevate your meals without gluten?
Zucchini Noodles With Pesto and Cherry Tomatoes
Zucchini noodles, also known as “zoodles,” are a fantastic gluten-free alternative to traditional pasta. They aren’t only low in carbs but also packed with nutrients, making them a favorite among health enthusiasts.
When paired with vibrant pesto and juicy cherry tomatoes, this dish becomes a delightful medley of flavors and textures that can be enjoyed any time of the year.
Making zucchini noodles is a simple and fun process; all you need is a spiralizer or a julienne peeler to transform fresh zucchinis into beautiful strands. The addition of homemade or store-bought pesto adds a rich, herbaceous flavor, and the cherry tomatoes provide a burst of sweetness that complements the dish perfectly.
This recipe is quick to prepare, making it ideal for a healthy weeknight dinner or a light lunch.
Ingredients:
- 2 medium zucchinis
- 1 cup cherry tomatoes, halved
- 1/2 cup basil pesto (homemade or store-bought)
- 2 tablespoons olive oil
- Salt and pepper to taste
- Grated Parmesan cheese (optional, for serving)
- Fresh basil leaves (for garnish)
To prepare the dish, begin by spiralizing the zucchinis into noodles and set them aside. In a large skillet, heat the olive oil over medium heat. Add the zucchini noodles and sauté them for about 2-3 minutes until they’re just tender.
Stir in the cherry tomatoes and cook for an additional 2 minutes. Remove the skillet from heat and mix in the pesto, ensuring that the noodles are well coated. Season with salt and pepper to taste and serve immediately, garnished with grated Parmesan cheese and fresh basil leaves if desired.
For an extra touch, consider adding protein such as grilled chicken or shrimp to make the meal more filling. If you prefer a firmer texture, be careful not to overcook the zucchini noodles, as they can become mushy.
Ultimately, you can customize the dish by experimenting with different vegetables or by using a variety of pesto flavors, such as sun-dried tomato or spinach-based pesto, to suit your taste.
Quinoa Salad With Avocado and Black Beans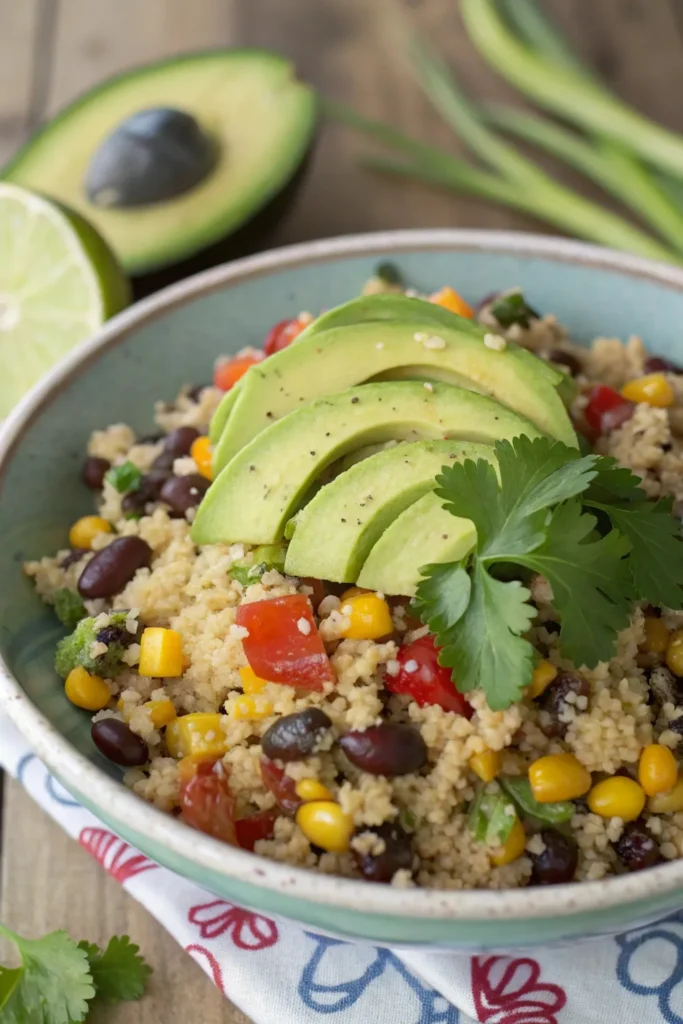
Quinoa salad with avocado and black beans is a delightful dish that combines the earthy flavors of quinoa with the creamy texture of avocado and the hearty goodness of black beans. This invigorating salad isn’t only gluten-free but also packed with nutrients, making it a perfect option for a light lunch or a side dish at dinner.
The vibrant colors and textures of the ingredients make it visually appealing and a treat for the taste buds.
To prepare this salad, you’ll need to cook the quinoa first, which serves as a nutritious base. The dish is then enhanced with the addition of ripe avocado, protein-rich black beans, and a zesty dressing that ties all the flavors together. It’s quick and easy to make, and you can customize it by adding your favorite vegetables or herbs.
This is a versatile recipe that can be enjoyed year-round.
Ingredients:
- 1 cup quinoa
- 2 cups water or vegetable broth
- 1 can (15 oz) black beans, drained and rinsed
- 1 ripe avocado, diced
- 1 cup cherry tomatoes, halved
- 1/2 red onion, finely chopped
- 1/4 cup fresh cilantro, chopped
- Juice of 1 lime
- 2 tablespoons olive oil
- Salt and pepper to taste
To make the quinoa salad, start by rinsing the quinoa under cold water to remove its natural bitterness. In a medium saucepan, combine the rinsed quinoa and water or vegetable broth, bringing it to a boil.
Once boiling, reduce the heat to low, cover, and simmer for about 15 minutes or until the quinoa is fluffy and the liquid is absorbed. Remove from heat and let it cool.
In a large bowl, combine the cooled quinoa, black beans, diced avocado, cherry tomatoes, red onion, and cilantro. Drizzle with lime juice and olive oil, tossing gently to combine. Season with salt and pepper to taste.
When preparing this quinoa salad, consider using a variety of colorful vegetables to enhance both the flavor and presentation. You can also add ingredients like corn, bell peppers, or even a dash of cumin for extra flavor.
If you’re making the salad ahead of time, it’s best to add the avocado just before serving to prevent browning. Enjoy your healthy and delicious dish!
Cauliflower Pizza Crust With Toppings
Cauliflower pizza crust is an excellent gluten-free alternative to traditional pizza crust, offering a delicious and nutritious base for your favorite toppings. This recipe utilizes riced cauliflower, which provides a fantastic texture and flavor while being low in carbs. Not only is it a great option for those with gluten sensitivities, but it also allows you to sneak in some extra veggies into your diet without sacrificing taste.
To make your cauliflower pizza crust, you’ll first need to prepare the cauliflower by ricing it and removing any excess moisture. This step is essential for achieving a crisp crust that holds up under the weight of your chosen toppings.
Once the crust is baked to perfection, you can layer on a variety of toppings, from classic tomato sauce and cheese to more adventurous options like pesto and roasted vegetables. The possibilities are endless, making this dish perfect for family gatherings or a cozy night in.
Ingredients:
- 1 medium head of cauliflower, riced
- 1/2 cup shredded mozzarella cheese
- 1/4 cup grated Parmesan cheese
- 1 large egg
- 1 teaspoon dried oregano
- 1/2 teaspoon garlic powder
- Salt and pepper to taste
- 1/2 cup pizza sauce (for topping)
- Additional toppings of your choice (e.g., pepperoni, bell peppers, olives, mushrooms)
To prepare the cauliflower pizza crust, preheat your oven to 425°F (220°C) and line a baking sheet with parchment paper. In a large bowl, combine the riced cauliflower, mozzarella cheese, Parmesan cheese, egg, oregano, garlic powder, salt, and pepper.
Mix until well combined, then spread the mixture onto the prepared baking sheet, forming a circular shape about 1/2 inch thick. Bake for 20-25 minutes, or until the crust is golden brown and firm.
Remove from the oven, spread your pizza sauce over the crust, add your desired toppings, and return to the oven for an additional 10-15 minutes until the cheese is melted and bubbly.
Extra Tips:
For the best results, make sure to thoroughly drain the riced cauliflower after steaming it to prevent a soggy crust. You can also experiment with different cheeses and herbs to customize the flavor of your crust.
If you prefer a crispier base, consider baking the crust on a preheated pizza stone or flipping it halfway through cooking. Enjoy your gluten-free pizza night!
Stuffed Bell Peppers With Ground Turkey and Rice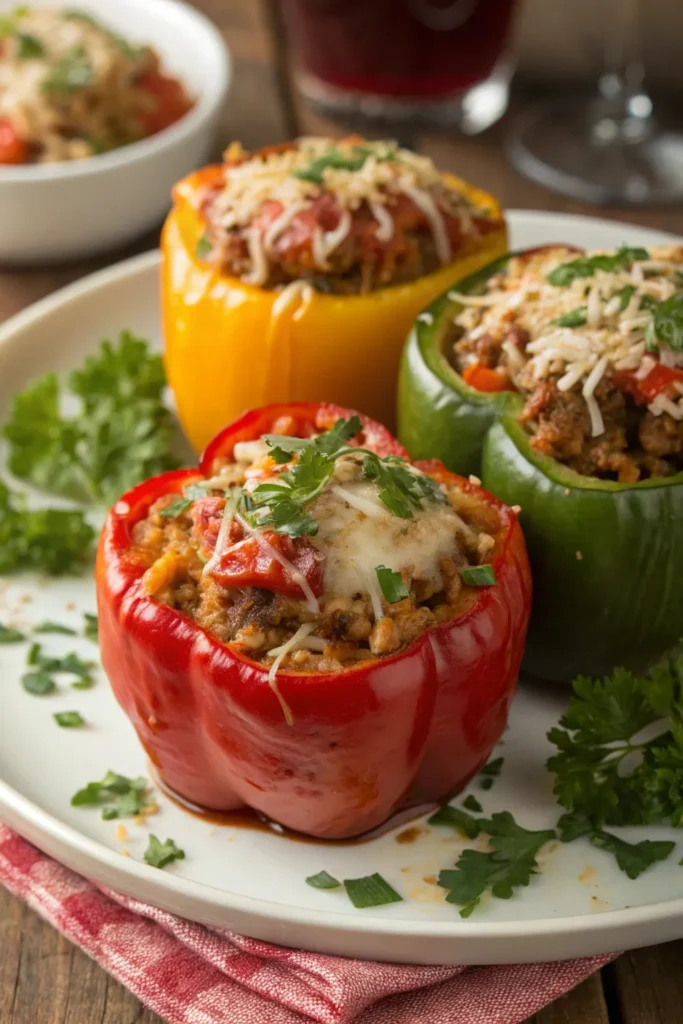
Stuffed bell peppers are a delicious and nutritious meal that can easily be made gluten-free by using ground turkey and rice as the primary filling. This colorful dish not only looks appealing on the plate but is also packed with flavor and essential nutrients. The combination of savory turkey, wholesome rice, and vibrant bell peppers creates a satisfying dinner that the whole family will enjoy.
The beauty of stuffed bell peppers lies in their versatility. You can customize the filling with your favorite herbs and spices, or even add in some vegetables for an extra nutritional boost. This recipe offers a simple yet effective way to prepare a gluten-free meal that’s both hearty and healthy.
Ingredients:
- 4 large bell peppers (any color)
- 1 pound ground turkey
- 1 cup cooked rice (white or brown)
- 1 small onion, chopped
- 2 cloves garlic, minced
- 1 can (14.5 oz) diced tomatoes, drained
- 1 teaspoon dried oregano
- 1 teaspoon paprika
- Salt and pepper to taste
- 1 cup shredded cheese (optional)
Cooking Instructions:
Preheat your oven to 375°F (190°C). Cut the tops off the bell peppers and remove the seeds and membranes.
In a large skillet over medium heat, cook the ground turkey, chopped onion, and minced garlic until the turkey is browned and the onion is translucent. Stir in the cooked rice, diced tomatoes, oregano, paprika, salt, and pepper, and mix until combined.
Spoon the turkey and rice mixture into each bell pepper, placing them upright in a baking dish. If desired, sprinkle cheese on top of each filled pepper. Cover the dish with foil and bake for 25-30 minutes, then remove the foil and bake for an additional 10 minutes until the peppers are tender and the cheese is melted.
Extra Tips:
Feel free to experiment with different types of cheese or add additional spices to enhance the flavor of your stuffed peppers.
You can also substitute ground turkey with ground chicken, beef, or even a plant-based protein for a vegetarian option. For added nutrition, consider mixing in black beans or corn to the filling.
If you have leftover filling, it can be served as a side dish or added to salads for a quick and healthy meal.
Coconut Curry Shrimp With Jasmine Rice
Coconut Curry Shrimp with Jasmine Rice is a delightful dish that brings together the tropical flavors of coconut and the aromatic spices of curry. This gluten-free recipe is perfect for those looking to enjoy a quick yet flavorful meal that transports your taste buds to a sunny beachside destination. The combination of tender shrimp, creamy coconut milk, and fragrant jasmine rice creates a harmonious balance that’s both satisfying and comforting.
This dish isn’t only delicious but also incredibly easy to prepare. With minimal prep work and a one-pan cooking method, you can have a gourmet meal on the table in under 30 minutes. Whether you’re serving it for a weeknight dinner or impressing guests at a gathering, Coconut Curry Shrimp with Jasmine Rice is sure to become a favorite in your culinary repertoire.
Ingredients:
- 1 pound shrimp, peeled and deveined
- 1 cup jasmine rice
- 1 can (14 oz) coconut milk
- 2 tablespoons red curry paste
- 1 tablespoon fish sauce (or soy sauce for a vegetarian option)
- 1 tablespoon olive oil
- 2 cloves garlic, minced
- 1 inch fresh ginger, grated
- 1 bell pepper, sliced
- 1 cup snap peas
- Fresh cilantro, for garnish
- Lime wedges, for serving
In a medium saucepan, cook the jasmine rice according to package instructions. In a large skillet, heat the olive oil over medium heat and sauté the garlic and ginger until fragrant. Add the bell pepper and snap peas, cooking for about 3-4 minutes until they begin to soften.
Stir in the red curry paste, followed by the coconut milk and fish sauce, allowing it to simmer for a few minutes. Add the shrimp and cook until they turn pink and opaque, about 5-7 minutes. Serve the shrimp curry over the jasmine rice, garnished with fresh cilantro and lime wedges.
When preparing Coconut Curry Shrimp, consider adjusting the level of spice to your preference by adding more or less red curry paste. You can also experiment with different vegetables such as zucchini or spinach for added nutrition.
For a richer flavor, let the curry simmer a bit longer before adding the shrimp. Enjoy your culinary adventure!
Sweet Potato and Chickpea Buddha Bowl
Sweet Potato and Chickpea Buddha Bowls are a nutritious and vibrant meal option that isn’t only gluten-free but also packed with flavor and texture. This dish brings together the earthiness of roasted sweet potatoes, the protein punch of chickpeas, and a variety of fresh vegetables, making it a perfect choice for lunch or dinner. The combination of ingredients not only creates a colorful presentation but also provides a balance of carbohydrates, proteins, and healthy fats.
In addition to being delicious, this Buddha bowl is highly customizable. Feel free to add your favorite greens, grains, or sauces to make it your own. The key is to create a well-rounded meal that satisfies your taste buds and nutritional needs. Whether you’re meal-prepping for the week or serving family and friends, this dish is sure to impress!
Ingredients:
- 2 medium sweet potatoes, peeled and cubed
- 1 can (15 oz) chickpeas, drained and rinsed
- 2 tablespoons olive oil
- 1 teaspoon smoked paprika
- 1 teaspoon cumin
- Salt and pepper to taste
- 4 cups mixed greens (spinach, kale, arugula, etc.)
- 1 avocado, sliced
- 1 cup cherry tomatoes, halved
- 1/4 cup tahini sauce (optional)
- Fresh herbs (parsley or cilantro) for garnish
Cooking Instructions:
Preheat your oven to 425°F (220°C). On a baking sheet, toss the cubed sweet potatoes and chickpeas with olive oil, smoked paprika, cumin, salt, and pepper. Roast in the oven for about 25-30 minutes, or until the sweet potatoes are tender and lightly caramelized.
Meanwhile, prepare your serving bowls by layering the mixed greens, followed by the roasted sweet potatoes and chickpeas, avocado slices, and cherry tomatoes. Drizzle with tahini sauce if desired, and garnish with fresh herbs before serving.
Extra Tips:
For added flavor, consider marinating the chickpeas in lemon juice and spices before roasting. You can also experiment with different dressings or toppings, such as a squeeze of fresh lime, toasted nuts, or seeds for crunch.
Make sure to enjoy the Buddha bowl fresh, but it can also be refrigerated for up to three days, making it a great option for meal prep!
Gluten-Free Chicken Parmesan
Gluten-Free Chicken Parmesan is a delicious twist on the classic Italian dish, perfect for those who need to avoid gluten without sacrificing flavor. This recipe features tender, breaded chicken breasts topped with marinara sauce and melted cheese, all while using gluten-free ingredients.
It’s an easy weeknight meal that the whole family will enjoy, providing a satisfying crunch and savory taste that rivals any traditional version. To make this dish, you’ll be using gluten-free breadcrumbs, which can be found in most grocery stores or made at home from gluten-free bread.
Pair the chicken with your favorite marinara sauce and a sprinkle of fresh basil or parsley for a burst of color and flavor. Whether served over gluten-free pasta or alongside a fresh salad, this Chicken Parmesan is sure to impress.
Ingredients:
- 2 boneless, skinless chicken breasts
- 1 cup gluten-free breadcrumbs
- 1/2 cup grated Parmesan cheese
- 1 teaspoon garlic powder
- 1 teaspoon Italian seasoning
- 1/2 teaspoon salt
- 1/4 teaspoon black pepper
- 1 large egg
- 1 cup marinara sauce
- 1 cup shredded mozzarella cheese
- Fresh basil or parsley for garnish (optional)
- Olive oil for frying
Cooking Instructions:
Begin by preheating your oven to 375°F (190°C). While the oven is warming up, pound the chicken breasts to an even thickness.
In one bowl, whisk the egg. In another bowl, combine gluten-free breadcrumbs, Parmesan cheese, garlic powder, Italian seasoning, salt, and pepper. Dip each chicken breast in the egg, then coat it thoroughly with the breadcrumb mixture.
Heat olive oil in a skillet over medium heat and cook the chicken for 3-4 minutes on each side until golden brown. Transfer the chicken to a baking dish, top each piece with marinara sauce and mozzarella cheese, and bake for 15-20 minutes, or until the cheese is bubbly and the chicken is cooked through.
Extra Tips:
To enhance the flavors of your Gluten-Free Chicken Parmesan, consider marinating the chicken in a bit of Italian dressing or lemon juice for an hour before breading.
If you want a crunchier texture, you can double-dip the chicken in egg and breadcrumbs. For a healthier version, try baking the chicken instead of frying it by placing it on a parchment-lined baking sheet and spraying it lightly with cooking spray before baking. Enjoy!
Almond Flour Pancakes With Fresh Berries
Almond flour pancakes are a delightful gluten-free alternative to traditional pancakes, offering a nutty flavor and a fluffy texture that pairs perfectly with fresh berries.
These pancakes aren’t only simple to make but also a great way to start your day with a healthy dose of protein and fiber. The addition of fresh berries provides a burst of sweetness and a vibrant color that makes the dish visually appealing.
Whether you’re enjoying breakfast with family or indulging in a weekend brunch, these almond flour pancakes are sure to impress.
To make these pancakes even more enjoyable, consider experimenting with different types of berries, such as blueberries, raspberries, or strawberries. You can also top them with a drizzle of pure maple syrup or a dollop of Greek yogurt for an extra layer of flavor.
These pancakes are versatile and can be customized to suit your taste preferences, making them a favorite in any household.
Ingredients:
- 1 cup almond flour
- 2 large eggs
- 1/4 cup almond milk (or any milk of choice)
- 1 tablespoon honey or maple syrup
- 1 teaspoon vanilla extract
- 1/2 teaspoon baking powder
- 1/4 teaspoon salt
- Fresh berries (strawberries, blueberries, raspberries) for topping
- Coconut oil or butter for cooking
Cooking Instructions:
In a mixing bowl, combine almond flour, baking powder, and salt.
In another bowl, whisk together the eggs, almond milk, honey (or maple syrup), and vanilla extract until smooth.
Gradually add the wet ingredients to the dry ingredients, stirring until just combined—be careful not to overmix.
Heat a non-stick skillet over medium heat and add a small amount of coconut oil or butter.
Pour about 1/4 cup of the pancake batter onto the skillet for each pancake. Cook for 2-3 minutes on one side until bubbles form and the edges look set, then flip and cook for an additional 1-2 minutes until golden brown.
Serve warm topped with fresh berries.
Extra Tips:
When cooking almond flour pancakes, it’s important to watch the heat carefully as almond flour can brown quickly.
If the skillet is too hot, the pancakes may burn on the outside while remaining uncooked on the inside.
You can also keep the pancakes warm in a low oven while you cook the remaining batter.
Feel free to adjust the thickness of the batter by adding more almond milk if necessary, and don’t hesitate to add spices like cinnamon or nutmeg for an extra flavor kick!
Spinach and Feta Stuffed Chicken Breast
Spinach and Feta Stuffed Chicken Breast is a delicious and healthy dish that’s perfect for a weeknight dinner or a special occasion. This recipe combines the rich flavors of creamy feta cheese and sautéed spinach, all wrapped in tender chicken breasts. Not only is it gluten-free, but it’s also packed with protein and nutrients, making it a great choice for those looking to maintain a balanced diet.
Preparing this dish is simple and can be done in under an hour. The combination of ingredients creates a delightful filling that complements the natural flavors of the chicken. Serve this stuffed chicken with a side of roasted vegetables or a fresh salad for a complete meal that will impress your family and friends.
Ingredients:
- 4 boneless, skinless chicken breasts
- 2 cups fresh spinach, chopped
- 1 cup feta cheese, crumbled
- 2 cloves garlic, minced
- 1 tablespoon olive oil
- 1 teaspoon dried oregano
- Salt and pepper to taste
- Toothpicks or kitchen twine for securing
Cooking Instructions:
Preheat your oven to 375°F (190°C). In a skillet over medium heat, add olive oil and sauté the minced garlic until fragrant. Add the chopped spinach and cook until wilted. Remove from heat and mix in the crumbled feta cheese and oregano.
Using a sharp knife, create a pocket in each chicken breast and stuff them with the spinach and feta mixture. Secure the opening with toothpicks or tie with kitchen twine. Season the outside of the chicken with salt and pepper, then place the stuffed breasts in a baking dish and bake for 25-30 minutes, or until the chicken is cooked through and reaches an internal temperature of 165°F (75°C).
Extra Tips:
For added flavor, you can marinate the chicken in olive oil, lemon juice, and herbs before stuffing. Feel free to experiment with different cheeses or add other ingredients like sun-dried tomatoes or olives to the filling.
If you want a crispy exterior, sear the stuffed chicken in a hot skillet for a few minutes on each side before transferring to the oven. Always let the chicken rest for a few minutes after cooking to guarantee it stays juicy when cutting into it.
Chocolate Avocado Mousse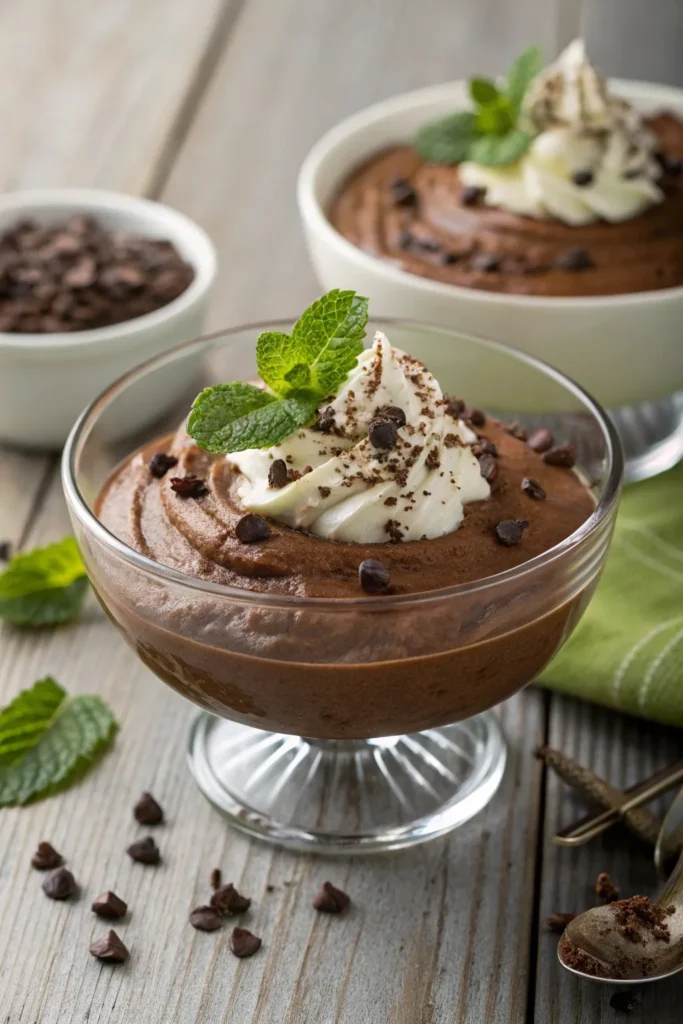
Chocolate Avocado Mousse is a delightful and creamy dessert that proves you can enjoy a rich chocolate flavor without any gluten or dairy. This easy-to-make mousse combines the healthy fats from avocados with the indulgent taste of chocolate, making it a guilt-free treat that everyone will love.
Not only is it delicious, but it also packs in nutrients, guaranteeing that you’re not just satisfying your sweet tooth, but also nourishing your body. This recipe is perfect for those who are following a gluten-free diet or for anyone looking to incorporate more wholesome ingredients into their desserts.
The avocados provide a smooth texture while the cocoa powder and sweetener bring the chocolatey goodness. Whether you’re hosting a dinner party or just want a sweet snack, this Chocolate Avocado Mousse is sure to impress your guests and satisfy your cravings.
Ingredients:
- 2 ripe avocados
- 1/2 cup unsweetened cocoa powder
- 1/2 cup maple syrup (or honey)
- 1/4 cup almond milk (or any dairy-free milk)
- 1 teaspoon vanilla extract
- A pinch of salt
Instructions:
In a blender or food processor, combine the ripe avocados, unsweetened cocoa powder, maple syrup, almond milk, vanilla extract, and salt.
Blend until the mixture is completely smooth and creamy, scraping down the sides as needed to guarantee everything is well combined. Taste the mousse and adjust the sweetness if desired, then transfer it to serving bowls or glasses and chill in the refrigerator for at least 30 minutes before serving.
Extra Tips:
For an extra touch, consider garnishing your Chocolate Avocado Mousse with fresh berries, whipped coconut cream, or a sprinkle of sea salt.
You can also experiment with different sweeteners like agave or coconut sugar to suit your taste. If you want a more intense chocolate flavor, try adding a splash of espresso or strong coffee. Enjoy your delicious and healthy dessert!
Flourless Peanut Butter Cookies
Flourless peanut butter cookies are a delightful treat that combines the rich flavor of peanut butter with a simple, wholesome approach to baking. These cookies aren’t only gluten-free but also incredibly easy to make, requiring just a handful of ingredients.
Whether you’re looking for a quick snack, a dessert to impress your guests, or a treat to satisfy your sweet tooth, these cookies are the perfect solution.
The beauty of flourless peanut butter cookies lies in their chewy texture and rich taste, making them a favorite among both kids and adults. With just peanut butter, sugar, and an egg, you can whip up a batch in no time.
Plus, they’re naturally gluten-free, which means everyone can enjoy them without worry. So, let’s plunge into this simple recipe and start baking!
Ingredients:
- 1 cup creamy or crunchy peanut butter
- 1 cup granulated sugar
- 1 large egg
- 1 teaspoon vanilla extract
- 1/2 teaspoon baking soda
- A pinch of salt
- Optional: chocolate chips or chopped nuts for added texture
Cooking Instructions:
Preheat your oven to 350°F (175°C) and line a baking sheet with parchment paper.
In a mixing bowl, combine the peanut butter, sugar, egg, vanilla extract, baking soda, and salt. Stir until everything is well blended and a dough forms.
Use a tablespoon or cookie scoop to drop spoonfuls of dough onto the prepared baking sheet, spacing them about 2 inches apart. Flatten each cookie slightly with a fork, creating a crisscross pattern, and bake for 10-12 minutes, or until the edges are golden.
Allow them to cool on the baking sheet for a few minutes before transferring them to a wire rack to cool completely.
Extra Tips:
When making flourless peanut butter cookies, make sure to use a good quality peanut butter that doesn’t contain added sugars or hydrogenated oils for the best flavor and texture.
If you prefer a less sweet cookie, you can reduce the amount of sugar slightly.
Feel free to experiment with different add-ins like mini chocolate chips, chopped peanuts, or even a sprinkle of sea salt on top before baking for an extra burst of flavor. Enjoy your delicious cookies!


