
Lunch doesn’t have to be mundane. There’s a world of flavors just waiting for you to explore, from the zesty Tacos Al Pastor to the comforting Goulash. Each dish tells a story, reflecting its culture and ingredients. You might be surprised at how a simple meal can transform your midday break. Curious to see which dishes could elevate your lunch routine?
Tacos Al Pastor – Mexico
Tacos Al Pastor is a beloved Mexican dish that showcases the rich culinary traditions of the country. Originating from the Lebanese immigrants who introduced shawarma to Mexico, this dish combines marinated pork with vibrant flavors and fresh toppings, making it a staple in taquerias across the nation. The name “Al Pastor” translates to “in the style of the shepherd,” which refers to the traditional cooking method of grilling meat on a vertical spit, similar to shawarma.
To prepare Tacos Al Pastor at home, you’ll want to focus on marinating the pork with a blend of spices and pineapple, which adds a unique sweetness that balances the savory flavors. The marinated meat is then grilled to perfection and served on warm corn tortillas, topped with onions, cilantro, and fresh lime juice for a burst of flavor. This dish isn’t only delicious but also a fantastic option for gatherings and celebrations.
Ingredients:
- 2 lbs pork shoulder, sliced thinly
- 3 dried guajillo chilies
- 2 dried ancho chilies
- 1/2 cup pineapple juice
- 1/4 cup white vinegar
- 3 cloves garlic, minced
- 1 tablespoon achiote paste
- 1 tablespoon ground cumin
- 1 tablespoon oregano
- 1 tablespoon salt
- 1/2 teaspoon black pepper
- 1/4 cup chopped fresh pineapple
- Corn tortillas
- Chopped onions (for topping)
- Chopped cilantro (for topping)
- Lime wedges (for serving)
To prepare the Tacos Al Pastor, begin by soaking the dried guajillo and ancho chilies in hot water for about 15 minutes until softened. Blend the chilies with pineapple juice, white vinegar, garlic, achiote paste, cumin, oregano, salt, and black pepper to create a marinade.
Marinate the sliced pork in this mixture for at least 2 hours or overnight for the best flavor. Once marinated, grill the pork on high heat until cooked through and slightly charred. Let the meat rest before slicing it into small pieces. Serve the pork on warm corn tortillas, topped with chopped onions, cilantro, and pieces of fresh pineapple. Squeeze lime juice over the tacos before enjoying.
For extra tips, make sure to get the best quality pork shoulder available, as it will enhance the flavor and tenderness of the dish. If you don’t have access to a grill, you can also cook the marinated meat on a stovetop skillet or in an oven.
Feel free to customize your toppings by adding salsa or avocado for additional flavor. Enjoy the vibrant taste of Tacos Al Pastor and impress your family and friends with this iconic Mexican dish!
Banh Mi – Vietnam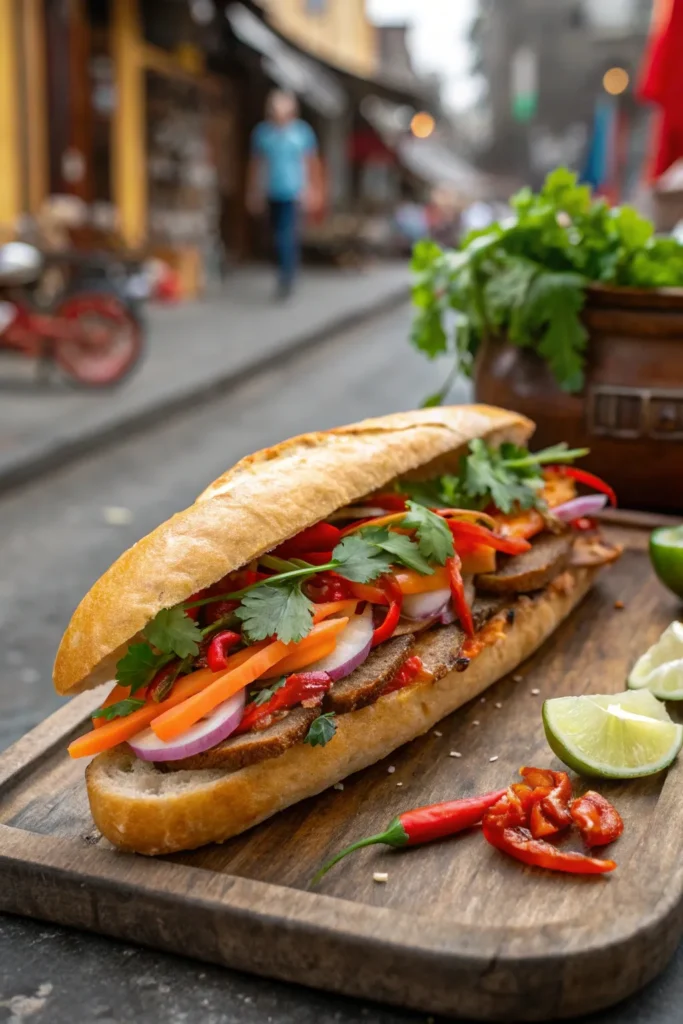
Banh Mi is a beloved Vietnamese sandwich that perfectly encapsulates the country’s diverse culinary influences, combining French colonial elements with traditional Vietnamese flavors. The name “Banh Mi” refers to both the bread and the sandwich itself, which is typically made with a crispy baguette filled with a variety of ingredients.
It’s a street food staple in Vietnam, celebrated for its unique blend of textures and tastes, from the crunch of the bread to the savory and tangy fillings.
To make a classic Banh Mi, you’ll need to gather a variety of fresh ingredients that enhance the flavor profile of the sandwich. Common fillings include marinated meats, pickled vegetables, fresh herbs, and a spread of creamy mayonnaise or pate.
The balance of flavors and textures makes Banh Mi a delightful choice for lunch, offering a satisfying meal that can be easily customized based on personal preferences.
Ingredients:
- 1 baguette (preferably Vietnamese style)
- 200g pork shoulder or chicken breast, thinly sliced
- 1 tablespoon soy sauce
- 1 tablespoon fish sauce
- 1 tablespoon sugar
- 1 tablespoon minced garlic
- 1 tablespoon minced shallots
- 1 small carrot, julienned
- 1 small daikon radish, julienned
- 1/4 cup vinegar (rice or white)
- 1 tablespoon salt
- Fresh cilantro leaves
- Sliced cucumber
- Mayo or pork pate
- Fresh chili slices (optional)
Instructions:
Marinate the thinly sliced pork or chicken in a mixture of soy sauce, fish sauce, sugar, garlic, and shallots for at least 30 minutes.
While the meat is marinating, prepare the pickled vegetables by soaking the julienned carrot and daikon radish in a mixture of vinegar and salt for about 30 minutes.
After marinating, grill or pan-fry the meat until cooked through. Slice the baguette open, spread a layer of mayo or pate on one side, then layer with the cooked meat, pickled vegetables, fresh cilantro, sliced cucumber, and chili slices if desired.
Extra Tips:
For the best Banh Mi experience, use a light and airy baguette that has a crispy crust.
You can also experiment with different proteins such as grilled beef, tofu, or even egg for a vegetarian option.
Don’t skimp on the fresh herbs and vegetables, as they provide essential flavor and crunch.
Finally, feel free to adjust the level of spiciness by adding more or less chili according to your taste preference. Enjoy your homemade Banh Mi!
Paella – Spain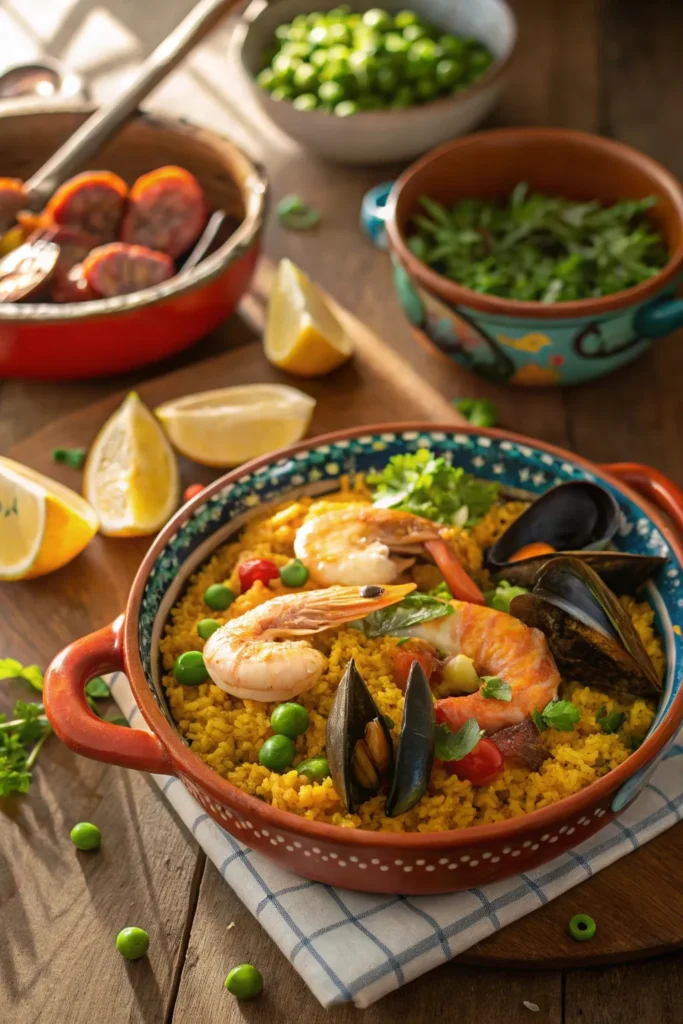
Paella is a vibrant and flavorful dish that hails from the coastal region of Valencia, Spain. Traditionally, it’s cooked in a wide, shallow pan over an open flame, which gives it that characteristic smoky flavor.
Paella is a dish that beautifully blends both land and sea, making it a true feast for the senses. With a mix of saffron-infused rice, fresh seafood, tender meats, and an array of colorful vegetables, paella is perfect for gatherings and celebrations.
This dish isn’t only a culinary delight but also a cultural experience. Each ingredient plays a significant role in the overall flavor profile, and the process of cooking paella brings together families and friends.
Whether you prefer a seafood paella filled with shrimp and mussels or a mixed version with chicken and chorizo, this dish is sure to impress. Gather your ingredients and get ready to plunge into the rich culinary traditions of Spain!
Ingredients:
- 2 cups Bomba rice (or any short-grain rice)
- 4 cups chicken broth
- 1/2 teaspoon saffron threads
- 1/2 pound shrimp, peeled and deveined
- 1/2 pound mussels, cleaned
- 1/2 pound chicken thighs, cut into pieces
- 1/2 cup chorizo, sliced
- 1 red bell pepper, diced
- 1 cup green peas (frozen or fresh)
- 4 cloves garlic, minced
- 1 onion, diced
- 2 medium tomatoes, diced
- 1/4 cup olive oil
- Salt and pepper to taste
- Lemon wedges for serving
- Fresh parsley, chopped (for garnish)
To prepare the paella, heat the olive oil in a large paella pan or wide skillet over medium heat. Add the chicken and chorizo, cooking until browned.
Next, add the onion and garlic, sautéing until softened. Stir in the tomatoes, bell pepper, and peas, cooking for a few more minutes.
Add the rice and saffron, mixing well to coat the grains. Pour in the chicken broth, season with salt and pepper, and bring to a boil.
Reduce the heat and let it simmer without stirring for about 15-20 minutes, or until the rice absorbs the liquid. Finally, arrange the shrimp and mussels on top, cover, and cook for an additional 5-7 minutes, until the seafood is cooked through and the mussels have opened.
For the best results, remember not to stir the rice once you add the broth, as this helps develop the coveted socarrat, the crispy bottom layer of rice.
Letting the paella rest for a few minutes before serving allows the flavors to meld and the rice to set perfectly. Don’t forget to garnish with fresh parsley and serve with lemon wedges for an extra burst of flavor.
Enjoy your homemade paella with friends and family for a truly authentic Spanish experience!
Pani Puri – India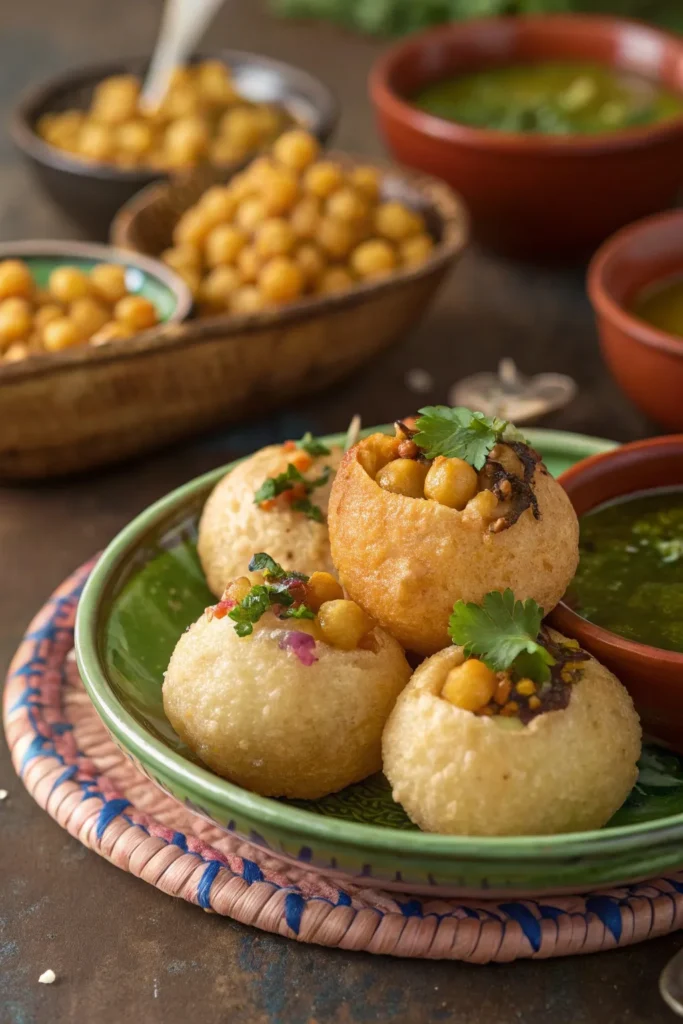
Pani Puri is a beloved street food from India, known for its explosive flavors and delightful textures. This dish consists of hollow, crispy puris filled with a spicy and tangy water, combined with a medley of ingredients that tantalize the taste buds. Traditionally served as a snack or appetizer, Pani Puri isn’t only a feast for the mouth but also a visual treat, with its vibrant colors and enticing aroma.
The magic of Pani Puri lies in its unique combination of textures – the crunch of the puris, the zest of the spiced water, and the soft filling of potatoes or chickpeas. The dish is often enjoyed in a social setting, where friends and family gather to savor each delicious bite. Making Pani Puri at home can be a fun and rewarding experience, allowing you to customize the flavors to suit your preferences.
Ingredients:
- 1 cup semolina (sooji)
- 2 tablespoons all-purpose flour
- 1/4 teaspoon baking soda
- Water (as needed)
- Oil (for deep frying)
- 2 medium-sized potatoes (boiled and mashed)
- 1/2 cup boiled chickpeas
- 1/4 teaspoon cumin powder
- 1/4 teaspoon chaat masala
- Salt (to taste)
- 1 cup tamarind pulp
- 1/4 cup fresh mint leaves
- 1/4 cup fresh coriander leaves
- 2-3 green chilies (adjust to taste)
- 1 tablespoon lemon juice
- 1 teaspoon black salt
- 1 teaspoon roasted cumin powder
- Cold water (as needed)
To prepare Pani Puri, start by making the puris. In a mixing bowl, combine semolina, all-purpose flour, and baking soda. Gradually add water to form a stiff dough. Cover the dough with a damp cloth and let it rest for 30 minutes.
Meanwhile, prepare the spicy water (pani) by blending mint leaves, coriander leaves, green chilies, tamarind pulp, lemon juice, black salt, roasted cumin powder, and cold water in a blender until smooth. Adjust the seasoning according to your taste.
Once the dough has rested, roll it out thinly and cut small circles. Deep fry the puris in hot oil until they puff up and turn golden brown. Assemble by breaking a puri, filling it with mashed potatoes, chickpeas, and pouring the spicy water over it.
When making Pani Puri, make certain that the oil is hot enough for frying to achieve the desired puffiness of the puris. Allow the puris to cool completely before storing them in an airtight container to maintain their crispiness.
You can also experiment with different fillings, such as sprouted beans or yogurt, and adjust the spice levels in the pani to suit your palate. Enjoy the process and share your delicious Pani Puri with family and friends for a delightful culinary experience!
Falafel Wraps – Middle East
Falafel wraps are a delicious and popular dish originating from the Middle East. They’re made using flavorful chickpea patties that are deep-fried until golden brown and then wrapped in a soft pita bread along with fresh vegetables and creamy sauces.
These wraps not only make for a satisfying meal but are also a great vegetarian option that’s packed with protein and nutrients.
The beauty of falafel wraps lies in their versatility. You can customize them to your taste by adding various toppings such as pickles, lettuce, tomatoes, and tahini sauce. Whether you’re enjoying them for lunch, dinner, or as a snack, falafel wraps are sure to impress anyone seeking a burst of Middle Eastern flavors.
Ingredients:
- 1 cup dried chickpeas (soaked overnight)
- 1 small onion, chopped
- 2 cloves garlic, minced
- 1/4 cup fresh parsley, chopped
- 1/4 cup fresh cilantro, chopped
- 1 teaspoon ground cumin
- 1 teaspoon ground coriander
- 1/2 teaspoon baking powder
- Salt and pepper to taste
- Oil for frying
- Pita bread
- Fresh vegetables (lettuce, tomatoes, cucumbers)
- Tahini sauce or yogurt sauce for drizzling
Cooking Instructions:
Begin by draining the soaked chickpeas and placing them in a food processor along with the onion, garlic, parsley, cilantro, cumin, coriander, baking powder, salt, and pepper.
Blend the mixture until it reaches a coarse, grainy texture. Form the mixture into small balls or patties, then heat oil in a deep pan over medium heat.
Fry the falafel until they’re golden brown, about 4-5 minutes on each side. Once cooked, remove them from the oil and drain on paper towels.
Serve the falafel in pita bread, adding your choice of fresh vegetables and a drizzle of tahini or yogurt sauce.
Extra Tips:
For an even more authentic flavor, you can experiment with adding spices like paprika or cayenne pepper to the falafel mixture.
If you prefer baking over frying, you can brush the formed patties with olive oil and bake them at 375°F (190°C) for about 25 minutes, flipping halfway through.
Additionally, allowing the falafel mixture to chill in the fridge for about an hour before frying can help the patties hold their shape better.
Enjoy your homemade falafel wraps!
Goulash – Hungary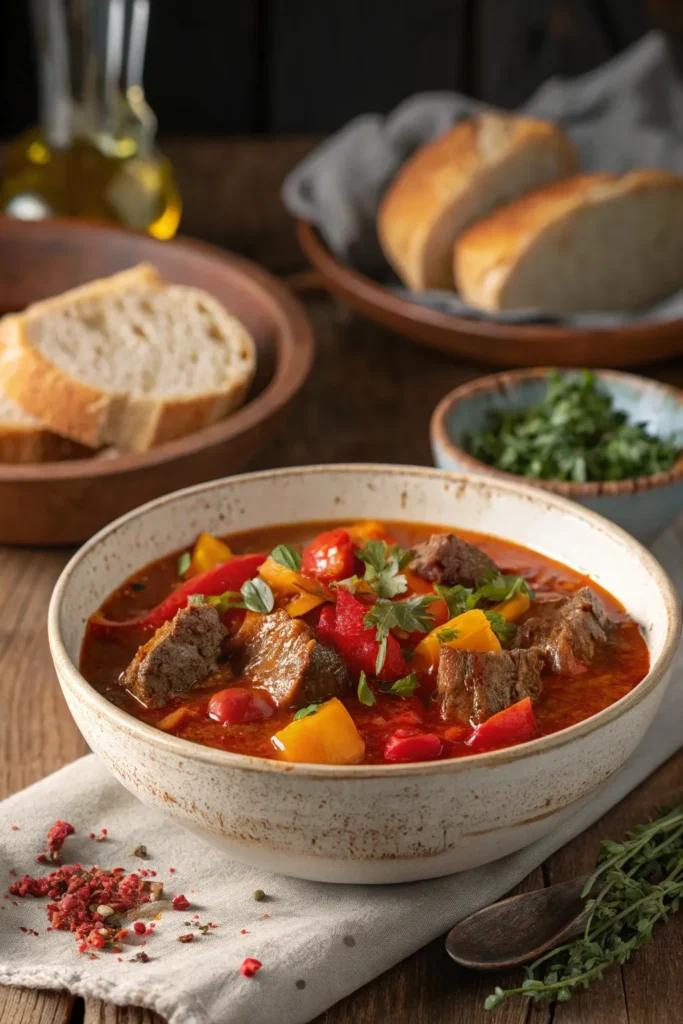
Goulash is a traditional Hungarian dish that has become beloved in many parts of the world, known for its rich flavors and hearty ingredients. This comforting stew is typically made with tender chunks of meat, vegetables, and paprika, which gives it a distinctive taste and vibrant color.
Originating from the 9th century, goulash was initially a simple dish made by shepherds, but over the years, it has evolved into a symbol of Hungarian cuisine, often served with bread or dumplings.
Making goulash isn’t only satisfying but also allows for some creativity in the kitchen. You can adjust the ingredients based on your preferences or what you have available, such as swapping beef for pork or adding different vegetables.
The key to a great goulash is patience; allowing the flavors to meld together will result in a deliciously rich and hearty meal that’s perfect for sharing with family and friends.
Ingredients:
- 2 lbs beef chuck, cut into 1-inch cubes
- 2 tablespoons vegetable oil
- 2 large onions, chopped
- 3 cloves garlic, minced
- 2 tablespoons sweet paprika
- 1 teaspoon caraway seeds
- 1 bell pepper, chopped
- 2 medium carrots, sliced
- 2 medium potatoes, diced
- 4 cups beef broth
- Salt and pepper, to taste
- Fresh parsley, chopped (for garnish)
To prepare the goulash, heat the vegetable oil in a large pot over medium heat. Add the chopped onions and cook until they’re soft and translucent.
Stir in the minced garlic, sweet paprika, and caraway seeds, cooking for an additional minute to release their flavors. Add the beef cubes to the pot, browning them on all sides.
Then, add the bell pepper, carrots, and potatoes, followed by the beef broth. Season with salt and pepper, bring the mixture to a boil, then reduce the heat and let it simmer for about 2 hours, or until the beef is tender.
Stir occasionally and adjust seasoning as needed. Once ready, serve hot, garnished with fresh parsley.
For the best results, consider marinating the beef in the paprika and some salt for a few hours or overnight before cooking. This enhances the flavor and tenderness of the meat.
Additionally, feel free to experiment with adding different veggies, like mushrooms or peas, to customize your goulash. Pair it with a crusty bread or traditional dumplings to soak up the delicious sauce, making for a truly authentic Hungarian experience.
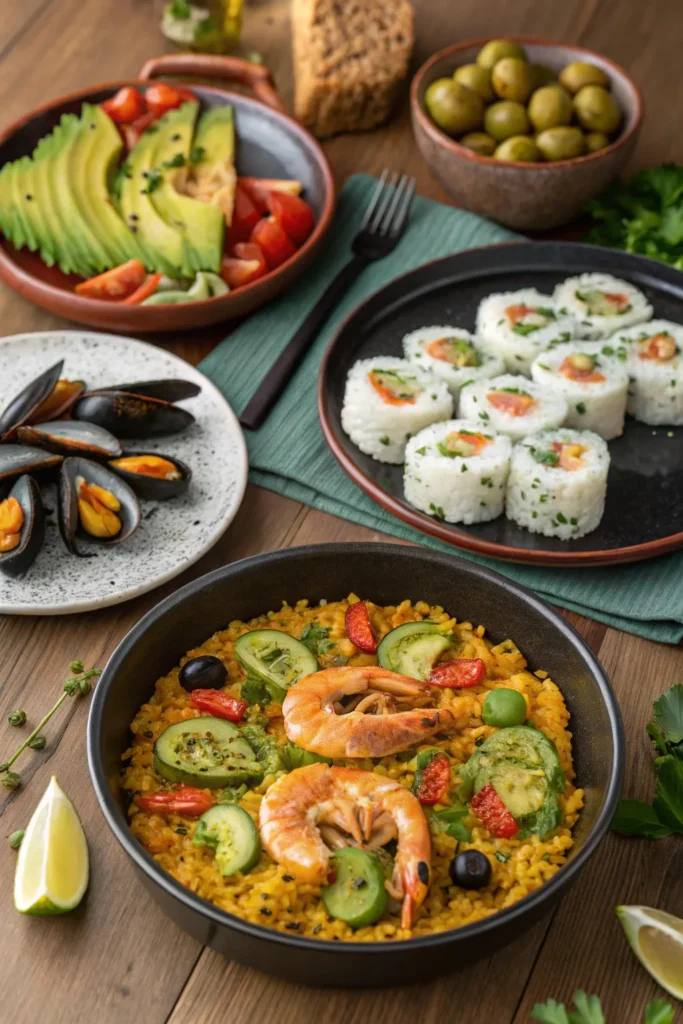
Sushi Rolls – Japan
Sushi rolls, or maki, are a beloved Japanese dish that combines vinegared rice with a variety of fillings, wrapped in seaweed (nori). This dish isn’t only delicious but also visually appealing, making it a great choice for lunch or dinner gatherings.
Preparing sushi rolls at home can be a fun and rewarding experience, allowing you to customize ingredients to suit your taste preferences. Whether you prefer classic fillings like tuna and cucumber or more inventive combinations, sushi rolls can be adapted to delight everyone.
To begin your sushi-making adventure, it’s crucial to gather the right ingredients and equipment. You’ll need a bamboo sushi mat for rolling, as well as a sharp knife for cutting the finished rolls. Sushi rice is a short-grain rice that becomes sticky when cooked, making it easy to hold together in a roll. Fresh ingredients, such as fish, vegetables, or even cooked meats, will elevate your sushi rolls and provide a burst of flavor in every bite.
Ingredients:
- 2 cups sushi rice
- 2 1/2 cups water
- 1/2 cup rice vinegar
- 2 tablespoons sugar
- 1 teaspoon salt
- 4 sheets of nori (seaweed)
- 1 cucumber, julienned
- 1 avocado, sliced
- 1/2 pound sushi-grade fish (such as tuna or salmon), sliced
- Soy sauce, for serving
- Wasabi and pickled ginger, for garnish (optional)
Instructions:
Rinse the sushi rice under cold water until the water runs clear, then soak it in water for about 30 minutes.
Drain and combine the rice with 2 1/2 cups of water in a rice cooker or pot; cook according to the rice cooker instructions or bring to a boil, then cover and simmer for 20 minutes.
Once cooked, mix the rice vinegar, sugar, and salt in a small bowl until dissolved, then gently fold this mixture into the warm rice. Allow the rice to cool to room temperature.
Place a sheet of nori on the bamboo mat, spread a thin layer of sushi rice over the nori, leaving a small border at the top, and layer your desired fillings (cucumber, avocado, and fish) in a line across the center.
Roll the sushi tightly using the bamboo mat, sealing the edge of the nori with a bit of water. Use a sharp knife to slice the roll into bite-sized pieces and serve with soy sauce, wasabi, and pickled ginger.
Extra Tips:
When making sushi rolls, freshness is key, especially when using raw fish. Always buy sushi-grade fish from a reputable source and consume it on the same day.
If you’re new to rolling, practice makes perfect! Don’t be discouraged if your first few attempts aren’t perfect; the flavor will still be delightful.
Feel free to experiment with different fillings, such as cooked shrimp, crab, or even vegetarian options like bell peppers and carrots.
Finally, keep a bowl of water nearby to wet your hands and knife, which will help prevent sticking while you work.
Shakshuka – Israel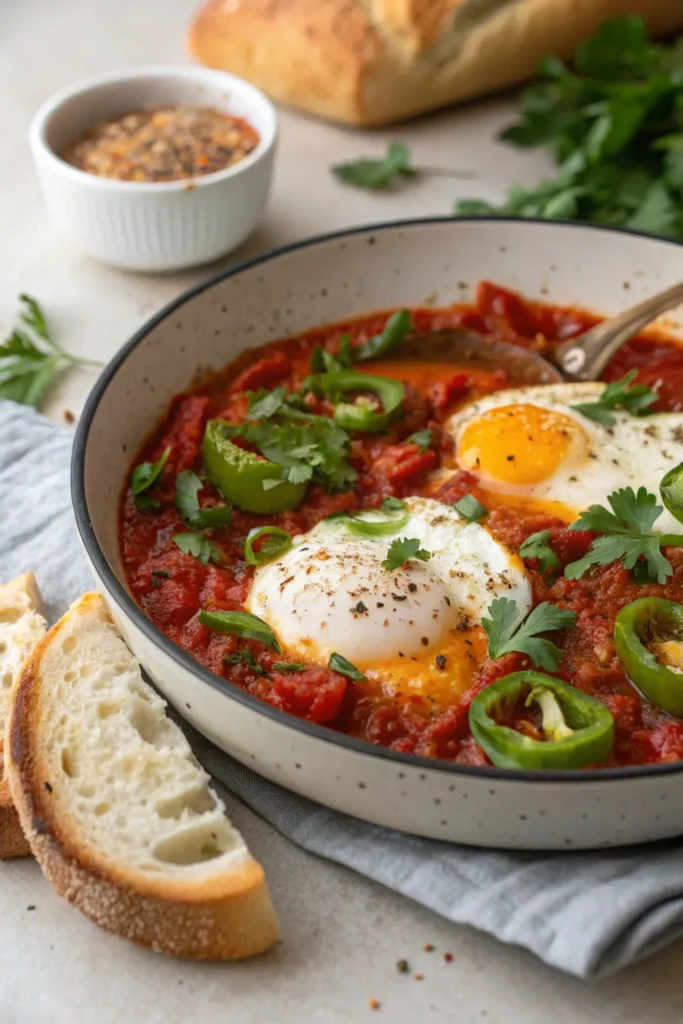
Shakshuka is a beloved traditional dish originating from North Africa and widely adopted in Israel. It consists of poached eggs nestled in a richly spiced tomato sauce, often served with crusty bread for dipping. The combination of flavors and textures makes it a popular choice for breakfast or brunch, but it can be enjoyed at any time of the day. The dish isn’t only delicious but also visually appealing, showcasing vibrant colors that brighten any table.
To make a perfect shakshuka, it’s important to use fresh ingredients and take your time with the sauce. The key to an authentic shakshuka lies in the balance of spices and the way the eggs are cooked to achieve a tender, runny yolk. This dish can also be easily customized with additional ingredients such as bell peppers, feta cheese, or herbs, depending on your preference.
Ingredients:
- 2 tablespoons olive oil
- 1 onion, finely chopped
- 1 bell pepper, diced (red or green)
- 3 garlic cloves, minced
- 1 teaspoon ground cumin
- 1 teaspoon paprika
- 1/4 teaspoon cayenne pepper (optional)
- 1 can (14 oz) diced tomatoes
- Salt and black pepper to taste
- 4 large eggs
- Fresh parsley or cilantro, chopped (for garnish)
- Crusty bread (for serving)
In a large skillet, heat the olive oil over medium heat, then add the chopped onion and bell pepper, sautéing until soft. Stir in the minced garlic, cumin, paprika, and cayenne pepper, and cook until fragrant.
Add the diced tomatoes, season with salt and pepper, and let the mixture simmer for about 10-15 minutes until it thickens slightly. Use a spoon to create small wells in the sauce, gently crack the eggs into each well, cover the skillet, and let them poach for about 5-7 minutes, or until the whites are set but the yolks remain runny.
Garnish with fresh parsley or cilantro and serve hot with crusty bread.
For a perfect shakshuka, consider using a cast-iron skillet for even heat distribution. Experiment with different spices like harissa for added heat or add vegetables like spinach or zucchini for extra nutrition.
Remember to serve it immediately after cooking, as the eggs are best enjoyed warm and runny. Don’t hesitate to customize the dish to your liking, and enjoy the fun of dipping your bread into the flavorful sauce!
Jollof Rice – West Africa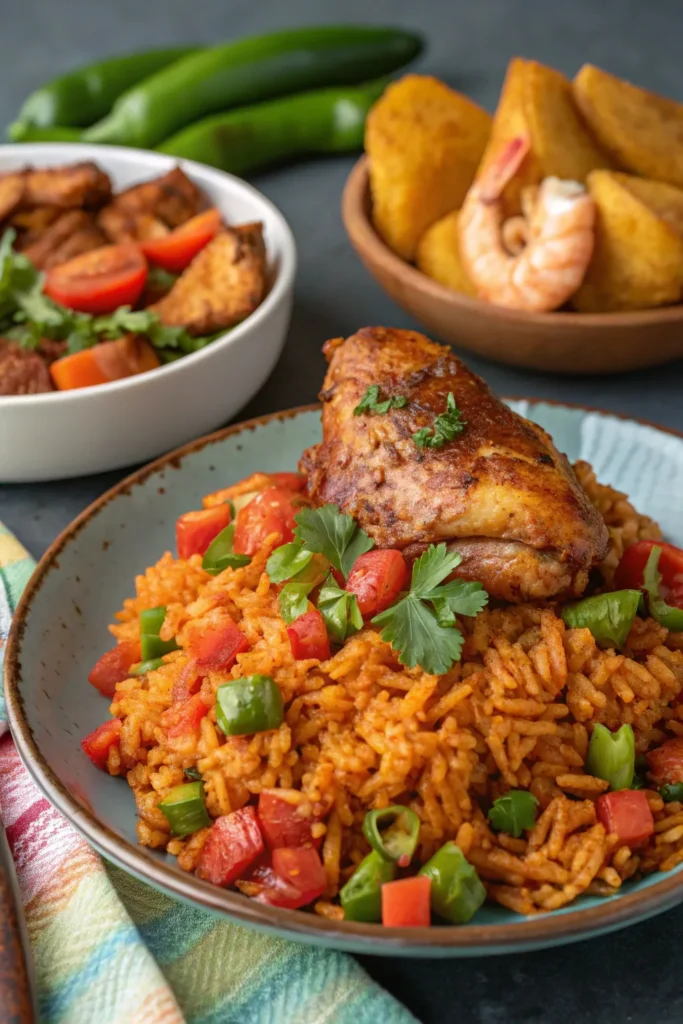
Jollof Rice is a beloved West African dish that’s rich in flavor and colorful in presentation. Known for its vibrant red hue, thanks to the tomatoes and bell peppers, Jollof Rice is often served at celebrations and gatherings, making it a staple in many households. The dish is versatile, allowing for various protein additions such as chicken, fish, or even vegetables, catering to different dietary preferences. The aromatic blend of spices and the cooking technique creates a one-pot meal that’s both satisfying and delicious.
Cooking Jollof Rice is an art that requires patience and attention to detail. Each region in West Africa has its unique twist on the recipe, but the essence remains the same: a delicious, savory rice dish that brings people together. The key to achieving the perfect Jollof Rice lies in the preparation of the tomato base and the cooking method, ensuring that each grain of rice is infused with flavor and cooked to perfection.
Ingredients:
- 2 cups of long-grain parboiled rice
- 1/4 cup vegetable oil
- 1 large onion, chopped
- 4 large tomatoes, blended
- 1 red bell pepper, blended
- 2-3 tablespoons tomato paste
- 2 cups chicken or vegetable broth
- 1 teaspoon thyme
- 1 teaspoon curry powder
- 1 teaspoon paprika
- Salt and pepper to taste
- 1-2 cups mixed vegetables (optional)
- Protein of choice (chicken, fish, or tofu)
Cooking Instructions:
In a large pot, heat the vegetable oil over medium heat and sauté the chopped onions until they’re soft and translucent.
Add the blended tomatoes and red bell pepper, cooking for about 10-15 minutes until the mixture thickens and the oil begins to separate.
Stir in the tomato paste, thyme, curry powder, paprika, salt, and pepper, and let it cook for another few minutes.
Next, add the rice, stirring to coat it with the sauce, then pour in the broth and bring it to a boil.
Reduce the heat to low, cover the pot, and simmer for about 20-30 minutes until the rice is cooked through and has absorbed the flavors.
If using, add the mixed vegetables and protein towards the end of the cooking time to heat through.
Extra Tips:
For an extra depth of flavor, consider marinating your protein in spices before adding it to the Jollof Rice.
Additionally, for that authentic smoky flavor, you can leave the lid slightly ajar during the last few minutes of cooking to allow some steam to escape.
If you find that the rice isn’t fully cooked but the liquid has evaporated, simply add a bit more broth or water and continue cooking until done.
Enjoy your Jollof Rice with a side of fried plantains or a fresh salad for a complete meal!
Dim Sum – China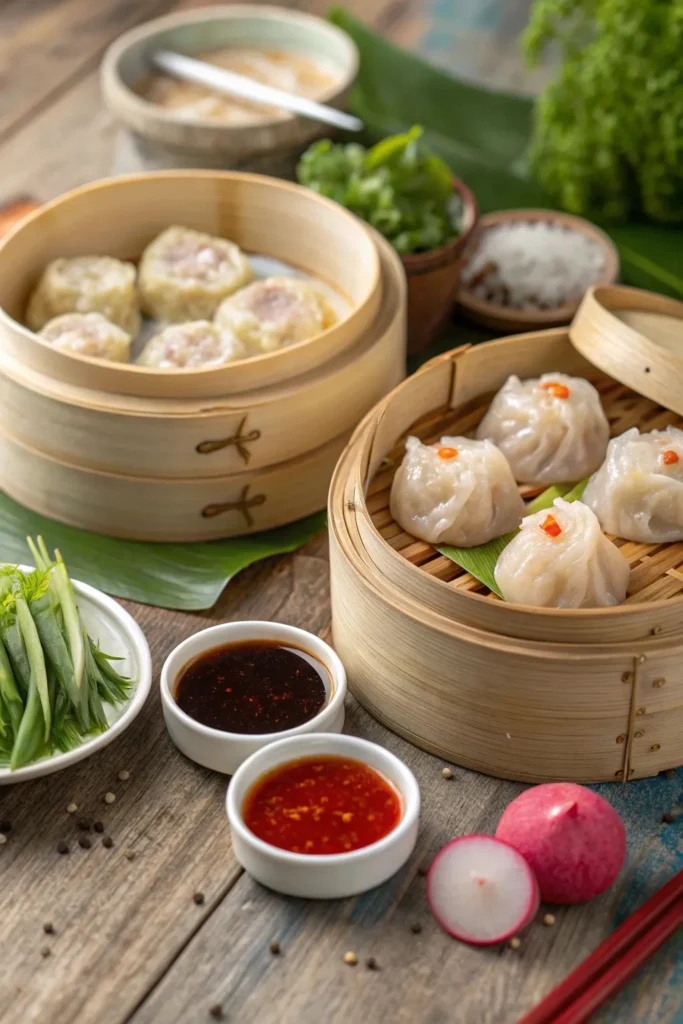
Dim Sum is a traditional Chinese cuisine often served as small bite-sized portions, making it ideal for sharing and enjoying a variety of flavors in one meal. This culinary art form has its origins in the Cantonese culture, where it’s traditionally served with tea.
Dim Sum consists of a wide range of dishes, including dumplings, buns, and rolls, each with unique fillings and cooking methods, making it a delightful experience for food lovers.
To make Dim Sum at home, you can prepare a variety of dumplings, such as shrimp dumplings, pork siu mai, and vegetable dumplings. The process involves making the dough, preparing the fillings, and then steaming or pan-frying the dumplings to perfection.
This recipe will guide you through a simple yet delicious approach to creating your own Dim Sum at home, allowing you to impress your family and friends with this delightful and culturally rich dish.
Ingredients:
- 2 cups all-purpose flour
- 1/2 cup water
- 1 tablespoon vegetable oil
- 1/2 pound ground pork
- 1/2 pound shrimp, peeled and chopped
- 2 green onions, finely chopped
- 1 tablespoon soy sauce
- 1 teaspoon sesame oil
- 1 teaspoon ginger, grated
- 1 teaspoon garlic, minced
- 1/2 cup finely chopped vegetables (carrots, bell peppers, or mushrooms)
- Salt and pepper to taste
Cooking Instructions:
In a mixing bowl, combine the flour, water, and vegetable oil to form a smooth dough; knead for about 5 minutes and let it rest for 30 minutes.
In another bowl, mix the ground pork, chopped shrimp, green onions, soy sauce, sesame oil, ginger, garlic, and vegetables, seasoning with salt and pepper.
Roll out the dough into thin circles and place a small spoonful of filling in the center of each; fold and pleat the edges to seal.
Steam the dumplings in a bamboo steamer for about 15-20 minutes until cooked through.
Extra Tips:
To enhance the flavors of your Dim Sum, consider experimenting with different fillings such as mushrooms, scallops, or tofu to cater to various dietary preferences.
Additionally, make certain the steamer is properly lined with parchment paper or cabbage leaves to prevent the dumplings from sticking.
Serve with soy sauce or chili oil for dipping, and enjoy the delightful experience of sharing these tasty bites with family and friends!
Pesto Pasta – Italy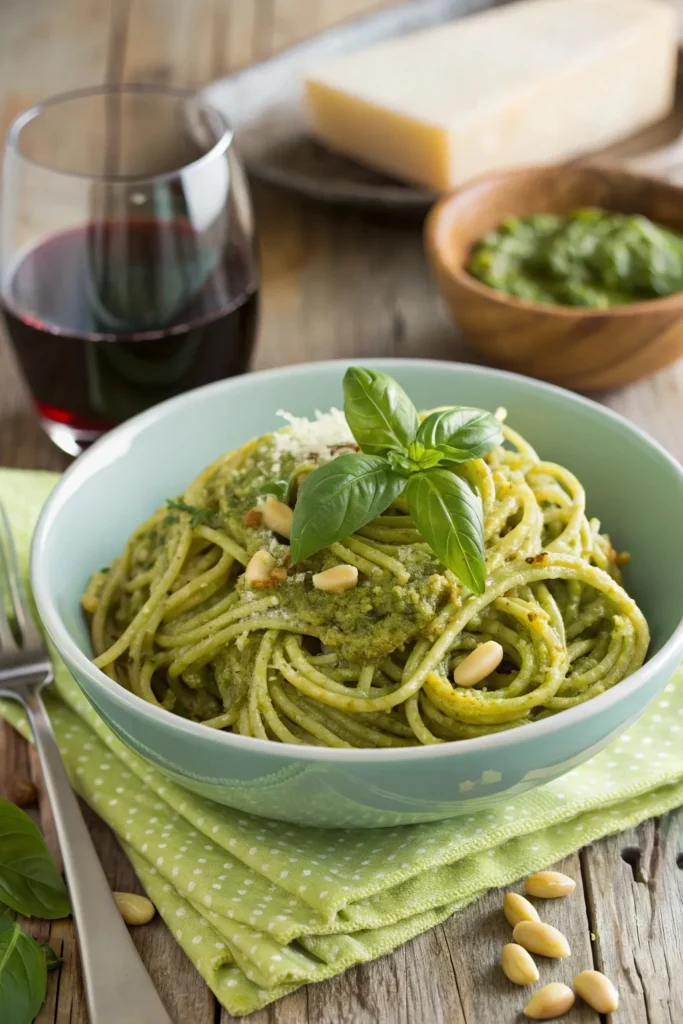
Pesto Pasta is a classic Italian dish that combines the vibrant flavors of fresh basil, garlic, pine nuts, and Parmesan cheese into a luscious sauce, perfect for coating al dente pasta. This dish isn’t only quick and easy to prepare, making it an ideal choice for a weekday lunch, but it also bursts with the invigorating essence of Italian cuisine.
The beauty of pesto lies in its versatility; it can be paired with various types of pasta or even used as a spread on sandwiches.
To make a truly authentic Pesto Pasta, using fresh ingredients is key. The basil should be vibrant and fragrant, the garlic should be fresh, and the cheese should ideally be freshly grated. This dish seamlessly combines the rich, nutty flavors of the pine nuts with the sharp, salty notes of the cheese, creating a delightful harmony that will transport you straight to Italy with every bite.
Ingredients:
- 400g pasta (spaghetti or linguine)
- 2 cups fresh basil leaves
- 2 cloves garlic
- 1/3 cup pine nuts
- 1/2 cup grated Parmesan cheese
- 1/2 cup extra virgin olive oil
- Salt, to taste
- Freshly ground black pepper, to taste
To prepare the Pesto Pasta, start by cooking the pasta according to the package instructions in a large pot of salted boiling water until al dente.
While the pasta cooks, prepare the pesto by combining the basil leaves, garlic, and pine nuts in a food processor and pulsing until finely chopped. Slowly drizzle in the olive oil while the processor is running until the mixture is smooth, then add the grated Parmesan and season with salt and pepper.
Once the pasta is cooked, drain it, reserving a bit of the pasta water, then toss the hot pasta with the pesto sauce, adding a splash of reserved pasta water if needed to reach the desired consistency.
For the best results, consider making your pesto ahead of time and storing it in the refrigerator; it will have time to develop its flavors.
Additionally, feel free to customize your pesto by adding different nuts like walnuts or pecans, or even incorporating arugula or spinach for a different twist.
To elevate the dish, serve it with a sprinkle of extra Parmesan cheese and a drizzle of high-quality olive oil on top, and enjoy the delightful burst of Italian flavors!


