
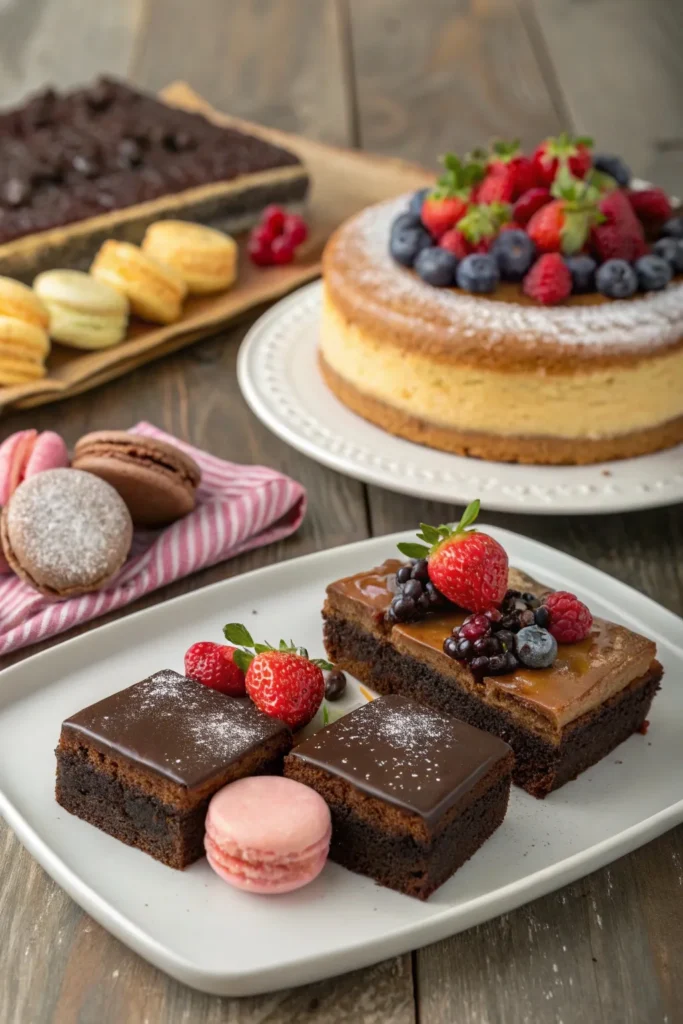
If you think gluten-free desserts lack flavor or texture, it’s time to reconsider. You’ll find that options like flourless chocolate cake and gluten-free brownies deliver rich, satisfying experiences that rival traditional sweets. Whether you crave chewy treats or creamy indulgences, there’s something here for everyone. Curious about the specific desserts that can surprise your taste buds? Let’s explore these eight tempting choices together.
Flourless Chocolate Cake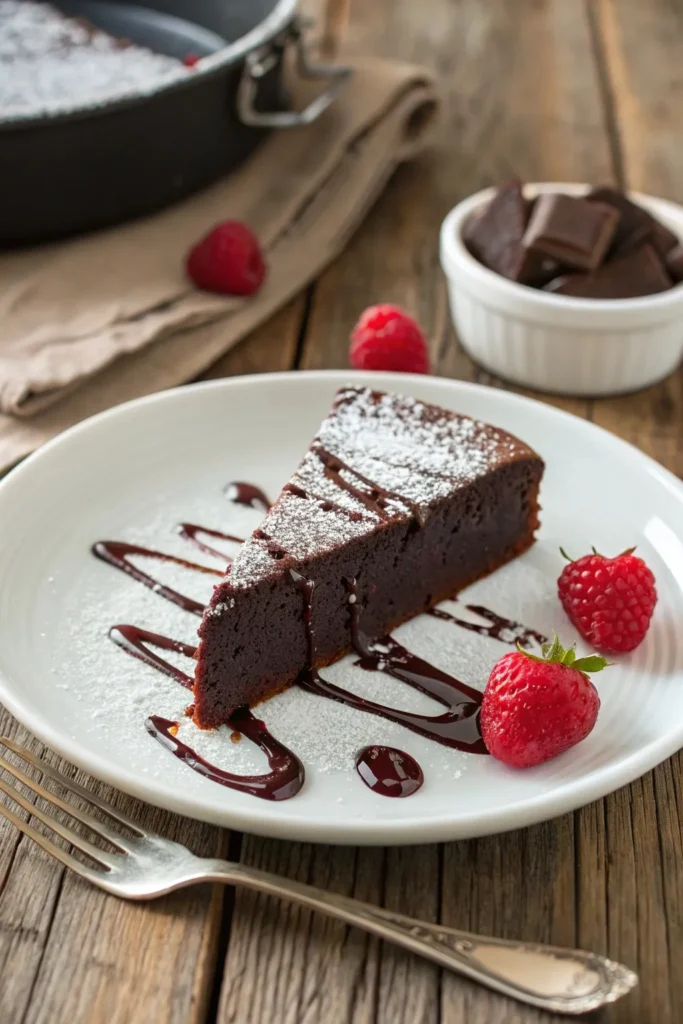
Flourless chocolate cake is a rich and decadent dessert that caters perfectly to those who are gluten-free. This indulgent cake isn’t only easy to make, but it’s also a chocolate lover’s dream come true. The absence of flour allows the intense flavor of the chocolate to shine through, resulting in a dense yet moist texture that melts in your mouth.
Whether served at a special occasion or enjoyed as a simple treat, this cake is sure to impress.
To make a flourless chocolate cake, you’ll need just a handful of ingredients, most of which you likely already have on hand. The preparation is straightforward, making it a great choice for both novice and experienced bakers. This cake can be topped with a dusting of powdered sugar, a dollop of whipped cream, or fresh berries for a delightful presentation. Get ready to bake a dessert that will leave everyone asking for seconds!
Ingredients:
- 1 cup (6 oz) semisweet or dark chocolate, chopped
- 1/2 cup (1 stick) unsalted butter
- 3/4 cup granulated sugar
- 1/4 teaspoon salt
- 1 teaspoon vanilla extract
- 3 large eggs
- 1/2 cup unsweetened cocoa powder
Cooking Instructions:
Preheat your oven to 375°F (190°C) and grease an 8-inch round cake pan, then line the bottom with parchment paper for easy removal.
In a medium saucepan over low heat, combine the chopped chocolate and butter, stirring until both are melted and smooth. Remove from heat and whisk in the sugar, salt, and vanilla extract until well combined.
Allow the mixture to cool slightly before adding the eggs, one at a time, mixing well after each addition. Finally, sift in the cocoa powder and stir until just combined.
Pour the batter into the prepared pan and bake for about 25 minutes, or until the edges are set and a toothpick inserted into the center comes out with a few moist crumbs. Let the cake cool in the pan for 10 minutes before inverting onto a plate.
Extra Tips:
For an even richer flavor, consider using high-quality chocolate with a higher cocoa content.
Make sure to use unsweetened cocoa powder to maintain the balance of sweetness in the cake. Additionally, you can enhance the taste by adding a splash of coffee or espresso powder to the chocolate mixture, which will deepen the chocolate flavor.
Remember to let the cake cool completely before serving, as this allows it to firm up and makes for easier slicing. Enjoy your delightful gluten-free dessert!
Gluten-Free Brownies
Gluten-free brownies are a delicious alternative for those with gluten sensitivities or celiac disease, and they can be just as rich and fudgy as traditional brownies. With the right ingredients, you can create a dessert that satisfies your chocolate cravings without any gluten. This recipe uses almond flour for a nutty flavor and a chewy texture, making it a favorite among gluten-free dessert lovers.
These brownies aren’t only easy to make but also require minimal ingredients, making them a great option for a quick sweet treat. Whether you’re baking for a special occasion or just want to indulge in something sweet, these gluten-free brownies will impress your family and friends. So gather your ingredients, and let’s get started on these chocolaty delights!
Ingredients:
- 1 cup almond flour
- 1/2 cup unsweetened cocoa powder
- 1/2 cup granulated sugar
- 1/4 teaspoon salt
- 1/4 teaspoon baking powder
- 2 large eggs
- 1/2 cup melted coconut oil (or unsalted butter)
- 1 teaspoon vanilla extract
- 1/2 cup chocolate chips (optional)
To prepare the brownies, preheat your oven to 350°F (175°C) and line an 8×8 inch baking pan with parchment paper. In a mixing bowl, combine the almond flour, cocoa powder, sugar, salt, and baking powder.
In a separate bowl, whisk together the eggs, melted coconut oil, and vanilla extract. Pour the wet ingredients into the dry ingredients and mix until well combined. If desired, fold in the chocolate chips.
Pour the batter into the prepared baking pan and spread it evenly. Bake for 20-25 minutes, or until a toothpick inserted into the center comes out with a few moist crumbs. Allow the brownies to cool completely before cutting them into squares.
When making gluten-free brownies, be mindful of the type of chocolate chips you use, as some may contain gluten. Always check the label to verify they’re gluten-free.
Additionally, you can experiment with different add-ins such as nuts, dried fruits, or even a swirl of peanut butter for extra flavor. If you prefer a fudgier texture, reduce the baking time slightly, and for more cake-like brownies, bake a bit longer. Enjoy your delicious, gluten-free treat!
Almond Joy Bars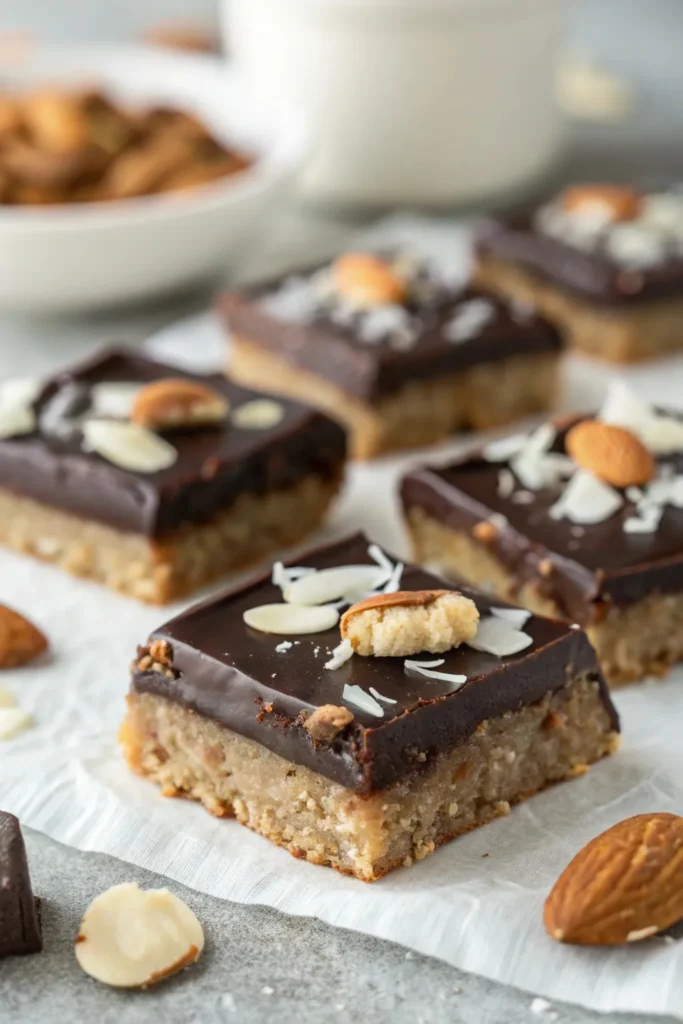
Almond Joy Bars are a delightful gluten-free dessert that combines the rich flavors of chocolate, coconut, and almond. These bars are inspired by the popular candy bar and are perfect for satisfying your sweet tooth while adhering to a gluten-free diet. Not only are they delicious, but they’re also simple to make, making them an ideal treat for any occasion, be it a family gathering or a cozy night in.
The best part about Almond Joy Bars is that they can be made with wholesome ingredients that provide a satisfying crunch and a chewy texture. You can easily customize them to suit your taste, whether you prefer dark chocolate or a sprinkle of sea salt on top. These bars can also be stored in the fridge for a quick snack or dessert whenever you crave something sweet.
Ingredients:
- 1 cup almond flour
- 1 cup shredded unsweetened coconut
- 1/4 cup maple syrup or honey
- 1/4 cup coconut oil, melted
- 1/2 teaspoon vanilla extract
- 1/4 teaspoon salt
- 1/2 cup dark chocolate chips
- 1/2 cup whole almonds (for topping)
Instructions:
In a mixing bowl, combine almond flour, shredded coconut, maple syrup, melted coconut oil, vanilla extract, and salt until well blended.
Press this mixture firmly into a parchment-lined 8×8 inch baking dish. Bake at 350°F (175°C) for 15-20 minutes until the edges are golden brown.
Allow the base to cool completely, then melt the dark chocolate chips and spread them evenly over the cooled base.
Press whole almonds into the melted chocolate for decoration. Refrigerate for at least an hour until the chocolate hardens, then cut into bars.
Extra Tips:
For added flavor, consider adding a pinch of sea salt on top of the chocolate before it sets.
You can also experiment with different types of nuts or dried fruits mixed into the base for a unique twist.
If you’re a fan of coconut, feel free to increase the amount of shredded coconut for a more pronounced flavor.
Finally, these bars can be stored in an airtight container in the fridge for up to a week, making them a perfect make-ahead dessert.
Coconut Macaroons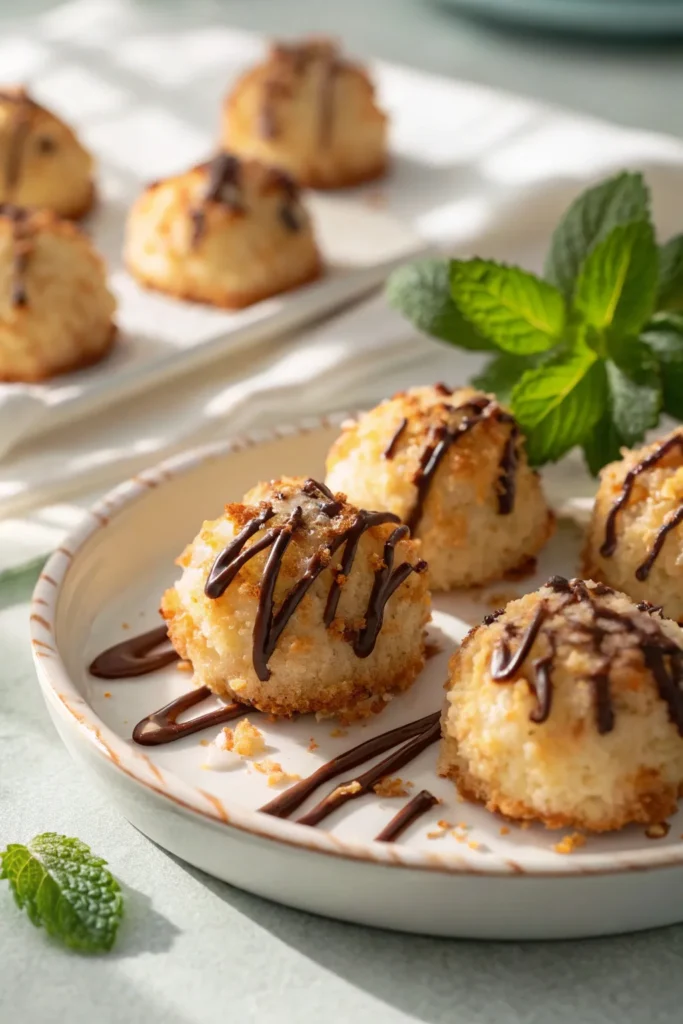
Coconut macaroons are a delightful treat that perfectly exemplifies the joy of gluten-free desserts. These chewy, sweet morsels are made from simple ingredients, yet they pack a punch in flavor and texture. With their golden-brown exterior and soft, coconut-rich interior, they’re ideal for satisfying your sweet tooth without compromising your dietary preferences.
Making coconut macaroons is an enjoyable and straightforward process, making them perfect for both novice bakers and seasoned chefs alike. Whether you’re hosting a gathering or simply indulging in a personal treat, these little cookies can be whipped up in no time.
Pair them with a cup of tea or coffee, and they’ll surely impress anyone who takes a bite.
Ingredients:
- 3 cups shredded unsweetened coconut
- 1 cup sweetened condensed milk
- 1 teaspoon vanilla extract
- 2 large egg whites
- 1/4 teaspoon salt
- Optional: chocolate for drizzling
Instructions:
Preheat your oven to 325°F (163°C) and line a baking sheet with parchment paper. In a large bowl, combine the shredded coconut, sweetened condensed milk, vanilla extract, egg whites, and salt. Mix until everything is thoroughly combined.
Using a spoon or your hands, form small mounds of the mixture and place them onto the prepared baking sheet, spacing them about an inch apart. Bake for 25-30 minutes, or until the edges are golden brown. Allow them to cool on the baking sheet for a few minutes before transferring to a wire rack.
Extra Tips:
For an extra touch of flavor, consider adding a pinch of almond extract to the mixture. If you want to elevate your coconut macaroons, drizzle melted chocolate over the cooled cookies or dip the bottoms in chocolate before allowing them to set.
Store any leftovers in an airtight container at room temperature for up to a week, and enjoy the delightful taste of these sweet treats whenever you crave something special.
Gluten-Free Cheesecake
Gluten-Free Cheesecake is a delicious dessert that can be enjoyed by those with gluten sensitivities or celiac disease, without sacrificing flavor or texture. This rich and creamy treat is perfect for any occasion, from family gatherings to dinner parties. With a few simple substitutions, you can create a delectable cheesecake that will impress everyone at the table.
The crust of this gluten-free cheesecake is made using gluten-free graham cracker crumbs, which provide that classic crunch and flavor. The filling is a smooth blend of cream cheese, sugar, and vanilla, creating a luscious texture that melts in your mouth. Whether you serve it plain or topped with fresh fruit or chocolate sauce, this cheesecake is sure to become a favorite in your dessert repertoire.
Ingredients:
- 1 ½ cups gluten-free graham cracker crumbs
- ½ cup unsalted butter, melted
- 2 tablespoons granulated sugar
- 4 (8-ounce) packages cream cheese, softened
- 1 cup granulated sugar
- 1 teaspoon vanilla extract
- 4 large eggs
- 1 cup sour cream
- 2 tablespoons all-purpose gluten-free flour (optional)
Instructions:
Preheat your oven to 325°F (160°C). In a mixing bowl, combine the gluten-free graham cracker crumbs, melted butter, and 2 tablespoons of sugar until well mixed. Press this mixture firmly into the bottom of a 9-inch springform pan to create the crust.
In another large mixing bowl, beat the softened cream cheese with 1 cup of sugar and the vanilla extract until smooth and creamy. Add the eggs one at a time, mixing well after each addition. Finally, stir in the sour cream and gluten-free flour, if using, until the batter is well combined.
Pour the filling over the crust and smooth the top. Bake for about 60 minutes or until the center is set and slightly jiggly. Allow the cheesecake to cool at room temperature before refrigerating for at least 4 hours, or overnight, before serving.
Extra Tips:
For a smooth and creamy cheesecake, verify that all your ingredients are at room temperature before mixing. Additionally, avoid overmixing the batter to prevent air bubbles, which can cause cracks while baking.
You can also experiment with different toppings like fresh berries, caramel sauce, or chocolate ganache to customize your gluten-free cheesecake to your taste. If you’re making this dessert in advance, it can be stored in the refrigerator for up to five days, making it a convenient option for special occasions.
Chocolate Chip Cookies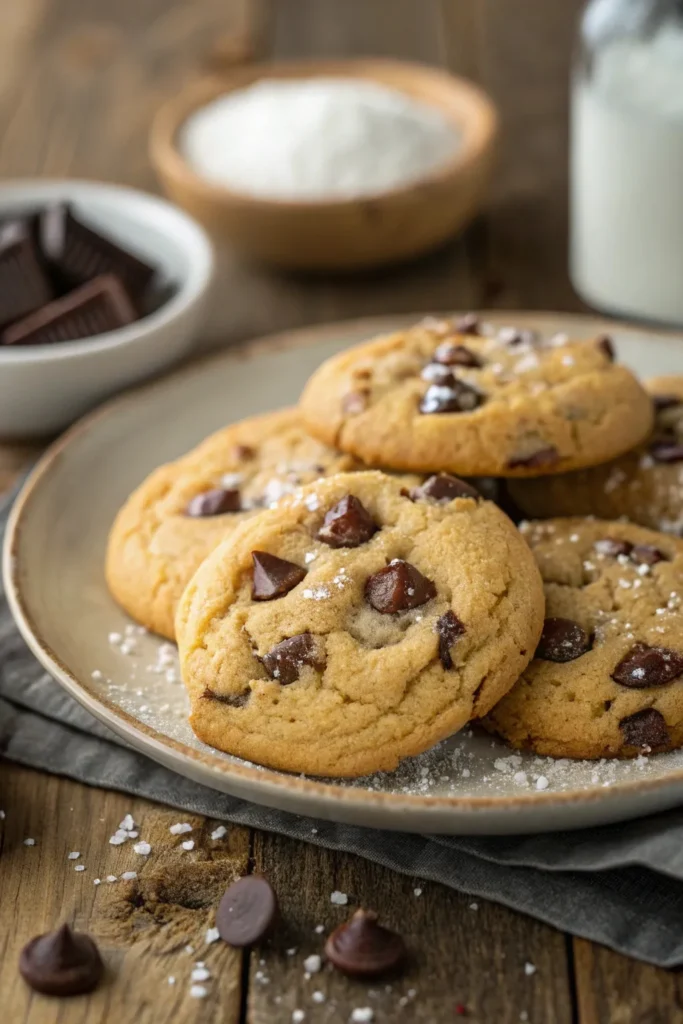
Chocolate chip cookies are a beloved treat that can easily be made gluten-free without sacrificing flavor or texture. Using gluten-free flour blends, these cookies maintain their chewy and buttery goodness while guaranteeing that everyone can enjoy them, including those with gluten sensitivities or celiac disease.
With just a few simple ingredients and steps, you can whip up a batch of delicious gluten-free chocolate chip cookies that will delight both kids and adults alike. The beauty of gluten-free baking is that it often requires minimal adjustments to traditional recipes.
In this recipe, we’ll use a gluten-free all-purpose flour that includes xanthan gum, which helps to mimic the structure that gluten provides in regular baking. These cookies are perfect for sharing at gatherings, enjoying as an after-school snack, or simply indulging in with a glass of milk.
Let’s get started on making these scrumptious treats!
Ingredients:
- 1 cup gluten-free all-purpose flour (with xanthan gum)
- 1/2 teaspoon baking soda
- 1/4 teaspoon salt
- 1/2 cup unsalted butter, softened
- 1/4 cup granulated sugar
- 1/4 cup packed brown sugar
- 1 teaspoon vanilla extract
- 1 large egg
- 1 cup gluten-free chocolate chips
Instructions:
Preheat your oven to 350°F (175°C) and line a baking sheet with parchment paper. In a bowl, whisk together the gluten-free flour, baking soda, and salt.
In a separate mixing bowl, cream the softened butter, granulated sugar, brown sugar, and vanilla extract until smooth. Beat in the egg until fully incorporated, then gradually add the dry ingredients to the wet mixture. Ultimately, fold in the gluten-free chocolate chips.
Drop spoonfuls of the cookie dough onto the prepared baking sheet, spacing them about 2 inches apart. Bake for 10-12 minutes, or until the edges are golden brown. Allow them to cool on the baking sheet for a few minutes before transferring them to a wire rack to cool completely.
Extra Tips:
For the best results, verify your gluten-free flour blend is fresh and contains a starch, as it helps provide the right texture.
You can also experiment with different types of chocolate chips, such as dark chocolate or dairy-free options, to cater to various dietary preferences. If you prefer softer cookies, remove them from the oven while they’re still slightly underbaked, as they’ll continue to firm up as they cool.
Finally, store any leftover cookies in an airtight container to keep them fresh for days!
Berry Crumble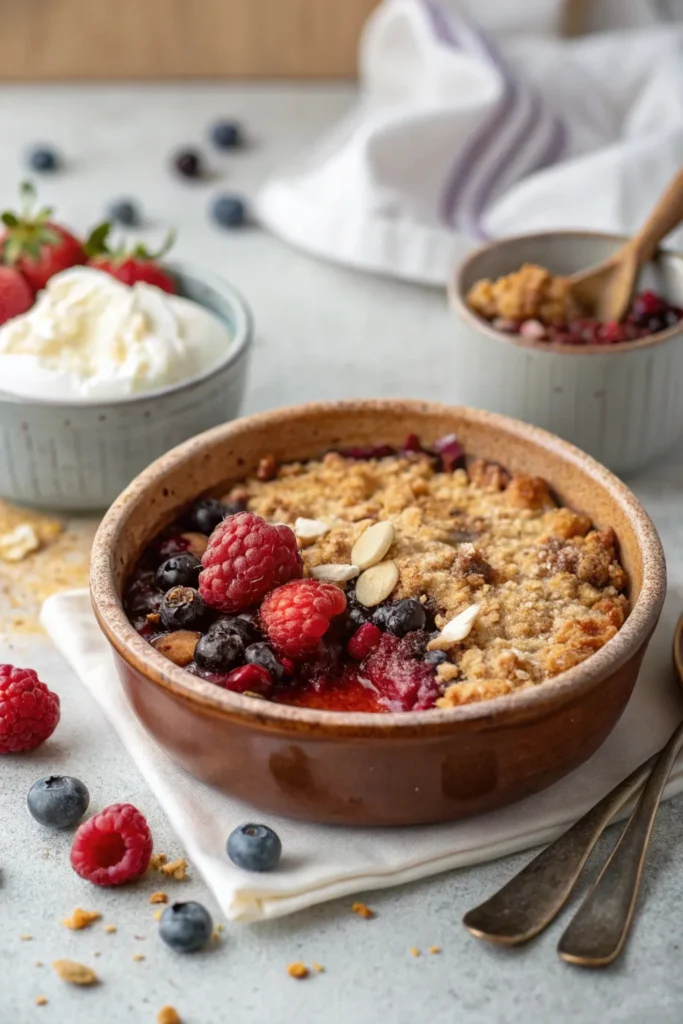
Berry crumble is a delightful dessert that brings together the natural sweetness of fresh berries with a crunchy, buttery topping. This gluten-free version allows everyone to enjoy a comforting treat without the worry of gluten intolerance.
The combination of tart and sweet berries creates a vibrant flavor profile that’s perfect for any occasion, whether it’s a summer gathering or a cozy winter evening. Making a berry crumble isn’t only simple but also a fantastic way to use seasonal fruits. You can mix and match berries according to your preference, including strawberries, blueberries, raspberries, and blackberries.
This versatile dessert can be served warm with a scoop of vanilla ice cream or chilled with a dollop of whipped cream, making it an irresistible choice for dessert lovers.
Ingredients:
- 2 cups mixed berries (fresh or frozen)
- 1/4 cup honey or maple syrup
- 1 tablespoon cornstarch
- 1 teaspoon vanilla extract
- 1 cup gluten-free oats
- 1/2 cup almond flour
- 1/4 cup coconut sugar or brown sugar
- 1/4 cup melted coconut oil or unsalted butter
- 1/2 teaspoon cinnamon
- A pinch of salt
Cooking Instructions:
Preheat your oven to 350°F (175°C). In a mixing bowl, combine the mixed berries, honey or maple syrup, cornstarch, and vanilla extract, and toss gently to coat. Spread the berry mixture evenly in a greased baking dish.
In another bowl, mix the gluten-free oats, almond flour, coconut sugar, melted coconut oil, cinnamon, and salt until crumbly, then sprinkle this topping evenly over the berry mixture. Bake in the preheated oven for 25-30 minutes or until the topping is golden brown and the berries are bubbly.
Extra Tips:
For added texture and flavor, consider folding in some chopped nuts like walnuts or pecans into the crumble topping. If you prefer a bit more tartness, add a tablespoon of lemon juice to the berry mixture.
Also, feel free to experiment with different spices like nutmeg or ginger for a unique twist. Finally, to avoid sogginess, make certain your berries are well-drained if using frozen ones, and allow the crumble to cool slightly before serving to help it set.
Rice Pudding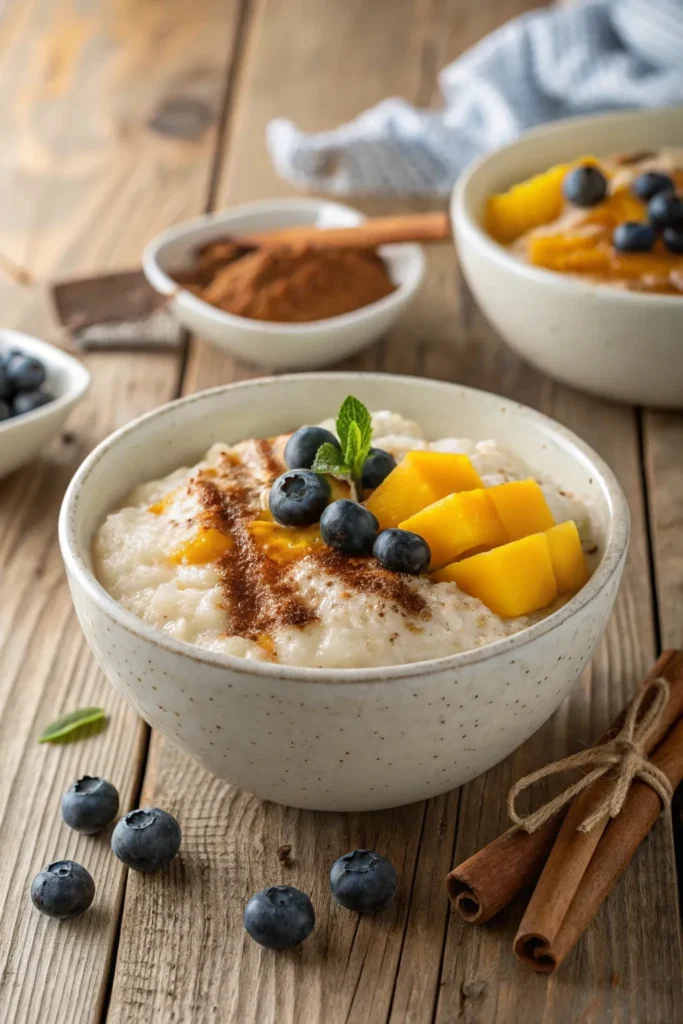
Rice pudding is a delightful and creamy dessert that has been enjoyed by many cultures around the world. This gluten-free version is both comforting and satisfying, making it a perfect treat for any occasion. With its simple ingredients and easy preparation, rice pudding can be whipped up in no time, allowing you to indulge in a sweet, velvety dessert that warms the soul.
To make this classic dessert, you’ll only need a few pantry staples, making it an accessible recipe for anyone looking to satisfy their sweet tooth without gluten. This rice pudding is versatile and can be flavored with spices such as cinnamon or vanilla, and it can also be topped with fresh fruits or nuts to enhance its flavor and texture. Whether served warm or chilled, this rice pudding is sure to please everyone at the table.
Ingredients:
- 1 cup of Arborio rice (or any short-grain rice)
- 4 cups of milk (dairy or non-dairy)
- 1/2 cup of granulated sugar
- 1 teaspoon of vanilla extract
- 1/4 teaspoon of salt
- 1/2 teaspoon of ground cinnamon (optional)
- 1/2 cup of raisins or dried fruits (optional)
Cooking Instructions:
In a medium saucepan, combine the Arborio rice, milk, sugar, vanilla extract, and salt. Bring the mixture to a gentle boil over medium heat, then reduce the heat to low and let it simmer, stirring occasionally.
Cook for about 20-25 minutes or until the rice is tender and the mixture has thickened to your desired consistency. If using, stir in the cinnamon and raisins or dried fruits in the last few minutes of cooking. Remove from heat and let it cool slightly before serving.
Extra Tips:
For a creamier texture, you can substitute some of the milk with heavy cream or coconut milk. If you prefer a sweeter pudding, adjust the sugar to your taste.
To add more flavor, experiment with different spices like nutmeg or cardamom, and for a delightful presentation, consider garnishing with chopped nuts, a drizzle of honey, or a sprinkle of fresh fruit before serving.
Remember that rice pudding can be stored in the refrigerator for a few days, making it a great make-ahead dessert.


