
Finding meals that satisfy both kids and adults can be a challenge. You want dishes that are nutritious, fun to make, and appealing to young taste buds. Luckily, there are plenty of kid-friendly recipes that the whole family will appreciate. From cheesy quesadillas to colorful fruit skewers, these options encourage kids to get involved in the kitchen. Curious about which recipes can transform mealtime into a delightful adventure?
Cheesy Spinach and Chicken Quesadillas
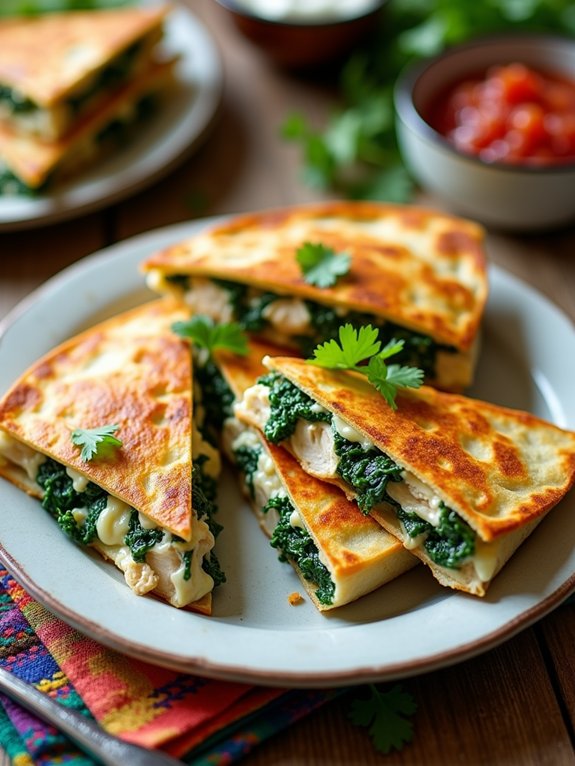
Cheesy Spinach and Chicken Quesadillas are a delightful and nutritious twist on a classic favorite that the whole family will love. These quesadillas not only pack a punch with flavors but also sneak in some healthy ingredients like spinach and chicken. Perfect for a quick lunch or a satisfying dinner, they’re easy to make and can be customized with your favorite toppings.
To get started, you’ll want to gather your ingredients and make sure you have a good non-stick skillet on hand for cooking. The combination of gooey cheese, tender chicken, and vibrant spinach makes these quesadillas irresistible. Serve them with a side of salsa or guacamole for a fun and tasty meal that kids will be excited to eat.
Ingredients:
- 2 cups cooked chicken, shredded
- 1 cup fresh spinach, chopped
- 1 cup shredded cheese (cheddar or mozzarella)
- 4 large flour tortillas
- 1 tablespoon olive oil
- 1 teaspoon garlic powder
- Salt and pepper to taste
- Optional: sour cream or salsa for serving
Cooking Instructions:
In a large bowl, combine the shredded chicken, chopped spinach, cheese, garlic powder, salt, and pepper.
Heat the olive oil in a non-stick skillet over medium heat. Place one tortilla in the skillet, and spread a portion of the chicken and spinach mixture evenly over half of the tortilla.
Fold the tortilla in half and cook for about 2-3 minutes on each side, or until the cheese is melted and the tortilla is golden brown.
Repeat with the remaining tortillas and filling.
Extra Tips:
For added flavor, consider mixing in some diced bell peppers or onions with the chicken and spinach mixture.
You can also make these quesadillas in advance and reheat them for a quick meal during busy days.
If you prefer a crunchier texture, cook them a little longer in the skillet.
Enjoy experimenting with different cheeses and spices to find your family’s perfect combination!
Rainbow Veggie Pasta Salad
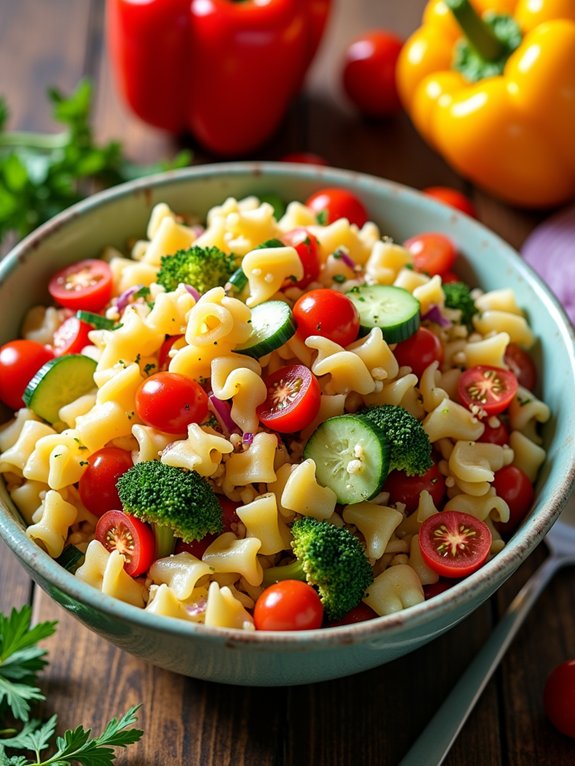
Rainbow Veggie Pasta Salad is a fun and vibrant dish that not only looks appealing but also packs a nutritious punch. Perfect for kids and adults alike, this salad combines colorful vegetables and pasta, making it an excellent way to sneak in some healthy ingredients. The mix of textures and flavors is delightful, making it a great side dish for picnics, barbecues, or even a light lunch.
The best part about this recipe is its versatility. You can easily customize it by adding your favorite vegetables or proteins. Whether you prefer crunchy bell peppers, sweet cherry tomatoes, or cool cucumbers, feel free to get creative! This salad can be prepared ahead of time, allowing the flavors to meld together, making it a convenient option for busy families.
Ingredients:
- 2 cups pasta (bowtie or rotini works well)
- 1 red bell pepper, diced
- 1 yellow bell pepper, diced
- 1 cup cherry tomatoes, halved
- 1 cup cucumber, diced
- 1 cup broccoli florets, blanched
- 1/4 cup red onion, finely chopped
- 1/4 cup fresh parsley, chopped
- 1/2 cup Italian dressing
- Salt and pepper to taste
To prepare the Rainbow Veggie Pasta Salad, start by cooking the pasta according to package instructions until al dente. Drain and rinse under cold water to cool.
In a large mixing bowl, combine the cooled pasta with the diced bell peppers, cherry tomatoes, cucumber, blanched broccoli, red onion, and parsley. Drizzle the Italian dressing over the salad, tossing gently to combine. Season with salt and pepper to taste, and refrigerate for at least 30 minutes before serving to allow the flavors to meld.
When making this salad, feel free to experiment with different vegetables based on your family’s preferences. Adding some protein, like grilled chicken or chickpeas, can turn this side dish into a complete meal.
For extra flavor, consider adding a sprinkle of feta cheese or a squeeze of lemon juice before serving. Enjoy this colorful and delicious salad as a healthy addition to your meal rotation!
Mini Turkey Meatballs With Dipping Sauce
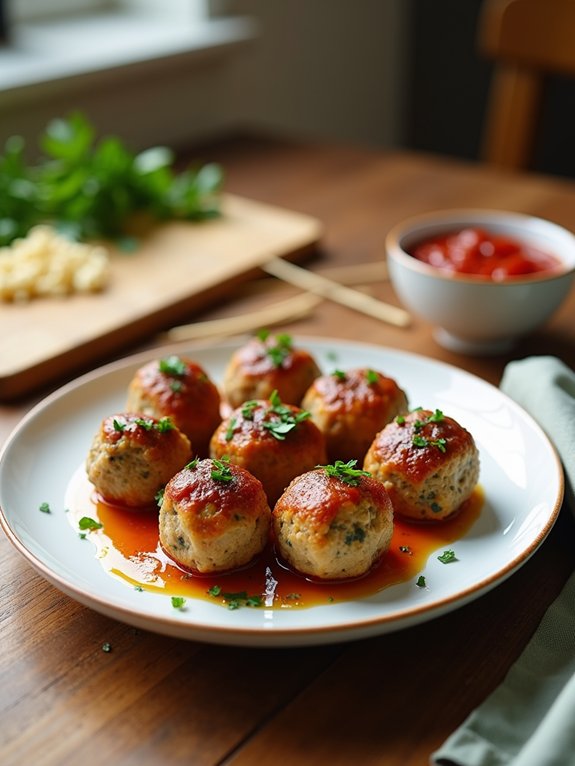
Mini Turkey Meatballs With Dipping Sauce are a delightful and nutritious option for kids and adults alike. These bite-sized meatballs are packed with flavor and make for an excellent snack or meal addition. The best part is that they can be easily customized with different herbs and spices to suit your family’s preferences.
Pair them with a tasty dipping sauce, and you have a dish that will have everyone asking for seconds. Making these mini meatballs is a fun activity that kids can help with, whether it’s mixing the ingredients or rolling them into small balls.
They’re perfect for family gatherings, lunchboxes, or simply as a wholesome treat at home. Plus, these meatballs can be baked, making them a healthier option compared to frying. So, gather your ingredients and let’s get cooking!
Ingredients:
- 1 pound ground turkey
- 1/2 cup breadcrumbs
- 1/4 cup grated Parmesan cheese
- 1/4 cup chopped fresh parsley
- 1 egg
- 2 cloves garlic, minced
- 1 teaspoon onion powder
- 1 teaspoon Italian seasoning
- Salt and pepper to taste
- Cooking spray or olive oil
- Dipping sauce of your choice (such as marinara or honey mustard)
Cooking Instructions:
Preheat your oven to 400°F (200°C) and line a baking sheet with parchment paper. In a large bowl, combine the ground turkey, breadcrumbs, Parmesan cheese, parsley, egg, minced garlic, onion powder, Italian seasoning, salt, and pepper.
Mix until well combined, then use your hands to form small meatballs, about 1 inch in diameter. Place the meatballs on the prepared baking sheet, lightly spraying them with cooking spray or drizzling with olive oil. Bake for 15-20 minutes or until the meatballs are cooked through and golden brown.
Extra Tips:
For added flavor, consider incorporating finely chopped vegetables, such as spinach or bell peppers, into the meatball mixture. If you want to make these meatballs ahead of time, they can be frozen either raw or cooked.
Just be sure to store them in an airtight container. When reheating, you can warm them up in the oven or microwave, and serve with a variety of dipping sauces to keep things interesting!
Homemade Pizza With Fun Toppings

Making homemade pizza is a delightful activity that the whole family can enjoy. Not only is it a fun way to spend time together, but it also allows everyone to customize their own pizzas with their favorite toppings. This recipe is designed to be kid-friendly, so even the little ones can help in the kitchen. With a crispy crust, savory sauce, and a variety of toppings, homemade pizza is sure to become a favorite family meal.
To get started, gather your ingredients and prepare your workspace. Lay out all the toppings and let each child choose their favorites. This not only makes the pizza-making process creative and interactive but also encourages kids to be adventurous with their food. From classic pepperoni to colorful veggies, the options are endless. Ready to make some delicious pizzas? Let’s go!
Ingredients:
- 1 pre-made pizza dough (store-bought or homemade)
- 1 cup pizza sauce
- 2 cups shredded mozzarella cheese
- 1 cup sliced pepperoni
- 1 cup diced bell peppers
- 1 cup sliced olives
- 1 cup cooked sausage or ground beef
- 1 cup pineapple chunks
- 1 teaspoon dried oregano
- Olive oil (for brushing)
Cooking Instructions:
Preheat your oven to 475°F (245°C). Roll out the pizza dough on a floured surface to your desired thickness, then place it on a baking sheet or pizza stone.
Spread a generous amount of pizza sauce over the dough, leaving a small border around the edges. Sprinkle shredded mozzarella cheese evenly on top, and let the kids add their chosen toppings, creating their unique masterpieces.
Finish with a sprinkle of dried oregano and a light brush of olive oil around the crust for added flavor. Bake in the preheated oven for 12-15 minutes or until the cheese is bubbly and the crust is golden brown, then remove and let cool slightly before slicing.
Extra Tips:
Encourage creativity by providing a variety of toppings, including both savory and sweet options. Use cookie cutters to make fun shapes out of vegetables or cheese for added flair.
If you’re making multiple pizzas, consider varying the cooking times slightly based on the thickness of the crust and amount of toppings. Additionally, using a pizza stone can help achieve a crispier crust.
Finally, don’t forget to let the pizzas cool for a few minutes before serving to avoid burning little mouths! Enjoy your delicious homemade pizzas!
Sweet Potato and Black Bean Tacos

Sweet Potato and Black Bean Tacos are a delightful and nutritious meal that kids will love. These colorful tacos are packed with flavor and provide a great way to introduce vegetables into your child’s diet. The combination of sweet potatoes and black beans creates a satisfying filling that’s both hearty and healthy.
Plus, the vibrant toppings and easy assembly make these tacos a fun family activity. To add even more excitement, involve your kids in the cooking process! They can help peel and chop the sweet potatoes, mash the black beans, and choose their favorite toppings. This not only makes the meal more enjoyable but also encourages them to explore new flavors and ingredients.
These tacos are perfect for lunch, dinner, or even a fun taco night with friends.
Ingredients:
- 2 medium sweet potatoes, peeled and diced
- 1 can (15 oz) black beans, rinsed and drained
- 1 tablespoon olive oil
- 1 teaspoon cumin
- 1 teaspoon chili powder
- Salt and pepper, to taste
- Corn or flour tortillas
- Optional toppings: avocado, diced tomatoes, shredded cheese, cilantro, lime wedges
Cooking Instructions:
In a large skillet, heat the olive oil over medium heat. Add the diced sweet potatoes and cook for about 10-12 minutes, stirring occasionally, until they’re tender and slightly caramelized.
Stir in the black beans, cumin, chili powder, salt, and pepper, cooking for an additional 5 minutes until everything is heated through. Warm the tortillas in another pan or microwave, then fill each tortilla with the sweet potato and black bean mixture, adding your choice of toppings.
Extra Tips:
For added flavor, you can roast the sweet potatoes in the oven instead of sautéing them. Simply toss them with olive oil, cumin, and chili powder, and roast at 400°F for about 25-30 minutes until tender.
Additionally, feel free to customize the toppings based on your family’s preferences—sour cream, salsa, or even a sprinkle of hot sauce can elevate these tacos to a whole new level!
Fruit and Yogurt Parfaits
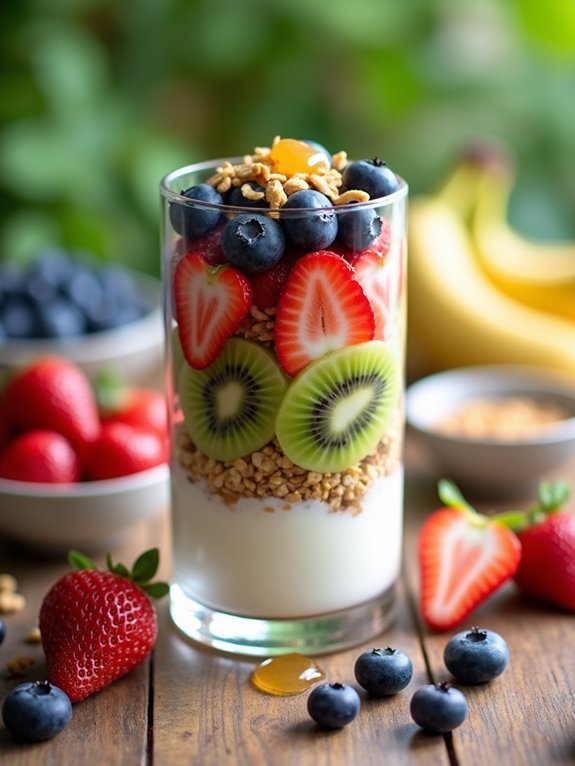
Fruit and yogurt parfaits are a delightful and healthy treat that make for a perfect breakfast, snack, or dessert. They’re incredibly easy to prepare and can be customized to suit your family’s taste preferences.
Layered with creamy yogurt, fresh fruits, and crunchy granola, these parfaits aren’t only visually appealing but also packed with nutrients that kids will love.
This recipe is a fun way to get your children involved in the kitchen. Let them choose their favorite fruits and help with the layering process. You can also experiment with different yogurt flavors or types, such as Greek yogurt for extra protein or dairy-free options if your family has dietary restrictions.
The possibilities are endless, making fruit and yogurt parfaits a versatile dish.
Ingredients:
- 2 cups of yogurt (plain, vanilla, or flavored)
- 2 cups of mixed fresh fruits (such as strawberries, blueberries, bananas, and kiwi)
- 1 cup of granola
- Honey or maple syrup (optional, for drizzling)
Instructions:
In a clear glass or bowl, start by adding a layer of yogurt at the bottom. Follow with a layer of mixed fruits, then a layer of granola.
Repeat the layers until the glass is full, finishing with a layer of fruit on top. If desired, drizzle some honey or maple syrup for added sweetness.
Extra Tips:
To make the parfaits even more exciting, consider adding a sprinkle of chia seeds or nuts between the layers for added texture and health benefits.
You can also prepare the ingredients ahead of time and let your kids assemble their own parfaits, creating a fun and interactive experience that encourages healthy eating habits!
Pancake Muffins With Maple Syrup

Pancake muffins are a delightful twist on traditional pancakes, perfect for busy mornings or as a fun snack for kids. These bite-sized treats combine the fluffy goodness of pancakes with the convenience of muffins, making them easy to grab and go. With a hint of maple syrup, they’re sure to satisfy your family’s sweet tooth while providing a comforting breakfast option.
Making pancake muffins isn’t only simple but also allows for creativity. You can customize the batter with various add-ins like chocolate chips, blueberries, or even nuts to cater to your family’s taste preferences. Once baked, these muffins can be enjoyed warm or stored for later, making them a versatile addition to your recipe repertoire.
Ingredients:
- 1 cup all-purpose flour
- 2 tablespoons sugar
- 1 tablespoon baking powder
- 1/2 teaspoon salt
- 1 cup milk
- 1 large egg
- 2 tablespoons melted butter
- 1 teaspoon vanilla extract
- Maple syrup (for serving)
Instructions:
Preheat your oven to 350°F (175°C) and line a muffin tin with paper liners or grease it lightly. In a large mixing bowl, whisk together the flour, sugar, baking powder, and salt.
In another bowl, combine the milk, egg, melted butter, and vanilla extract. Pour the wet ingredients into the dry ingredients and stir until just combined, being careful not to overmix.
Fill each muffin cup about 2/3 full with the batter and bake for 15-20 minutes, or until a toothpick inserted in the center comes out clean. Allow the muffins to cool slightly before serving with warm maple syrup.
Extra Tips:
To make these pancake muffins even more exciting, consider adding different flavorings or toppings. For instance, you can mix in some cinnamon or nutmeg for a warm spice flavor or sprinkle the tops with coarse sugar for a sweet crunch.
If you have leftovers, keep them in an airtight container in the refrigerator for up to three days, and simply reheat them in the microwave for a quick breakfast treat. Enjoy experimenting with different combinations to keep breakfast fun!
Baked Chicken Tenders With Honey Mustard
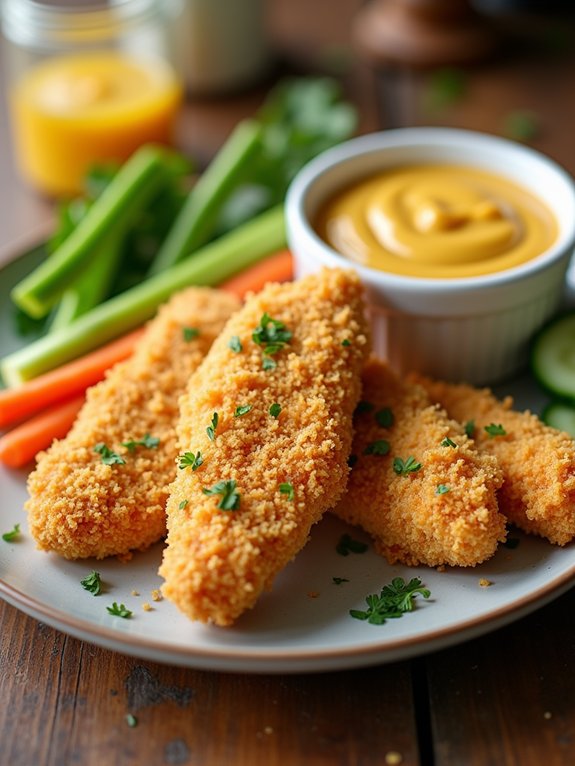
Baked chicken tenders are a fantastic option for kids and adults alike. Not only are they crispy and delicious, but they’re also healthier than their fried counterparts. This recipe for Baked Chicken Tenders with Honey Mustard is simple to prepare, making it perfect for a weeknight dinner or a fun family meal. The combination of tender chicken and the sweet and tangy honey mustard dip will surely please even the pickiest of eaters.
Using just a few ingredients, you can create a dish that’s both satisfying and nutritious. These chicken tenders can be served with a side of fresh veggies, salads, or even some sweet potato fries for a well-rounded meal. Plus, they’re a great way to get kids involved in the kitchen—let them help with the breading and dipping process!
Ingredients:
- 1 pound chicken tenders
- 1 cup breadcrumbs (panko or regular)
- 1/2 cup grated Parmesan cheese
- 1 teaspoon garlic powder
- 1 teaspoon onion powder
- 1 teaspoon paprika
- Salt and pepper to taste
- 1/2 cup all-purpose flour
- 2 large eggs
- 2 tablespoons honey
- 2 tablespoons Dijon mustard
Cooking Instructions:
Preheat your oven to 400°F (200°C) and line a baking sheet with parchment paper. In a shallow bowl, mix together the breadcrumbs, Parmesan cheese, garlic powder, onion powder, paprika, salt, and pepper.
In another bowl, place the flour, and in a third bowl, whisk the eggs. Dip each chicken tender first into the flour, then the eggs, and finally coat it well with the breadcrumb mixture. Arrange the coated tenders on the prepared baking sheet and bake for 15-20 minutes, flipping halfway through, until they’re golden brown and cooked through.
Extra Tips:
For added flavor, you can marinate the chicken tenders in buttermilk for a few hours or overnight before breading them. This helps to tenderize the meat and enhance the flavors.
If you’re looking for a healthier twist, consider using whole wheat breadcrumbs or adding some herbs like dried oregano or thyme to the breadcrumb mixture. Finally, feel free to adjust the honey mustard sauce by adding a little more honey for sweetness or a bit of hot sauce for a kick!
Veggie-Packed Smoothie Bowls
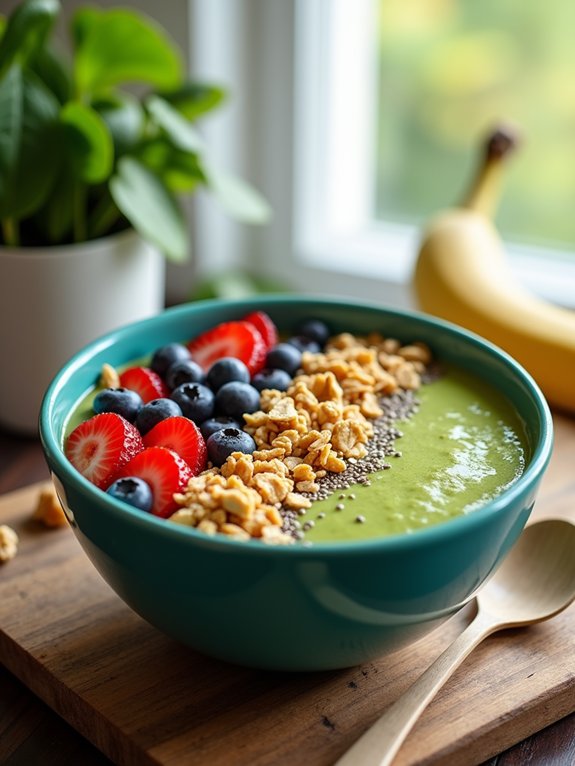
Smoothie bowls are a fantastic way to sneak in an abundance of fruits and vegetables, making them a nutritious choice for kids and adults alike. They aren’t only visually appealing with their vibrant colors, but they also allow for endless customization based on personal preferences and seasonal ingredients.
This recipe for veggie-packed smoothie bowls is a delightful option for breakfast or a snack, and it can easily be tailored to fit your family’s tastes. The base of this smoothie bowl is a creamy blend of spinach and banana, which creates a naturally sweet and nutrient-dense foundation. Topped with a variety of fruits, nuts, and seeds, this dish is as delicious as it’s healthy.
Feel free to get creative with the toppings and let the kids help in the kitchen for an enjoyable, hands-on experience.
Ingredients:
- 1 ripe banana
- 1 cup fresh spinach
- 1/2 cup Greek yogurt (or dairy-free yogurt)
- 1/2 cup almond milk (or any milk of choice)
- 1 tablespoon honey or maple syrup (optional)
- 1/2 cup frozen mixed berries
- Toppings: sliced fruits (like kiwi, strawberries, or blueberries), granola, chia seeds, and nuts
Instructions:
In a blender, combine the ripe banana, fresh spinach, Greek yogurt, almond milk, and optional honey or maple syrup. Blend until smooth and creamy. If the mixture is too thick, add a little more almond milk to reach your desired consistency.
Once blended, pour the smoothie into a bowl and generously add your favorite toppings like sliced fruits, granola, chia seeds, and nuts for added texture and flavor.
Extra Tips:
When preparing veggie-packed smoothie bowls, you can experiment with different leafy greens such as kale or swiss chard, depending on what you have on hand.
To make the bowls even more fun, try creating a “rainbow” effect with your toppings by using various fruits and nuts in different colors. Additionally, consider freezing leftover smoothie mixtures in ice cube trays for quick and easy smoothie bases in the future!
DIY Sushi Rolls for Kids
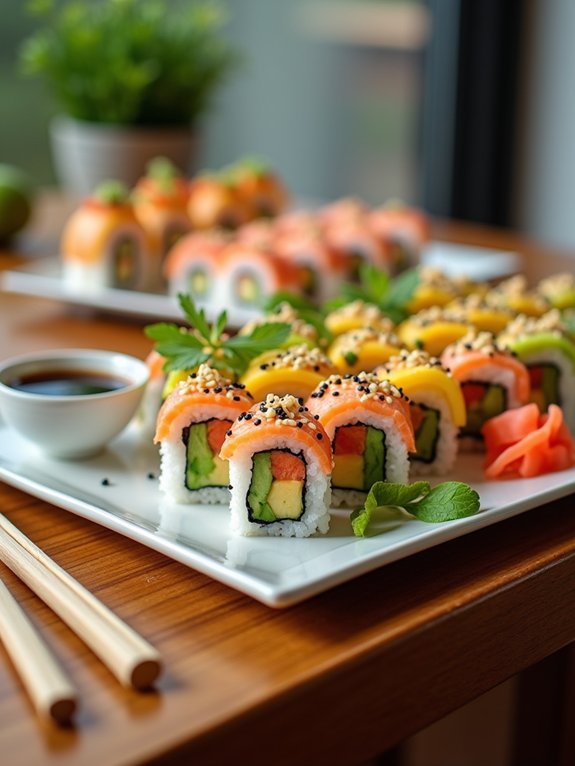
Making DIY sushi rolls is a fun and creative way to get kids involved in the kitchen! This hands-on recipe allows children to experiment with different ingredients and create their own unique sushi rolls. Plus, it’s a great way to encourage them to try new flavors and textures.
With a little guidance, even young chefs can craft delicious sushi that’s both colorful and nutritious. To start, gather your ingredients and tools. Sushi rolling can be a bit tricky at first, but with practice, kids will master the technique and enjoy the process. This recipe is designed to be adaptable, so feel free to swap out ingredients based on your child’s preferences. Get ready to roll up some delicious fun!
Ingredients:
- Sushi rice
- Rice vinegar
- Nori sheets (seaweed)
- Cucumber, julienned
- Carrot, julienned
- Avocado, sliced
- Cooked shrimp or crab sticks (optional)
- Soy sauce (for dipping)
- Sesame seeds (optional)
Cooking Instructions:
Begin by rinsing 1 cup of sushi rice under cold water until the water runs clear. Cook the rice according to package instructions, then mix in 2 tablespoons of rice vinegar once it’s done cooking. Let the rice cool slightly.
Lay a nori sheet on a bamboo sushi mat, and spread a thin layer of sushi rice over the nori, leaving about an inch at the top edge. Place your choice of fillings—cucumber, carrot, avocado, and any protein options—along the bottom edge of the rice.
Using the mat, carefully roll the sushi away from you, pressing gently but firmly to create a tight roll. Seal the edge with a little water and slice the roll into bite-sized pieces.
Extra Tips:
Encourage your kids to get creative with their sushi rolls by experimenting with different fillings and sauces. You can also use cooked ingredients or even fruits like mango or strawberries for a sweet twist.
Make sure to have a small bowl of water nearby for dipping your fingers while rolling to prevent sticking. Finally, enjoy rolling sushi together as a family, making it a fun activity that everyone can participate in!
Cheesy Broccoli and Rice Casserole
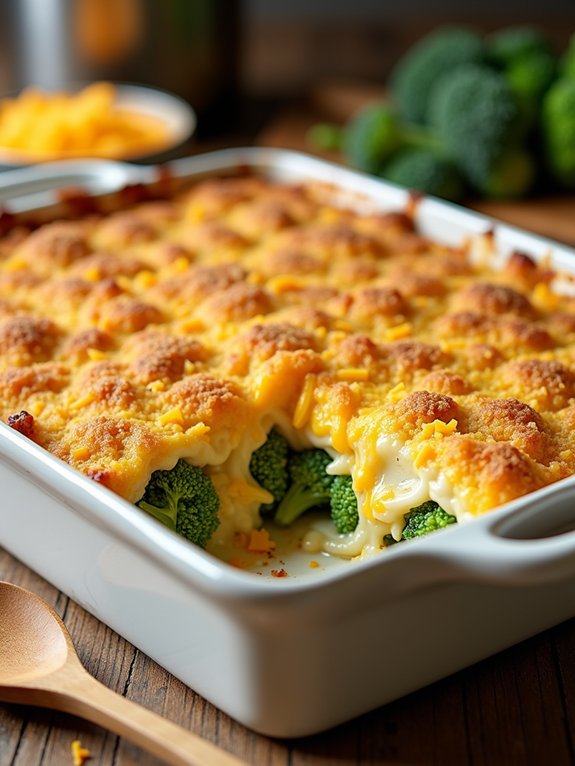
Cheesy Broccoli and Rice Casserole is a delightful dish that combines the wholesome goodness of broccoli with the comforting flavors of creamy cheese and tender rice.
This casserole is perfect for families looking to serve a nutritious meal that even the pickiest of eaters will enjoy. It’s a great way to sneak in some veggies while satisfying those cheesy cravings.
This dish isn’t only easy to prepare but also makes for excellent leftovers, which can be reheated for a quick meal during busy weeknights. The combination of textures and flavors—creamy, cheesy, and crunchy—will have your kids asking for seconds.
Plus, it can be customized with additional ingredients, making it versatile for various tastes.
Ingredients:
- 1 cup uncooked rice
- 2 cups broccoli florets
- 1 can (10.5 oz) cream of mushroom soup
- 1 cup cheddar cheese, shredded
- 1 cup milk
- 1/2 cup onion, chopped
- 1/2 teaspoon garlic powder
- 1/2 teaspoon salt
- 1/4 teaspoon black pepper
- 1/2 cup breadcrumbs
- 2 tablespoons butter, melted
Cooking Instructions:
Preheat your oven to 350°F (175°C).
In a saucepan, cook the rice according to package instructions. While the rice is cooking, steam the broccoli until just tender.
In a large mixing bowl, combine the cooked rice, steamed broccoli, cream of mushroom soup, cheddar cheese, milk, onion, garlic powder, salt, and pepper. Stir until all the ingredients are well mixed and then transfer to a greased 9×13 inch baking dish.
In a separate bowl, mix the breadcrumbs with melted butter and sprinkle evenly over the top of the casserole. Bake for 25-30 minutes or until bubbly and golden.
Extra Tips:
For a little extra flavor, consider adding cooked chicken or turkey to the casserole for a protein boost.
You can also experiment with different types of cheese, such as mozzarella or pepper jack, for a unique twist.
If you want to make this dish ahead of time, you can prepare it up to the baking step, cover, and refrigerate it for a day or two. Just add a few extra minutes to the baking time if baking from cold.
Enjoy your family meal!
Colorful Fruit Skewers
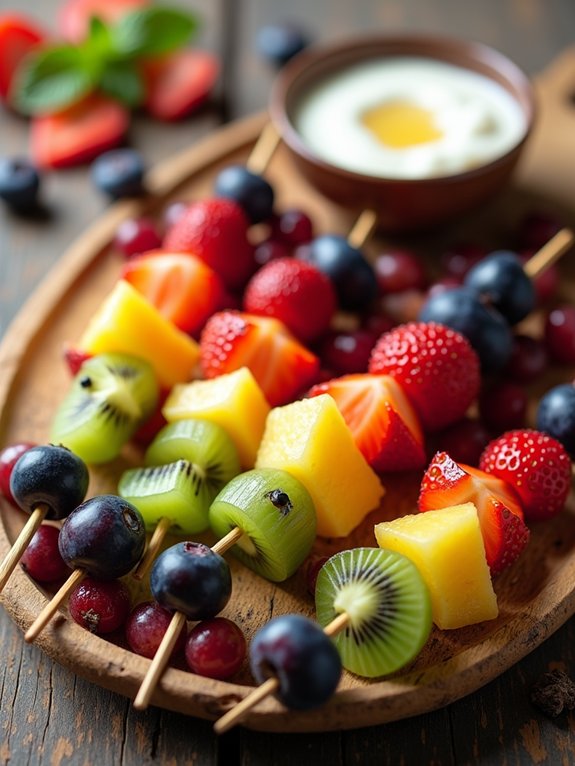
Colorful fruit skewers are a delightful and healthy treat that can brighten up any gathering or snack time. These vibrant skewers aren’t only visually appealing but also packed with essential vitamins and minerals. They’re perfect for kids, as they can be easily customized to include their favorite fruits. Additionally, this recipe is a fun way to encourage children to eat more fruit, as they can help assemble the skewers, making it an interactive cooking experience.
Creating these fruit skewers is simple and allows for endless creativity. You can mix and match different fruits based on the season or personal preferences. Whether you choose sweet strawberries, juicy watermelon, tangy kiwi, or revitalizing pineapple, these skewers are sure to please. Serve them as a healthy snack, a fun party appetizer, or a colorful addition to a picnic or barbecue.
Ingredients:
- Strawberries
- Pineapple chunks
- Kiwi slices
- Grapes
- Blueberries
- Wooden skewers
- Optional: honey or yogurt for dipping
Instructions:
Begin by washing all the fruits thoroughly. Then, cut the strawberries and kiwi into bite-sized pieces if necessary.
Next, take a wooden skewer and start threading the fruits onto it, alternating colors and types for a vibrant display. Continue until the skewer is filled, leaving some space at the bottom for easy handling.
Repeat the process with the remaining skewers and fruits.
Extra Tips:
When making colorful fruit skewers, consider using a mix of textures and flavors for an even more delicious experience.
For added fun, let the kids create their own patterns with the fruit, or challenge them to make a rainbow with the colors.
If you’re prepping ahead of time, store the skewers in the fridge until you’re ready to serve, and consider providing some honey or yogurt for a tasty dipping option!
Taco Stuffed Bell Peppers
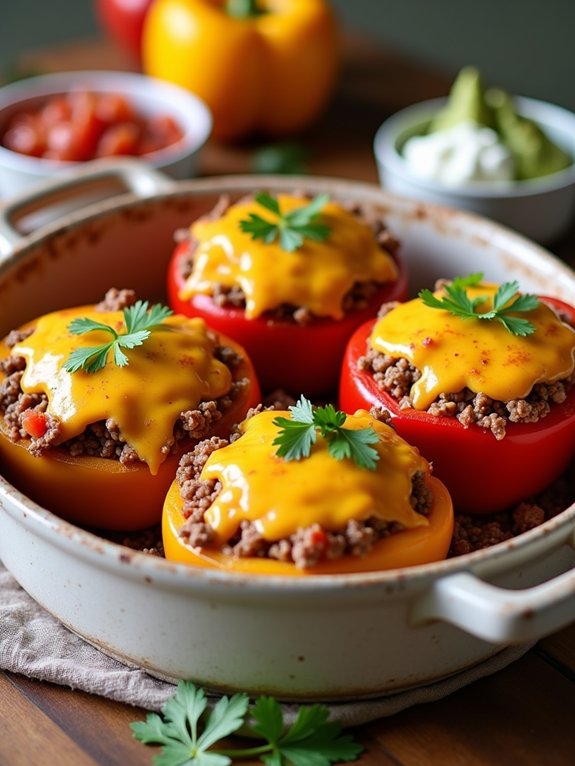
Taco Stuffed Bell Peppers are a fun and flavorful way to get kids excited about dinner. These colorful peppers aren’t only visually appealing but also packed with a delicious filling of seasoned ground meat, rice, and cheese, making them a satisfying meal for the whole family.
Plus, the interactive nature of stuffing the peppers allows kids to get involved in the kitchen, encouraging them to try new foods and flavors.
This recipe is incredibly versatile, allowing you to customize the filling based on your family’s preferences. You can use ground beef, turkey, or even a meat substitute for a vegetarian option.
Additionally, feel free to add your favorite taco toppings, like sour cream, guacamole, or salsa, to make these stuffed peppers even more delicious. With a little bit of prep work, you’ll have a scrumptious dish that everyone will love.
Ingredients:
- 4 large bell peppers (any color)
- 1 pound ground beef (or turkey)
- 1 cup cooked rice
- 1 small onion, chopped
- 1 packet taco seasoning
- 1 cup shredded cheddar cheese
- 1 can diced tomatoes (14.5 oz), drained
- 1 tablespoon olive oil
- Salt and pepper to taste
- Optional toppings: sour cream, guacamole, salsa, chopped cilantro
Cooking Instructions:
Preheat your oven to 375°F (190°C). Cut the tops off the bell peppers and remove the seeds and membranes.
In a skillet, heat the olive oil over medium heat and sauté the chopped onion until translucent. Add the ground beef and cook until browned.
Stir in the taco seasoning, cooked rice, diced tomatoes, and half of the cheddar cheese, mixing well. Stuff each bell pepper with the meat mixture and place them upright in a baking dish.
Top with the remaining cheddar cheese and cover the dish with aluminum foil. Bake for 30 minutes, then remove the foil and bake for an additional 10 minutes, or until the peppers are tender and the cheese is melted.
Extra Tips:
For a fun twist, try using different types of cheese, such as pepper jack for a spicy kick or Monterey jack for a milder flavor.
If you have leftover filling, it can be served as a side dish or used in tacos or burritos. To make this dish even healthier, feel free to add black beans, corn, or diced zucchini to the filling mixture.
Just remember to adjust the seasoning to taste!
Easy Veggie Frittata
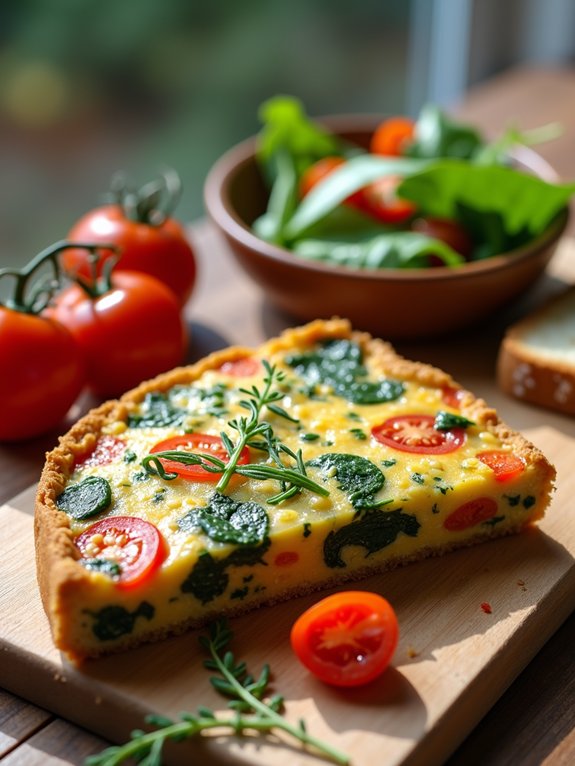
A veggie frittata is a delightful and nutritious dish that’s perfect for breakfast, lunch, or even dinner. It’s a fantastic way to incorporate vegetables into your family’s diet, and it can be customized with whatever ingredients you have on hand. This recipe isn’t only easy to prepare but also allows kids to get involved in the kitchen by helping to whisk the eggs or choose their favorite veggies to include.
The beauty of a frittata lies in its versatility. You can sneak in a variety of colorful vegetables, making it visually appealing and delicious. Serve it warm or at room temperature, and it’s sure to be a hit with both kids and adults alike. Plus, leftovers can be stored in the fridge and enjoyed the next day, making it an excellent make-ahead option.
Ingredients:
- 6 large eggs
- 1/4 cup milk
- 1 cup spinach, chopped
- 1/2 cup bell pepper, diced
- 1/2 cup zucchini, grated
- 1/2 cup cherry tomatoes, halved
- 1/2 cup cheese (cheddar, feta, or your choice), shredded
- Salt and pepper to taste
- 1 tablespoon olive oil
Cooking Instructions:
Preheat your oven to 375°F (190°C). In a large bowl, whisk together the eggs, milk, salt, and pepper.
Heat the olive oil in an oven-safe skillet over medium heat, then add the chopped spinach, bell pepper, and zucchini. Sauté the vegetables for about 3-5 minutes until they’re tender.
Pour the egg mixture over the veggies and gently stir to combine. Sprinkle the cherry tomatoes and cheese on top, then transfer the skillet to the oven. Bake for 15-20 minutes or until the frittata is set and golden.
Extra Tips:
For added flavor, consider including herbs such as basil or parsley, or even a sprinkle of garlic powder.
You can also experiment with different vegetables based on what you have in your fridge—mushrooms, broccoli, or sweet potatoes work great as well!
If you’re looking to make this dish more filling, serve it with a side of whole-grain toast or a fresh salad. Enjoy your cooking adventure!
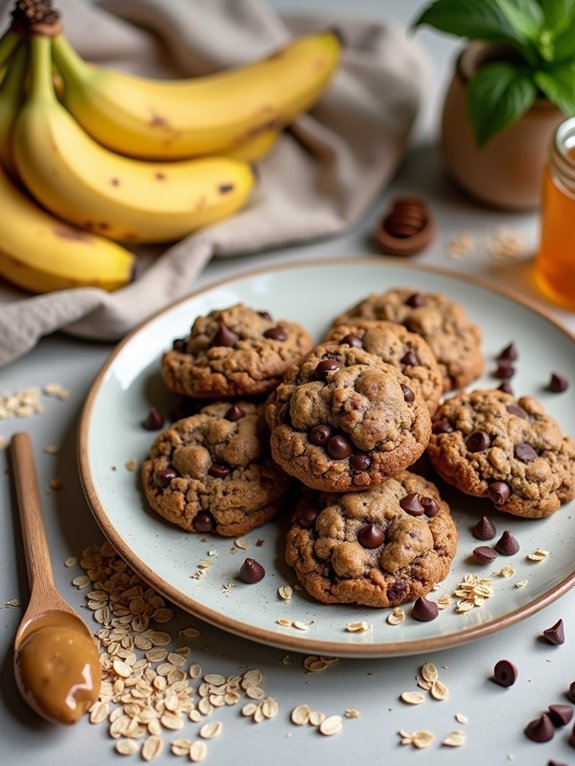
Chocolate Banana Oatmeal Cookies

Chocolate Banana Oatmeal Cookies are a delightful treat that both kids and adults will love. This recipe combines the natural sweetness of ripe bananas with the rich flavor of chocolate, creating a chewy cookie that isn’t only delicious but also nutritious.
The oats add a hearty texture, making these cookies a perfect snack for lunchboxes or after-school treats. Plus, they’re easy to make and require minimal ingredients, which is a bonus for busy families.
These cookies are also a great way to use up overripe bananas, turning them into a tasty dessert that everyone can enjoy. You can even involve the kids in the baking process, allowing them to mash the bananas and mix the ingredients.
With just a few simple steps, you’ll have a batch of warm, homemade cookies ready to share with family and friends.
Ingredients:
- 2 ripe bananas
- 1 cup rolled oats
- 1/2 cup chocolate chips
- 1/4 cup peanut butter (or any nut butter)
- 1/4 cup honey or maple syrup
- 1/2 teaspoon vanilla extract
- 1/2 teaspoon baking powder
- Pinch of salt
To make the cookies, preheat your oven to 350°F (175°C) and line a baking sheet with parchment paper. In a large bowl, mash the ripe bananas until smooth.
Add the rolled oats, chocolate chips, peanut butter, honey or maple syrup, vanilla extract, baking powder, and salt. Mix everything together until well combined.
Using a spoon or cookie scoop, drop spoonfuls of the mixture onto the prepared baking sheet, spacing them about 2 inches apart. Bake for 12-15 minutes or until golden brown.
Allow the cookies to cool on the baking sheet for a few minutes before transferring them to a wire rack to cool completely.
For best results, make sure your bananas are very ripe for maximum sweetness and flavor. You can also customize the cookies by adding nuts, dried fruits, or even a sprinkle of cinnamon for an extra kick.
Store any leftovers in an airtight container at room temperature for up to three days, or freeze them for longer storage. Enjoy your delicious and wholesome cookies!


