
When you’re in the mood for something sweet but don’t want to turn on the oven, no-bake desserts are your best friend. They’re simple to whip up and perfect for any gathering or just a treat for yourself. From creamy cheesecakes to fruity delights, there’s a wide array of options to satisfy your cravings. Let’s explore some easy recipes that will impress your guests and make your taste buds happy.
No-Bake Cheesecake
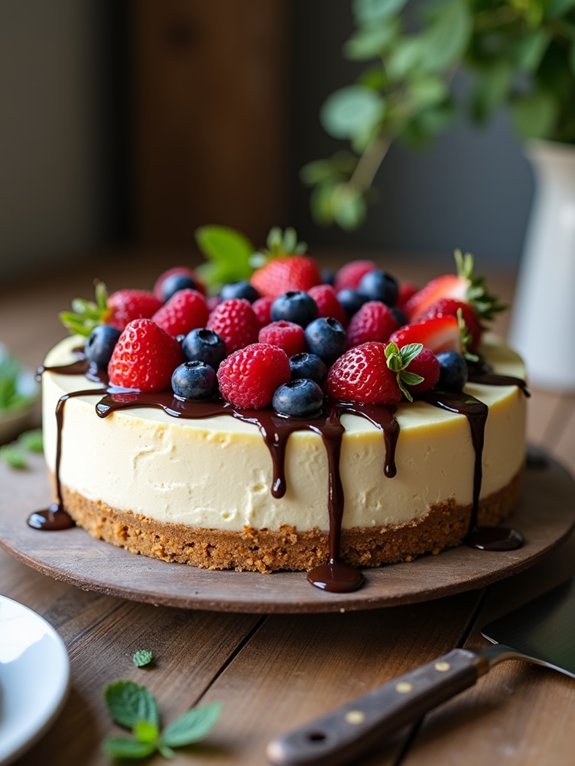
No-bake cheesecake is a delightful dessert that combines the creamy richness of classic cheesecake with the convenience of not having to turn on your oven. This indulgent treat is perfect for warm weather gatherings, parties, or simply as a sweet escape after a long day.
With a buttery graham cracker crust and a velvety filling made with cream cheese, sugar, and whipped cream, this no-bake cheesecake is sure to impress your family and friends.
Making a no-bake cheesecake is incredibly easy and requires just a few simple ingredients. You can customize it with your favorite toppings, such as fresh fruit, chocolate sauce, or a fruit compote.
Whether you’re an experienced baker or a novice in the kitchen, this recipe is straightforward and guarantees a delicious result every time.
Ingredients:
- 1 ½ cups graham cracker crumbs
- ½ cup unsalted butter, melted
- 2 cups cream cheese, softened
- 1 cup powdered sugar
- 1 teaspoon vanilla extract
- 1 cup heavy whipping cream
- Fresh fruit or chocolate sauce for topping (optional)
Instructions:
In a mixing bowl, combine the graham cracker crumbs and melted butter, then press the mixture into the bottom of a 9-inch springform pan to form the crust.
In another bowl, beat the softened cream cheese with powdered sugar and vanilla extract until smooth and creamy.
In a separate bowl, whip the heavy cream until stiff peaks form, then gently fold it into the cream cheese mixture until well combined.
Pour the filling over the prepared crust and smooth the top. Refrigerate for at least 4 hours or until set before serving.
Extra Tips:
To achieve the best texture, make sure your cream cheese is at room temperature before mixing to prevent lumps.
If you want a more flavorful cheesecake, consider adding zest from a lemon or lime to the filling.
For a fun twist, try using flavored cream cheese or adding a layer of fruit preserves between the crust and the filling.
Serve chilled and enjoy your delicious creation!
Chocolate Mousse
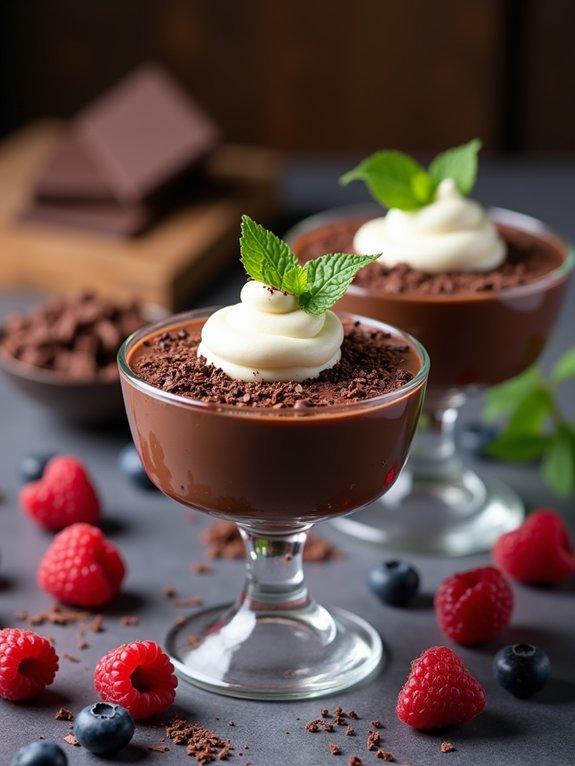
Chocolate mousse is a rich and velvety dessert that’s perfect for any occasion. With its intense chocolate flavor and airy texture, it’s a favorite among chocolate lovers. The beauty of chocolate mousse lies in its simplicity; it requires only a few key ingredients and can be prepared without any baking. This makes it an ideal treat for those who want to whip up something special without a lot of fuss.
This no-bake dessert can be made ahead of time, allowing you to enjoy the company of your guests without having to worry about last-minute preparations. The combination of whipped cream and melted chocolate creates a light yet indulgent treat that will satisfy your sweet tooth. Plus, you can customize it with toppings like fresh berries, whipped cream, or chocolate shavings to elevate the presentation and flavor.
Ingredients:
- 8 ounces dark chocolate, chopped
- 2 tablespoons unsalted butter
- 3 large eggs, separated
- 1/4 cup granulated sugar
- 1 cup heavy whipping cream
- 1 teaspoon vanilla extract
- Pinch of salt
Instructions:
Start by melting the dark chocolate and butter together in a heatproof bowl set over a pot of simmering water, stirring until smooth. Remove from heat and let it cool slightly.
In another bowl, whisk the egg yolks with the granulated sugar until pale and creamy, then mix in the melted chocolate. In a separate bowl, beat the egg whites with a pinch of salt until stiff peaks form, and in another bowl, whip the heavy cream with vanilla extract until soft peaks form.
Gently fold the whipped cream into the chocolate mixture, followed by the beaten egg whites, being careful not to deflate the mixture. Spoon the mousse into serving dishes and refrigerate for at least 2 hours or until set.
Extra Tips:
For a more intense chocolate flavor, you can use bittersweet chocolate or even add a splash of espresso or coffee to the melted chocolate mixture.
Be sure to serve the mousse chilled, and feel free to garnish with whipped cream, chocolate curls, or fresh fruits for an elegant touch. If you’re concerned about using raw eggs, you can use pasteurized eggs or egg substitute to guarantee food safety. Enjoy your delightful chocolate mousse!
Peanut Butter Pie
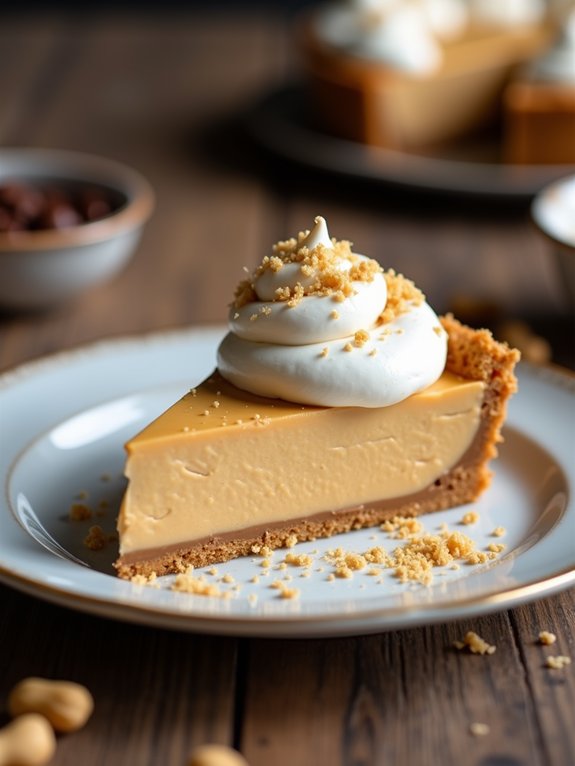
Peanut Butter Pie is a luscious and creamy dessert that’s perfect for any occasion, especially during warmer months when you want something sweet but don’t want to turn on the oven. This delightful no-bake treat combines the rich flavor of peanut butter with a smooth cream cheese filling, all nestled in a crunchy graham cracker crust.
It’s a crowd-pleaser that’s easy to whip up and requires minimal effort, making it an ideal choice for novice bakers or anyone looking to save time. This pie not only satisfies your sweet tooth but also brings a touch of nostalgia, reminiscent of childhood favorites.
The balance of sweetness from the powdered sugar and the salty richness of the peanut butter creates a harmonious flavor profile that’s hard to resist. Whether you serve it at a family gathering, potluck, or simply as a special treat for yourself, this Peanut Butter Pie is sure to impress!
Ingredients:
- 1 ½ cups graham cracker crumbs
- ½ cup unsalted butter, melted
- ¾ cup creamy peanut butter
- 8 oz cream cheese, softened
- 1 cup powdered sugar
- 1 tsp vanilla extract
- 1 cup whipped topping (Cool Whip or similar)
Instructions:
In a mixing bowl, combine the graham cracker crumbs and melted butter, then press the mixture firmly into the bottom of a 9-inch pie dish to form the crust.
In another bowl, beat together the peanut butter, cream cheese, powdered sugar, and vanilla extract until smooth. Gently fold in the whipped topping until well combined.
Pour the filling into the prepared crust and smooth the top with a spatula. Refrigerate the pie for at least 4 hours, or until set, before slicing and serving.
Extra Tips:
For an added layer of flavor, consider drizzling melted chocolate over the top of the pie before serving, or sprinkle with chopped peanuts for some crunch.
You can also customize the pie by using crunchy peanut butter for added texture or by experimenting with different flavored whipped toppings. If you’re looking to make this dessert ahead of time, it can be stored in the refrigerator for up to a week, making it a convenient option for busy schedules.
Strawberry Shortcake Cups
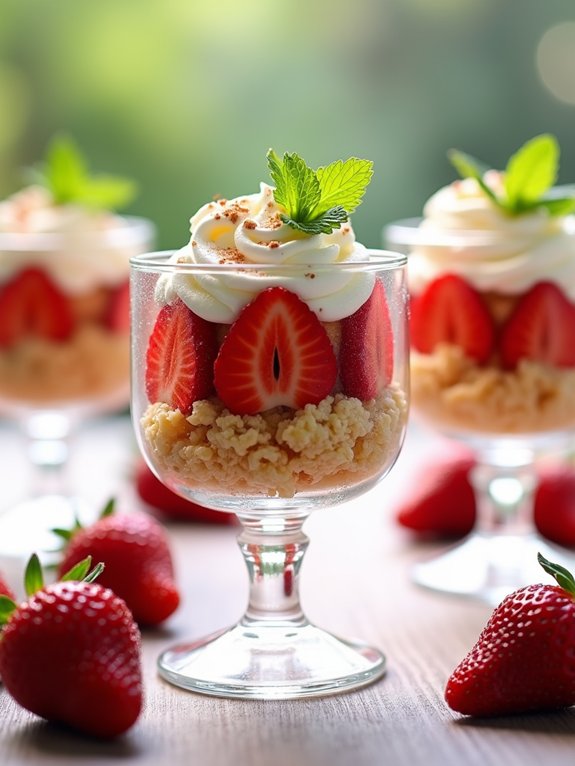
Strawberry Shortcake Cups are a delightful and invigorating dessert that perfectly captures the essence of summer. This no-bake treat combines fluffy whipped cream, sweet strawberries, and crumbly shortcake for a deliciously satisfying experience. They’re easy to prepare, making them an excellent choice for gatherings, picnics, or simply enjoying at home.
The beauty of this dessert lies not only in its taste but also in its presentation, as you can layer the ingredients in clear cups for a visually stunning effect. To make these Strawberry Shortcake Cups, you don’t need to turn on the oven, which means less mess and hassle.
The combination of fresh strawberries and whipped cream creates a light and airy texture, while the shortcake provides a perfect crumbly contrast. You can customize the recipe by adding your favorite fruits or even a drizzle of chocolate or caramel for an extra special touch. Get ready to impress your friends and family with this delightful dessert that’s as easy to make as it’s delicious.
Ingredients:
- 2 cups fresh strawberries, hulled and sliced
- 2 tablespoons granulated sugar
- 1 cup heavy whipping cream
- 2 tablespoons powdered sugar
- 1 teaspoon vanilla extract
- 1 cup store-bought shortcake or pound cake, crumbled
- Fresh mint leaves for garnish (optional)
Instructions:
In a medium bowl, combine the sliced strawberries and granulated sugar, tossing to coat. Let them sit for about 10 minutes to release their juices.
Meanwhile, in a separate bowl, whip the heavy cream, powdered sugar, and vanilla extract until soft peaks form. To assemble the cups, layer the crumbled shortcake at the bottom of each cup, followed by a layer of strawberries, and then a generous dollop of whipped cream.
Repeat the layers until the cups are filled, finishing with whipped cream on top. Garnish with fresh mint leaves if desired.
Extra Tips:
For the best flavor, use ripe, in-season strawberries. If you want to add a bit more texture, consider mixing in crushed graham crackers or nuts between the layers.
You can also prepare the components ahead of time and assemble the cups just before serving to keep everything fresh. If you’d like to make this dessert a bit more indulgent, feel free to add a layer of chocolate sauce or a sprinkle of cocoa powder on top.
Enjoy your no-bake Strawberry Shortcake Cups!
Lemon Icebox Pie

Lemon Icebox Pie is a revitalizing and zesty dessert that perfectly balances the tanginess of lemons with a creamy filling. This delightful no-bake treat is ideal for warm weather gatherings or when you’re simply craving something sweet and citrusy. With its graham cracker crust and smooth filling, it’s sure to impress your family and friends without much effort.
The best part about Lemon Icebox Pie is its simplicity and the ease with which it comes together. You can prepare it ahead of time, allowing the flavors to meld beautifully in the refrigerator. This dessert isn’t only delicious but also a great way to brighten up any occasion with its vibrant flavors and appealing presentation.
Ingredients:
- 1 ½ cups graham cracker crumbs
- ½ cup unsalted butter, melted
- 1/3 cup granulated sugar
- 1 can (14 ounces) sweetened condensed milk
- ½ cup fresh lemon juice
- Zest of 2 lemons
- 1 teaspoon vanilla extract
- 1 cup heavy whipping cream
- 2 tablespoons powdered sugar
Instructions:
In a medium bowl, combine the graham cracker crumbs, melted butter, and granulated sugar until well mixed. Press this mixture firmly into the bottom and up the sides of a 9-inch pie pan to form the crust.
In another bowl, whisk together the sweetened condensed milk, fresh lemon juice, lemon zest, and vanilla extract until smooth. In a separate mixing bowl, whip the heavy cream until soft peaks form, then gradually add the powdered sugar and continue whipping until stiff peaks form.
Gently fold the whipped cream into the lemon mixture until well combined, then pour it into the prepared crust. Refrigerate the pie for at least 4 hours or until set before serving.
Extra Tips:
For an extra burst of flavor, consider adding a few drops of lemon extract to the filling. If you prefer a sweeter pie, feel free to adjust the sugar levels to your taste.
Garnish your Lemon Icebox Pie with additional lemon zest or fresh berries for an eye-catching presentation. This pie can also be made a day in advance, making it a perfect make-ahead dessert for gatherings.
Oreo Truffle Balls
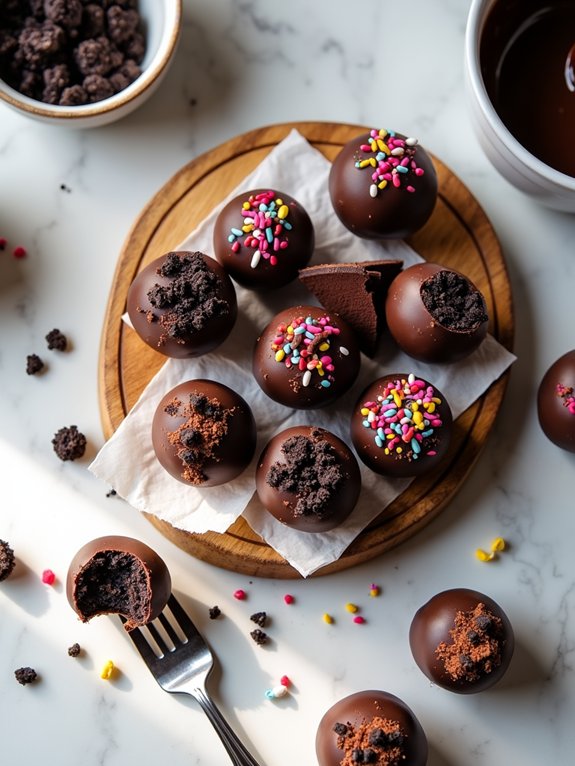
Oreo truffle balls are a delightful no-bake dessert that combines the rich flavor of Oreos with creamy cream cheese for an irresistible treat. Perfect for any occasion, these indulgent bites are easy to make and require minimal ingredients. Just a few simple steps, and you’ll have a batch of these sweet morsels ready to impress your family and friends.
To make Oreo truffle balls, you’ll need to let your creativity shine. These treats can be customized in various ways, such as rolling them in different toppings like crushed nuts, sprinkles, or cocoa powder. They aren’t only delicious but also visually appealing, making them a hit at parties or gatherings. Plus, they’re perfect for satisfying your sweet tooth without the need for baking.
Ingredients:
- 1 package (15.35 oz) Oreo cookies
- 8 oz cream cheese, softened
- 1 cup chocolate chips (milk, dark, or white chocolate)
- Optional toppings (crushed Oreos, sprinkles, cocoa powder)
Instructions:
Start by crushing the Oreo cookies into fine crumbs using a food processor or placing them in a zip-top bag and crushing them with a rolling pin.
In a mixing bowl, combine the crushed Oreos with the softened cream cheese until well blended. Once mixed, scoop out small portions of the mixture and roll them into balls.
Place the truffle balls on a lined baking sheet and freeze for about 30 minutes. Meanwhile, melt the chocolate chips in a microwave-safe bowl, stirring every 30 seconds until smooth.
Once the truffles are firm, dip each ball into the melted chocolate and place them back on the baking sheet. If desired, sprinkle your chosen toppings before the chocolate hardens. Refrigerate until set.
Extra Tips:
For an added touch, consider flavoring the cream cheese with a splash of vanilla extract or using flavored Oreos like mint or peanut butter.
Confirm the truffles are completely chilled before dipping them in chocolate for a smoother coating. Store any leftovers in an airtight container in the refrigerator for up to a week, but they’re likely to disappear long before then!
Coconut Cream Pie
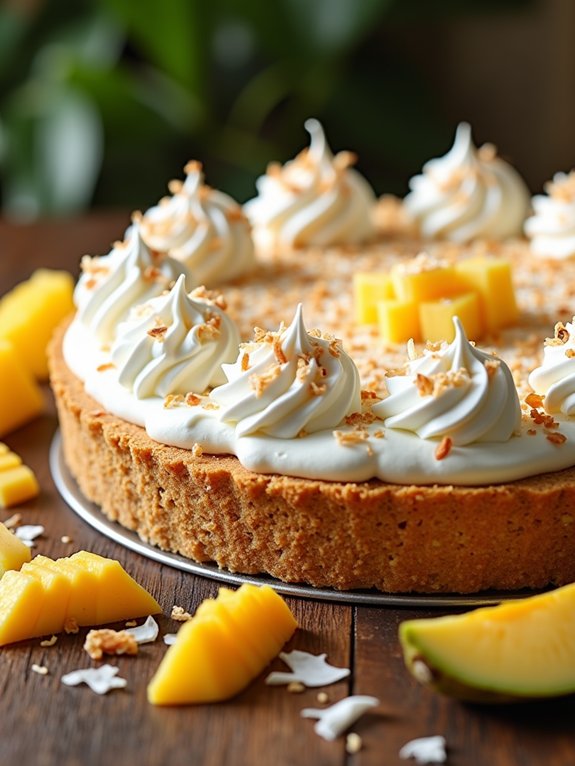
Coconut Cream Pie is a deliciously invigorating dessert perfect for any occasion, and the best part is that it requires no baking. This indulgent treat features a creamy coconut filling nestled inside a crumbly crust, topped with fluffy whipped cream, and garnished with toasted coconut flakes.
It’s a delightful way to satisfy your sweet tooth without turning on the oven, making it an ideal choice for warm weather gatherings or when you want to whip up something special in a hurry.
Making Coconut Cream Pie isn’t only easy, but it also allows for customization to suit your taste. You can use store-bought ingredients for a quick assembly or opt for homemade components to elevate the flavors.
Either way, this pie is sure to impress your family and friends with its luscious texture and tropical flair. Let’s explore the ingredients and steps to create this delectable no-bake dessert.
Ingredients:
- 1 ½ cups graham cracker crumbs
- ½ cup unsweetened shredded coconut
- ½ cup unsalted butter, melted
- 1 cup sweetened condensed milk
- 1 cup coconut milk
- ½ cup heavy cream
- 1 teaspoon vanilla extract
- 1 tablespoon cornstarch
- 1 cup whipped cream (for topping)
- Toasted coconut flakes (for garnish)
Instructions:
In a mixing bowl, combine the graham cracker crumbs and shredded coconut, then stir in the melted butter until the mixture resembles wet sand.
Press this mixture firmly into the bottom and up the sides of a 9-inch pie dish to form the crust.
In another bowl, whisk together the sweetened condensed milk, coconut milk, heavy cream, vanilla extract, and cornstarch until smooth and well combined.
Pour this filling into the prepared crust and refrigerate for at least 4 hours or until set.
Once set, top the pie with whipped cream and sprinkle with toasted coconut flakes before serving.
Extra Tips:
For an added burst of flavor, consider using toasted coconut in the crust as well as on top for a more intense coconut taste.
To toast coconut flakes, simply spread them out on a baking sheet and bake at 350°F (175°C) for about 5-7 minutes, stirring occasionally until they’re golden brown.
Additionally, if you want to make the pie even more tropical, you can add a layer of fresh pineapple or mango slices on top of the whipped cream before serving.
Rice Crispy Treats
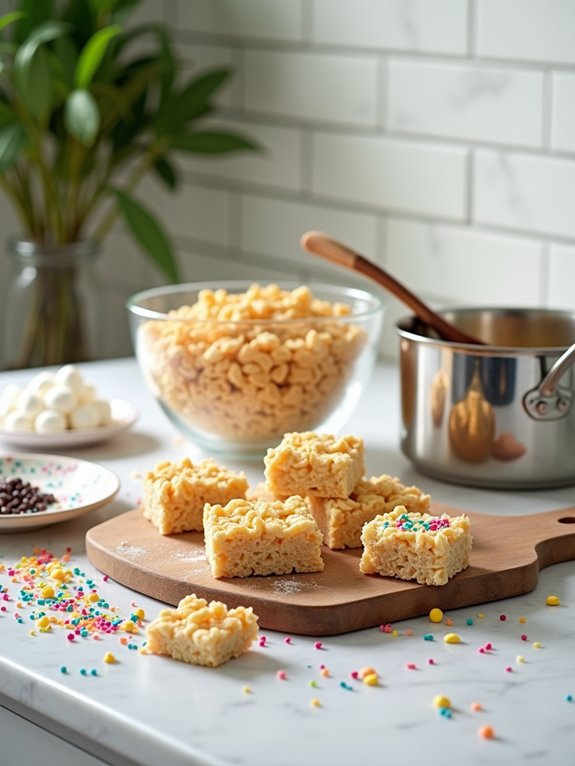
Rice Crispy Treats are a classic no-bake dessert that bring back sweet memories of childhood for many. They’re incredibly simple to make, requiring only a few ingredients and minimal time. This delightful treat combines the crunchy texture of rice cereal with the sweetness of marshmallows, making for a perfect snack or dessert for any occasion.
Whether you’re hosting a party, looking for a quick treat to enjoy with family, or simply craving something sweet, Rice Crispy Treats are an excellent choice. They can be easily customized by adding mix-ins like chocolate chips, sprinkles, or even peanut butter for an extra layer of flavor. Best of all, these treats can be prepared in under 30 minutes, making them a hassle-free option for dessert lovers of all ages.
Ingredients:
- 6 cups Rice Krispies cereal
- 4 cups mini marshmallows
- 3 tablespoons unsalted butter
- 1 teaspoon vanilla extract (optional)
- Cooking spray or butter (for greasing the pan)
Instructions:
In a large saucepan, melt the butter over low heat. Once the butter is melted, add the mini marshmallows and stir until they’re completely melted and smooth.
Remove the saucepan from heat and stir in the vanilla extract if using. Gradually add the Rice Krispies cereal to the melted marshmallow mixture, stirring until the cereal is evenly coated.
Pour the mixture into a greased 9×13-inch baking dish and press it down firmly with a spatula or your hands. Allow it to cool for about 30 minutes before cutting into squares.
Extra Tips:
To make the process easier, consider using a non-stick spray or greasing your hands with butter when pressing the mixture into the baking dish to prevent it from sticking.
Additionally, for added flavor, try mixing in some chocolate chips or swapping out regular butter for flavored butter, like cinnamon or maple. You can also store the Rice Crispy Treats in an airtight container at room temperature for up to a week to keep them fresh.
No-Bake Brownies
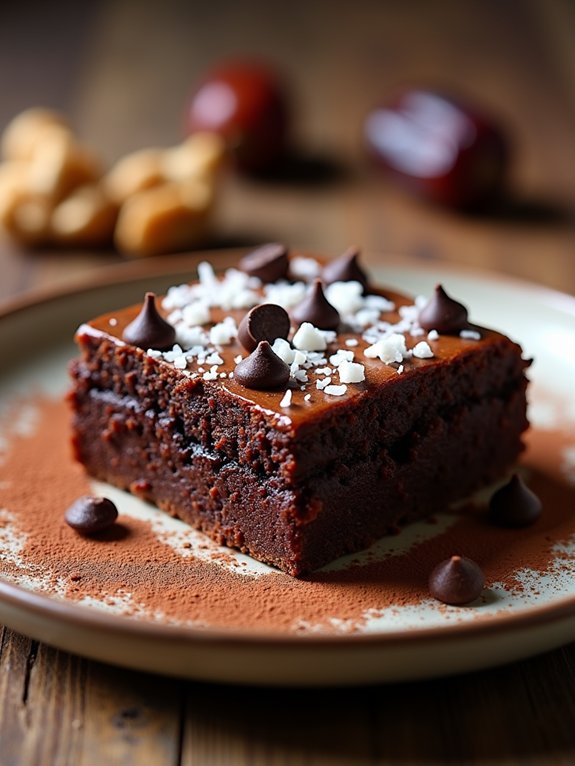
No-bake brownies are the perfect dessert for those who crave something sweet without the hassle of turning on the oven. These rich, fudgy bites are made with simple ingredients that come together quickly, allowing you to satisfy your chocolate cravings in no time.
Whether you’re hosting a gathering or just indulging yourself, these brownies are sure to impress with their decadent flavor and texture.
What makes no-bake brownies truly special is their versatility. You can easily customize the recipe by adding your favorite nuts, dried fruits, or even swapping out the sweetener to cater to dietary preferences.
Plus, they require no baking skills, making them an ideal treat for both novice and experienced cooks. Get ready to whip up a batch of these delightful brownies and enjoy them chilled or at room temperature!
Ingredients:
- 1 cup pitted dates
- 1 cup walnuts
- 1/2 cup unsweetened cocoa powder
- 1/4 cup almond butter (or any nut butter)
- 1 teaspoon vanilla extract
- A pinch of salt
- Optional toppings: shredded coconut, chopped nuts, or chocolate chips
In a food processor, combine the pitted dates, walnuts, cocoa powder, almond butter, vanilla extract, and salt. Process until the mixture is well-blended and sticky, scraping down the sides as necessary.
Once combined, transfer the mixture to an 8×8 inch baking dish lined with parchment paper. Press it down firmly into an even layer, and refrigerate for at least two hours to set.
Once chilled, cut into squares and enjoy!
For the best results, make sure your dates are soft and fresh, as this will help achieve the right consistency in your brownies. If your dates are hard, soak them in warm water for about 10 minutes before using.
Feel free to experiment with different nut butters or add-ins to create your perfect flavor combination. These brownies can be stored in an airtight container in the refrigerator for up to a week, making them a convenient treat to have on hand!
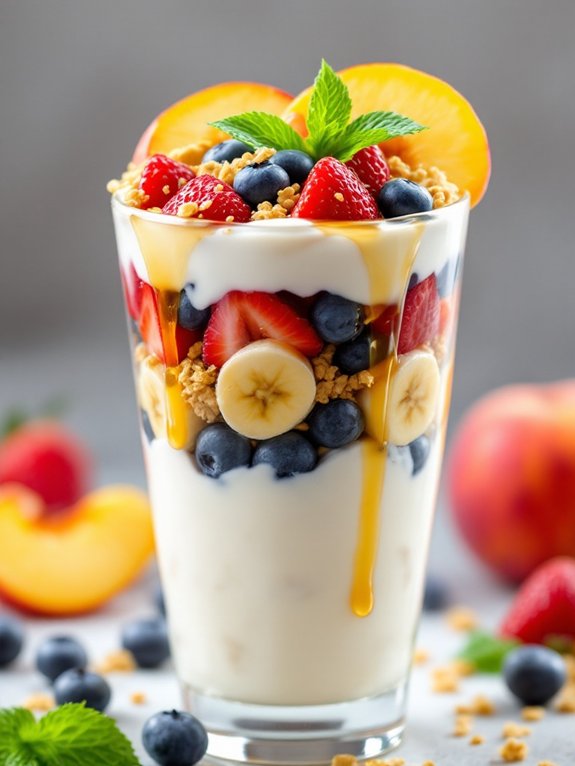
Fruit and Yogurt Parfaits

Fruit and yogurt parfaits are a delightful and healthy no-bake dessert that can be enjoyed at any time of the day. They’re perfect for breakfast, an afternoon snack, or even as a light dessert after dinner. With layers of creamy yogurt, fresh fruits, and crunchy granola, these parfaits aren’t only visually appealing but also packed with nutrients.
You can customize them with your favorite fruits, yogurt flavors, and toppings, making them a versatile option for every palate.
Preparing fruit and yogurt parfaits is incredibly simple, requiring no cooking at all! All you need to do is layer your ingredients in a glass or bowl, and voila! You have a delicious and healthy treat ready to enjoy.
It’s a great way to involve kids in the kitchen, allowing them to choose their favorite fruits and help with the assembly. Let’s explore the easy recipe that will make your taste buds dance.
Ingredients:
- 2 cups of Greek yogurt (plain or flavored)
- 2 cups of mixed fresh fruits (such as berries, bananas, and peaches)
- 1 cup of granola
- 2 tablespoons of honey or maple syrup (optional)
- Fresh mint leaves for garnish (optional)
Instructions:
In a clear glass or bowl, start by adding a layer of Greek yogurt at the bottom, followed by a layer of your chosen mixed fruits.
Next, sprinkle a layer of granola on top of the fruit. Repeat the layering process until you reach the top of the glass, finishing with a layer of yogurt and a few pieces of fruit on top.
Drizzle with honey or maple syrup if desired, and garnish with fresh mint leaves for a revitalizing touch.
Extra Tips:
For the best flavor and texture, use a variety of fruits with different colors and textures to create a beautiful presentation.
You can also freeze the parfaits for a couple of hours to enjoy a chilled treat on hot days. If you’re preparing them ahead of time, store the granola separately to keep it crunchy until serving.
Experiment with different yogurt flavors, such as vanilla or coconut, and add toppings like nuts or seeds for extra crunch!


